Point/pivot screws
There are two main types of screws used on
woodwind instruments to secure the keys in place; one is the rod
or hinge screw and the other is the point or pivot screw. This article
deals with point screws and discusses how they work and the various
pros and cons of the different types you're likely to see.
Basic principles:
 Point
screws allow for keys to be securely mounted to the body of the
instrument whilst still allowing them to move in an appropriate
fashion. Typically you'll find them used on long single keys where
a rod screw would be impractical or undesirable. In most cases a
point screw can be recognised by its large head (usually much larger
than that of rod screws), though a more reliable way of spotting
them is to look at the pillars at each end of a key - if you can
see a screw head with a slot in it in each pillar then it's very
likely the key is pivoted on such screws. Point
screws allow for keys to be securely mounted to the body of the
instrument whilst still allowing them to move in an appropriate
fashion. Typically you'll find them used on long single keys where
a rod screw would be impractical or undesirable. In most cases a
point screw can be recognised by its large head (usually much larger
than that of rod screws), though a more reliable way of spotting
them is to look at the pillars at each end of a key - if you can
see a screw head with a slot in it in each pillar then it's very
likely the key is pivoted on such screws.
Here we see a typical setup in which a pillar is fitted with a
point screw, which in turn supports a key barrel. Attached to the
barrel would be various key arms or key cups.
This diagram represent the best-case scenario; the slotted head
of the point screw fits flush into the pillar (so there are no edges
sticking out on which to catch your fingers) and the tapered point
of the screw exactly fits a corresponding hole in the pillar.
There is a very tiny gap between the end of the key barrel and the
opposing face of the pillar. This keeps friction to a minimum and
by preventing the key barrel from rubbing against the pillar also
reduces wear to both components.
When suitably lubricated, this arrangement allows the key to rotate
quite freely and smoothly, and because everything is a snug fit
there's no free play in the mechanism. The key cannot move in any
other fashion.
Point screw types:
 These
are the six most common types of point screws in use. These
are the six most common types of point screws in use.
They're divided into two sections; proper points and parallel points.
From the top down we have:
1: Proper point screw - the 'King' of point screws,
its tapered point allows for it to be adjusted to take up wear
and tear
2: Shoulderless point screw - essentially the same, but
without a head. We'll see how useful this feature is later
3: Elliptical point screw - a relative newcomer, but
because of the ever-increasing diameter of the tip, still a
proper point screw
4: Parallel point screw - also known as a cylindrical
point screw. It has no taper, though is sometimes seen with
a slight point
5: Pseudo or bullet point screw - looks like a proper
point, but isn't as it has a cylindrical section on the tip
6: Spear-headed point screw - another newcomer, but effectively
just a combination of the above two screws
The parts of the screw are broken down as follows:
The head - the largest diameter of the screw, which
also houses the slot...where the screwdriver goes
The thread - the section that screws into the pillar
The tip - the 'business' end of the screw, which sits inside
the key barrel
Screws can vary in size - small ones would be found on flutes,
oboes and clarinets - larger ones on saxophones.
These too will vary in size, shape and design - the threads will
be different between manufacturers, the diameter and thickness of
the heads vary, the length of the tips too.
This is an important consideration - if you happen to lose a screw
(they do sometimes drop out of their own accord) you can't just
bung any old thing back in the pillar as there's a very slim chance
that it will fit...or even if it appears to fit, it very probably
won't be of the correct dimensions. Forcing a screw with a different
thread into a pillar may damage the pillar - and if the screw gets
so tight that it breaks you'll end up with a hefty bill for putting
it right. It's not uncommon to find that someone has gone to all
the trouble of forcing an incorrect point screw into a pillar (and
thus 'crossing' the thread) only to find that the tip is too small
for the job.
Incidentally, if you do happen to lose a point screw (and it happens
to the best of us from time to time) poke a matchstick into the
pillar. It's strictly a temporary measure, but it'll get you through
a gig or two.
The pros and cons:
 I
referred to the proper point screw as the 'King' of screws earlier,
and here's why. I
referred to the proper point screw as the 'King' of screws earlier,
and here's why.
On the left is a diagram of what happens to the setup shown in
the opening diagram after the instrument has seen a good few years
use.
The pillar and screw haven't moved - but now there's a noticeable
gap between the tip of the point screw and the key barrel. This
will mean that the barrel is able to wobble on its pivot screws,
and when that happens it leads to a rattly action that feels sloppy
and imprecise. It also means that any key cups and arms attached
to the barrel won't move with as much accuracy - so a pad might
leak or a connection with another key won't be spot on (this can
lead to what's known as a regulation leak...a leak caused by the
mechanism rather than a pad).
It also means that any lubrication between the screw tip and the
barrel will get pumped out and grit can get in, so the wear gets
ever worse.
You can see too that the gap between the pillar's face and the key
barrel has increased because the point screw can no longer hold
the barrel off - so it can now rub against the pillar and wear itself
down.
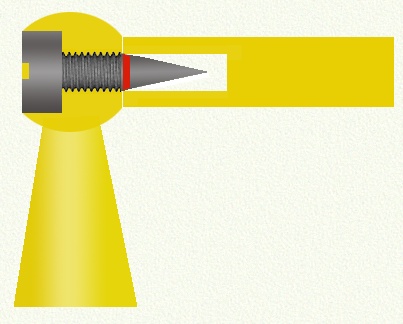
Here's the clever thing though - because the tip of the screw is
a proper taper, if there were a means of allowing it to push deeper
into the key barrel it would once again fit snugly and all would
be well.
And there is such a means - by reaming the pillar. This simply involves
removing a small amount of metal from the head end of the pillar,
which then allows the screw to be driven further into the pillar...thus
pushing the tip further out from the face. The section of the pillar
that would be removed is indicated in red. The actual amount removed
would be far smaller than shown, and such a job would need doing
maybe two or three times in an instrument's life - assuming it was
kept well lubricated inbetween-times. This is half of the job known
as tightening the action - the other half being that which deals
with free play on keys mounted on rod screws.
There is a caveat though, which we'll touch upon a little later.
 Here's
a slight variation on the theme. Here's
a slight variation on the theme.
In this instance the barrel has been drilled out with a cylindrical
hole.
This is far more likely to be the case than finding a barrel that's
been properly reamed with a tapered hole to match the screw tip.
It's a lot harder to get a tapered hole exactly right - one tiny
fraction too big and the key will never sit snugly and the manufacturer
would have to throw it away and start again. Very costly indeed.
That's why I said 'in an ideal world', because this diagram shows
what you're more likely to encounter.
It's our good old proper point screw again, but note how almost
all of the tip is sitting in air.
The part of the tip that's actually in contact with the barrel is
marked in red. As with most of these diagrams it's slightly exaggerated
in order to make it clearer, so you could reasonably expect rather
more of the tip to be doing some work.
I've shown the point of contact as being near the base of the tip,
but from a mechanical perspective it could quite easily be near
the end of the tip. It doesn't really matter that much (although
you might have realised that there won't be much more room for adjustment
with this particular setup) as long as there's a single point of
contact that holds the key barrel snugly.
The variations on the proper point screw (the elliptical and the
shoulderless) deal with the wear in exactly the same way - though
because the shoulderless screw has no head it does not require the
pillar to be reamed...you simply screw it in further. This is a
simple and efficient way of dealing with wear but it does, however,
require a means of locking the screw in place - and this can be
in the form of a small grub screw, a lock-nut, a nylon insert or
a drop of threadlocking fluid.
So this explains how and why proper point screws work, and what
makes them such a desirable feature. Let's look now at why the parallel
types fare less well.
 As
you can see it's much the same setup as the proper point screw. As
you can see it's much the same setup as the proper point screw.
The diagram shows the 'ideal world' scenario, with the cylindrical
tip of the screw nestling snugly inside the key barrel, which has
been drilled so as to perfectly accommodate it.
Unfortunately it seldom works out that way. What's more likely to
be the case is that the hole extends some way into the barrel -
as marked by the dotted lines.
When this occurs it allows for the barrel to move back and forth
along the screw tip - so the only thing preventing it from doing
so is having the ends of the key barrel rub up against the pillar
face.
We already know that's not a good idea as it adds friction and leads
to wear, and when that happens it leads to yet more wear.
However, as long as the diameter of the hole in the barrel is a
close fit to that of the screw tip the key will at least be unable
to wobble.
This means that the setup is unlikely to lead to regulation problems
but could, just about, lead to slight leaks in pads. At least until
the hole wears...and then it all gets a bit nasty.
 And
here it is, a classic example of wear in a key pivoted on a parallel
point screw. And
here it is, a classic example of wear in a key pivoted on a parallel
point screw.
As per the wear with a proper point screw, you can see that the
key barrel has worn around the diameter of the hole, so the tip
is now floating in free air.
When this happened with the proper point screw setup it was able
to be taken up by means of driving the whole screw deeper into the
pillar. But that's not going to work here.
If we assume this diagram accurately represents the state of wear
in a typical key barrel you can see that driving the screw in deeper
would allow for the end of the tip to meet the bottom of the hole.
But that wouldn't be of much use - the best that it would do would
be to prevent the ends of the barrel rubbing against the pillar
face...the key would still wobble. Besides, as we saw just above,
the hole is often very much deeper.
It should be quite clear then that's there's very little that can
be done to take up the wear.
Well, there is one method - which involves swedging (pronounced
sway-jing) the key barrel. This technique compresses the barrel
and thus decreases the size of the hole. It's a technique that's
used to take up the wear in keys mounted on rod screws. It's hard
work, and therefore expensive, and it often leaves visible marks
on the key barrels.
It's also the case that it's not always possible to swedge a key
barrel. The one shown in the diagram is conveniently bare, but many
of them will have a key arm attached at precisely the place where
you'd need to swedge the key.
In such cases rather more drastic measures are called for - such
as filling up the hole with silver-solder and re-drilling it.
 Here's
the same problem, but this time with a pseudo or bullet point screw. Here's
the same problem, but this time with a pseudo or bullet point screw.
Remember, the definition of a parallel point screw is that its tip
doesn't get increasingly larger in diameter - so the pseudo point
screw is prone to exactly the same problems as the cylindrical type.
It does, however, have a slight advantage - it has a tapered tip.
In effect it's half a proper point screw.
The diagram shows the screw fitted to a barrel that has some wear
- note the gap above and below the tip - but the coloured sections
are where it gets interesting.
The green section represents that portion of the key barrel that
the end of the tip is in contact with. As long as this remains the
case this type of screw will function as a proper point screw, i.e.
perfectly well.
When it wears it can be driven further into the pillar, but only
as far as the green portion extends. Once it gets much beyond this
you will have driven the head of the screw so far into the pillar
that there won't be much thread left in it - and that's not at all
good.
At this point the tip enters the red section, and with the end now
floating in free space the screw reverts to being nothing more than
a fancy cylindrical screw - with all the disadvantages that come
with it.
The spear-headed point screw would work in exactly the same fashion...though
why anyone would go to all the trouble of making such a screw I
have no idea - it seems utterly (and I've been waiting for this
bit) pointless.
All this assumes that the hole in the key isn't already too deep
- and unfortunately it usually is. The easy way to check this is
to remove the point screw from the pillar and poke the tip into
the hole in the barrel. If the screw goes in right up to the thread
then the hole is too deep. As it happens, this is one way in which
parallel point screws can be 'botched' to take up free play; they're
driven into the pillar until the threaded portion of the screw comes
out from the pillar face - the barrel then rubs up against the thread,
giving the appearance of being nice and snug.
This is the caveat I referred to earlier.
 If
you look closely at the graphics above you should be able to see
that the tip of the point screws start a little way inside the face
of the pillar. This is to provide some scope for reaming the pillar
out and moving the point screw (slightly) forward. In other words
there's a bit of 'meat' in hand for making adjustments. When this
runs out (or isn't there in the first place), reaming the pillar
will result in the threaded portion extending out beyond the face
of the pillar. Threads tend to be relatively sharp, and because
they're cut at an angle they won't be presenting a flat face to
the end of the barrel - and the result of all this is that the thread
will start to chew away at the key barrel. If
you look closely at the graphics above you should be able to see
that the tip of the point screws start a little way inside the face
of the pillar. This is to provide some scope for reaming the pillar
out and moving the point screw (slightly) forward. In other words
there's a bit of 'meat' in hand for making adjustments. When this
runs out (or isn't there in the first place), reaming the pillar
will result in the threaded portion extending out beyond the face
of the pillar. Threads tend to be relatively sharp, and because
they're cut at an angle they won't be presenting a flat face to
the end of the barrel - and the result of all this is that the thread
will start to chew away at the key barrel.
Here's what it looks like - and you can clearly see the end of the
barrel is pivoting on the threaded section of the point screw. It's
not good.
There are a number of techniques that can be used to prevent this
from happening (bushing the key barrel, swedging, fitting oversize/custom
point screws etc.), but they're all quite time-consuming and are
thus relatively expensive to carry out.
Perhaps the worst aspect of this phenomenon is that it's often invisible.
You pay someone to tighten up the action, and yes, it feels tight
when you get the horn back...but you can't see that the key barrels
are now pivoting on the point screw threads.
 A
fascinating point screw variation is this system found on modern
Selmer saxophones (and a few other brands). A
fascinating point screw variation is this system found on modern
Selmer saxophones (and a few other brands).
These instruments use a unique method to automatically adjust for
any wear in the action by means of a sprung cylinder inserted into
the bore of the key barrel.
As the tip of the screw wears away the contact point in the cylinder,
the spring pushes the cylinder forward to close the gap (obviously
this wear happens at an extremely slow rate). This ensures that
the business end of the pseudo point screw is always in contact
with the key barrel - and this means that you should never need
to ream the pillars to take up wear in the action.
Sounds ideal, but there are one or two drawbacks.
Because the system requires that there's a bit of a gap between
the end of the key barrel and pillar face (otherwise the sprung
cylinder would simply butt up against the pillar and you'd be back
to square one once the point screw tip starts to wear the barrel),
and because there's a spring in the barrel, or one at each end actually,
you can never adjust the action so that it's really tight.
By tight I don't mean stiff, but if you've ever wiggled a key properly
fitted between two proper point screws (and haven't we all) you'll
know exactly what I mean. The key can move up and down freely but
there's no lateral movement.
The other drawback is that it's possible for the cylinder to wear
in the key barrel...and then you're in trouble.
Technically speaking you can replace the cylinder, but if the barrel's
worn then there's little point. It could get very messy...
Another drawback of this system is that it adds another layer of
complexity to the action, and where there's complexity there's generally
a need for accuracy. By it very nature this system can never be
all that accurate because there has to be some clearance between
the bore of the key barrel and the insert in order to allow it to
move freely. It's also fair to say that some manufacturers implement
this system more accurately than others. Selmer do pretty well,
but inserts I've seen on other horns have sometimes been rather
loose or ended up getting jammed in the key barrel. The former isn't
great and the latter is pretty much a complete disaster.
In the review section you'll often see comments like "I was
disappointed to find pseudo point screws had been used..."
and perhaps this article explains why I feel that way about them.
Wear and tear is part of a woodwind instrument's life, and if you've
coughed up well into four figures for a nice sax or clarinet etc.
it's a bit disheartening to find that, sooner or later, you're going
to run into problems when it comes to tightening the action.
The worst of it is, the part that's responsible for the problem
isn't even replaceable. Putting a new point screw in when a key
has worn isn't going to change anything - you'd have to change the
key itself.
There is an option though - changing the type of point
screw fitted. In theory you could take out the pseudo or parallel
points screws and replace them with proper points - but this upgrade
rather relies on being able to find point screws of a suitable size
and shape. It's tricky, admittedly, but not always impossible. If
all else fails there's always the option of having them custom made.
This won't be a particularly cheap option, but it will be a one-time
fix and you'll be able to have the wear and tear in the keywork
adjusted out for at least as long as your playing life.
|