A virtual repository for all that's weird
and (un)wonderful on the workbench
Let's assume, for a moment, that you're sitting down of an evening
- perhaps with a cool beer in hand, or a jar of cockles - ready
for a spot of entertainment via the medium of your telly. This telly,
however, has only two channels; on channel one there's a display
of gymnastics, given by a fleet of finely honed athletes, which
promises to be a veritable feast of men jumping, successfully, over
various items - such as sticks and sand; on channel two though is
a programme about woefully unfit, and possibly drunk, middle-aged
men attempting to do pretty much the same thing around the house
- with predictable results.
What's it gonna be?
Well, it's a fair bet that the vast majority of you will opt for
the spectacle of people falling over and otherwise damaging themselves
and anything else within range. This is because we all enjoy a laugh
at other people's expense, and few things are more entertaining
than watching someone make a pig's ear of things.
The Germans have a wonderful word for this, the tongue-wrappingly
rich "Schadenfreude".
Similarly, if you take your kids for a walk around a local museum
it's a fair bet that the bit that will most appeal to them is the
section that houses the 'nasties' - grizzly jars containing pickled
pigs with three heads; photographs of apparently self-combusted
human remains; the actual mincing machine used by the Pie-Making
Whippet-Snatcher of Pudsey...and
perhaps a display dedicated to fashion in the 1980s.
Every museum worth its entrance fee has one of these - known, in
popular parlance, as a 'Black Museum'.
I'd like to have one too, but unfortunately my job is more about
fixing things rather than preserving their state of hideous disrepair...but
that doesn't stop me taking a few photographs and sharing some of
the more horrifying examples that find their way into my workshop
prior to my fixing them up.
So, pour that beer, dip into those cockles, and prepare to be shocked,
awed and truly queasificated (OK, I just made that word up...but
you heard it here first, right?) by some of the horrors that have
crawled onto my workbench.
If you're popping back for a return visit, new
exhibits can be found at the bottom of the page

 First
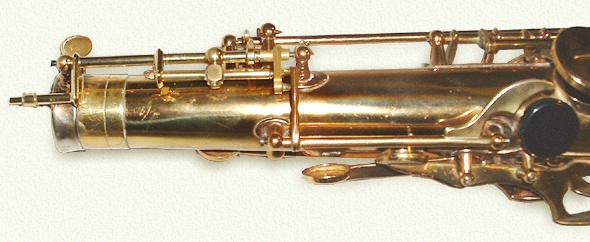
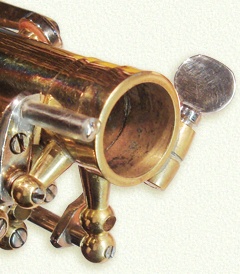
up is a tenor sax crook socket/receiver. First
up is a tenor sax crook socket/receiver.
To the untrained eye it looks quite normal - harmless even.
It's only when you understand how it's supposed to work that the
true horror becomes clear.
You'll notice a small slit in the bore. That's there because this
joint is effectively a clamp. The crook tube slides into this socket,
and by applying force to close the gap that the slit provides, the
crook is held firmly in place.
It follows, then, that some means of closing that gap is in order
- to whit, a clamp.
And so we have a clamp, on the outside - complete with a neat screw
and a corresponding slit.
I suspect that you're now beginning to see the problem - the slit
in the socket doesn't line up with the slit in the clamp.
Aha, you say, surely the clamp can still apply pressure to the joint.
Well, it could if the clamp was free to move on the joint tube -
but it isn't...it's soldered in place - so you could do the screw
up as tight as you like and it would never make any difference to
the tightness of the crook fitting. The best it can do is bend the
clamp screw sockets, or break the screw itself.
The thing that's particularly devilish about this example is that
the clamp is in the right place - it's the socket tube that's not.
It's been removed (or fallen off) and refitted out of line. The
clamp has been removed too, and refitted - but can only fit in one
position due to the necessity to line up that pillar with the rest
of the octave key mechanism.
 Moving
on to the next example we see an octave key mechanism on a Selmer. Moving
on to the next example we see an octave key mechanism on a Selmer.
Again, a casual observer might not notice anything terribly untoward
- but look carefully at the area around the right hand pillar.
Notice the gap where the key ends and the pillar begins?
Look too at the how the rocker bar sticks out of the key at its
left end - and note how far away the thumb key touchpiece is from
the thumbrest.
This is a Frankensteinian octave key mech - made up from parts of
no less than three models of Selmer saxes.
The bulk of the mechanism is the original Mark VI keywork; the bit
at the end (where the gap is) is from a Reference series, and the
thumb key is from an SA80 series.
What you can't see on the photo is that the thumb key arm (that
connects it to the mech itself) has a slot in it that's completely
incompatible with the part of the octave key it's supposed to connect
to. Needless to say, it didn't work at all.
 Next
up is a truly gruesome exhibit. Next
up is a truly gruesome exhibit.
Again, the ghastliness of this one isn't immediately evident.
I'm sure you can all see the difference in the two bell keys shown.
The B key (the lower one) looks fine...the cup appears to be sitting
nicely above its corresponding tonehole - but the Bb key seems to
be somewhat out of line, showing a sizeable gap at the rear and
being rather too far forward.
I wouldn't blame you at all for supposing that this is nothing more
than a bent key. Some of the more knowledgeable among you might
even suggest that the pillar (just visible at the bottom of the
photo) has been knocked out of line.
Not so, I'm afraid.
This, my friends, is another freakish transplant operation.
There is nothing wrong with the position of the pillar; there is
nothing wrong with the angle of the bell; there is even nothing
wrong with the Bb key...other than it's from a different instrument.
 The
full nastiness is revealed when you look at the other end of the
key. The
full nastiness is revealed when you look at the other end of the
key.
The touchpiece for the Bb key sits on the left of the photo.
Note how very far away it is from the low B touchpiece.
Granted, the key is of similar design to the one that should be
there but it's from a different, later model - and not only has
the bell angle changed on the later model, but also the position
and alignment of the bell key touchpieces, or 'spatulas'.
I feel you're now ready to withstand the real horror behind these
exhibits - they all feature on the same instrument.
Oh, there's more too - but I wouldn't want to be accused of giving
anyone nightmares.
Suffice to say, what we have here is a late vintage Selmer MKVI
tenor that has evidently lost a number of keys. Whoever has attempted
to fix it (and I know who) has worked on the principle that, say,
a Bb key is a Bb key is a Bb key...and that whilst it would perhaps
be foolish to replace a missing key from a Selmer with one from,
say, a Yamaha, it should be perfectly acceptable to replace it with
one from another Selmer...albeit a different model.
So - rather like the popular country and western song that celebrates
a Cadillac built from parts that span a number of years, this Selmer
is a MKVI/VII/SA80/Ref 54.
It was purchased on Ebay, and the seller commented that it 'needed
a few repairs, none of which are beyond the scope of a competent
repairer'. He was right - he just failed to mention that those repairs
would almost certainly get very close to the four-figure mark.
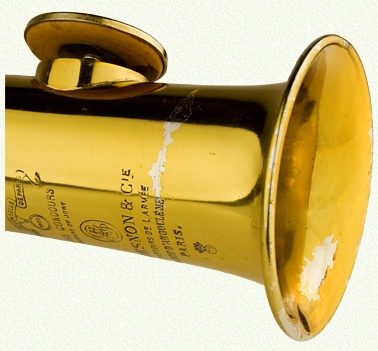
My next exhibit is perhaps rather less gruesome, but is still
guaranteed to make you wonder what on earth was going through the
troubled mind of the person responsible for it.
The horn in question is the much vaunted King Super 20 'Silversonic'
tenor. A late model, but nonetheless still a highly desirable piece
of kit - even more so considering the fact that is has just been
fully overhauled and sports a particularly fine set of black pads,
complete with Noyek reflectors
(or resonators).
Now, the term 'overhaul' implies that any problems that might affect
the proper operation of the instrument have been corrected - such
as wear in the keys, broken springs, missing corks and worn out
pads etc. It also implies that any bodywork problems have been sorted
out, such as significant dents, bends, loose fittings etc.
From experience I have to say that, unfortunately, this isn't always
the case - and many an apparently overhauled horn requires extra
work to bring it up to standard. More often than not this relates
to worn action or badly seated pads - but this horn really takes
the biscuit.
 The overriding principle of replacing a pad on an instrument is
that both the key cup and the tonehole must be level. If there's
any discrepancy at all the pad will fail to seat properly - or if
it does seat, it's likely to be unreliable once the pad settles
down or ages.
The overriding principle of replacing a pad on an instrument is
that both the key cup and the tonehole must be level. If there's
any discrepancy at all the pad will fail to seat properly - or if
it does seat, it's likely to be unreliable once the pad settles
down or ages.
I often spot wobbly toneholes/key cups on overhauled horns, but
for the most part the discrepancies are slight - and I put it down
to the repairer's lack of experience or laziness.
What you see here though is quite the most spectacularly warped
tonehole I've seen in quite a while. Indeed, the photo doesn't quite
do it justice - you need to see it from at least two angles to fully
appreciate how bad it is.
How did it get that bad, and could it have happened subsequent to
the overhaul?
Well, there are no dents visible in the body adjacent to the dips
on either side of the tonehole - so that rules out the horn having
copped a whack after the work was done. However, there's evidence
of dent removal adjacent to the peaks (front and rear) - which means
that the dips are in fact at the right height...and the peaks have
been pushed up by dent removal. You can't push a dent up by dropping
the horn, it takes a very deliberate act on the part of a repairer
to do so.
Furthermore, look along the bottom edge of the key cup - it's clearly
warped too.
It got like that because whoever fitted the pad (and once again,
I know who) did so in full knowledge that the tonehole was out of
level...and took a mallet to the key cup in a fiendish effort to
bash it so that the pad followed the warp in the tonehole.
If you think that's bad - this is but one example of many on the
same horn.
Were it just the one tonehole I might have given it the benefit
of the doubt and assumed that something strange and horrible had
happened subsequent to the horn having an overhaul...but the presence
of many similarly warped toneholes and correspondingly bent key
cups undoubtedly points to a 'mallet-set' pad job.
Continuing on the theme of being heavy-handed with a hammer, this
next exhibit is a perfect example of what's known in the trade as
the old 'double bounce dent'.
There are many techniques for removing dents from saxes, and the
most common is that involving the dent ball. This is nothing more
than a smooth, rounded ball fitted to a steel bar. The principle
is simple enough; a suitable ball is chosen and fitted to a bar
that's firmly clamped in a vice, the bar is inserted into the bore
of the horn until the ball sits under and makes contact with the
dent, and then the bar is struck with a hammer. The shock travels
down the bar, through the ball and out into the dent. In effect
it's like being able to climb into the bore and hit the dent with
a hammer.
It's an effective means of removing dents, though a very great deal
can go wrong if you don't have quite the right touch.
By far and away the most common problem comes from choosing the
wrong size and shape of dent ball.
When you whack that bar it vibrates - and the important point here
is that it vibrates in two directions...into the dent and away from
it. Once the ball is much larger than about 50% of the bore diameter
there's a very real risk that a suitably heavy whack to the bar
will allow the dent ball to smash into the opposite bore wall -
and so the skilled repairer will be careful to gauge both the right
sized ball for the job and the right weight of the blow to the bar.
 This
is what happens when it all goes wrong. This
is what happens when it all goes wrong.
The horn in question is a Selmer Reference 54 alto - a very expensive
bit of kit indeed.
There are two features to note here; the three ripples on the body
and the slight bulge just above the top F tone hole.
The horn had originally sustained damage to the opposite side -
a fall had resulted in a dent around the octave key pip where the
top F# key pillar had been driven into the body.
This is a particularly tricky job as this pillar sits on a strap
that runs the entire length of the left hand key stack. It's clearly
not practical to remove this strap...though it is possible to unsolder
and lift just the end, which makes for an easier job when it comes
to removing the dent.
If you don't lift this strap off you're effectively trying to remove
a dent from both the bore wall and the strap..and that's a LOT of
metal.
Naturally there's another method, and that's to shove a dent ball
up the horn and give the bar the mother of all whacks - and that's
precisely what's been done here.
If you look closely at the photo you can make out three distinct
ripples...which means that the repairer hit the dent bar at least
three times, and presumably never noticed the damage being inflicted
on the opposite wall...or perhaps didn't care!
If you think this is bad, it gets worse.
When a horn gets dropped with enough force to bash a dent under
a strap it usually means the body bends - and indeed it did. Thing
is though, this bend was left in.
When a body bends it increases the distance between the pillars
- and this had been resolved by a combination of knocking pillars
over at an angle to take up the gaps, and, where that had been insufficient,
the fitment of a brass washer between the end of a key barrel and
the pillar.
This next exhibit is breathtaking in its deviousness
insomuch as real money, and lots of it, was paid out for the privilege
of having the 'work' done.
It's a truly awesome example of a cack-handed job, otherwise known
as a 'right royal cock-up'. What makes it particularly horrifying
is that the job was done by someone who's a member of a repairer's
trade association, NAMIR, which led to the unsuspecting victim thinking
that the quality of workmanship would be at least of a certain standard
(the poor fool!).
 Cast
your eyes over this right hand stack setup. Cast
your eyes over this right hand stack setup.
The keys are being held down with more than enough pressure to ensure
a decent seat on any sax that's halfway reasonably set up - and
yet there are gaps clearly visible above each of the toneholes.
My standard test for a well set pad is to trap a cigarette paper
between the tonehole rim and the pad - when it's pulled out I'd
feel a steady grip if the pad is seating. On each of these pads
I reckon I could get a couple of client's Christmas cards between
the tonehole rim and the pad...and still have room for a fag paper.
A leak of this magnitude can never go unnoticed - even by a non-player.
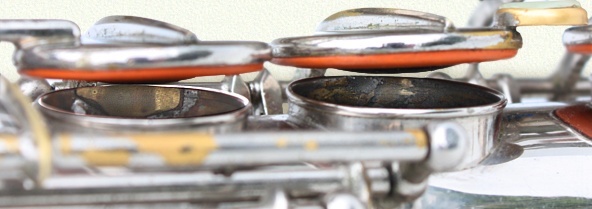
 Things
weren't much better up the top end either. Here's a shot of the
left hand key stack, with a positively cavernous gap between the
B key cup and its tonehole. Things
weren't much better up the top end either. Here's a shot of the
left hand key stack, with a positively cavernous gap between the
B key cup and its tonehole.
If you could see to the right you'd see a gap below the auxiliary
pad too. With such leaks at the top end of the horn it was little
wonder that the lower leaks weren't noticeable, the poor player
could never get below G - even with a grip on the keys that would
have made the Incredible Hulk sweat.
You could suggest that it wasn't so much that the pads weren't seating,
rather the problems were down to bad regulation - but if you corrected
the regulation (which I tried) the pads still didn't seat properly.
You can but imagine the anguish - but it doesn't
stop there...
Here's a small collection of key cups taken from the
unfortunate instrument.
The starting principle of repadding a saxophone is astonishingly
simple - remove the old pads and replace them with new ones that
fit the cups. In this instance the word 'fit' has been used in its
most liberal sense...sure, the pads do actually go into the cups
- but only in the same way that a man with a size 36 chest will
fit into a size 42 jacket.
 The
big problem here is that pads aren't exactly flat - they tend to
roll down at the edge - so it's very important to ensure that you
maximise the flat area by fitting pads that completely fill the
cups. If you don't you run the risk of the tonehole trying to make
a seal on the roll-off of the pad, and this is never satisfactory. The
big problem here is that pads aren't exactly flat - they tend to
roll down at the edge - so it's very important to ensure that you
maximise the flat area by fitting pads that completely fill the
cups. If you don't you run the risk of the tonehole trying to make
a seal on the roll-off of the pad, and this is never satisfactory.
The largest cup shown is that of the low Bb key - and you can just
see that the tonehole impression practically falls off the side
of the pad. It wouldn't have mattered though, as it was completely
impossible to get a note anywhere near the low Bb...and even if
it were possible the Bb pad was leaking anyway.
On its own this job is one of the most unedifying
exhibits I've ever had the misfortune to display, and even now I
can feel the cold chill of revulsion that creeps up your spine....but
wait, the worst is yet to come!
How much d'you think changed hands in remuneration for this grisly
operation? £50? £150? £250??
Alas no - a truly knee-wobbling, gut-wibbling, head-borking £500
was handed over in exchange for the foul deeds you see laid bare
before you today.
O Tempora! O Mores! O Bugger!
This next addition to the collection is perhaps a
little less daunting than the previous exhibits, but it will still
tug at that part of the human psyche that can't resist slowing down
to peek at traffic accidents on the other side of the road.
What's particularly notable about this exhibit is that it doesn't
involve the actions of a third party - rather it's an example of
a horror spawned during manufacture.
The unfortunate beast in question is an unusual tenor sax branded
'Galasso', a Brazilian manufacturer.
The horn itself is nothing to write home about, just a basic student
horn by the looks of it - and to the casual observer it just appears
to be 'A.N.Other' old horn. But look a little closer and the awful
truth is revealed...
What you see here is a standard drawn and rolled tonehole
- but what's that brassy patch at the rear?
It's exactly that - a patch.
No big deal on its own, the tonehole might have suffered some kind
of trauma at some point which required the fitting of a patch -
but look at the other tonehole and you can see evidence of yet more
remedial work at the rear.
It's the same for practically each and every tonehole on this unfortunate
instrument - almost all of them have been patched or filled, some
in more than one place.
What's happened here is a problem in the manufacturing process.
As the toneholes have been drawn out of the body they've fractured,
perhaps due to the poor quality of the brass or some fault in the
drawing process itself. There are plenty of scratch marks in the
toneholes which might indicate the drawing tool was rather rough
and ready - so these toneholes weren't so much carefully drawn as
violently ripped out of the body. There's some evidence to suggest
some of the repairs were made before the horn was finished in nickel
plate - which certainly points the finger at the manufacturer.
In spite of all that, it actually blows quite nicely (in places).
And now, good people, prepare
yourself for the foul horror that is....

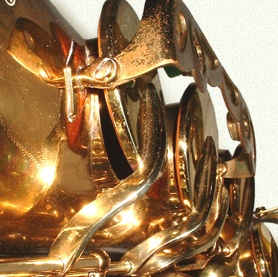
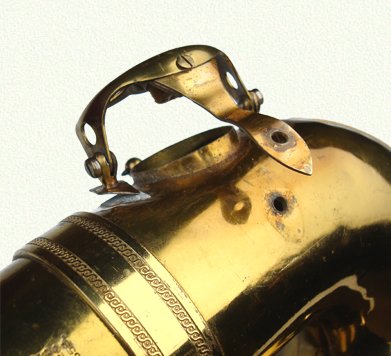 What
you see here is a vintage Selmer MkVI baritone sax - a very early
example, with a low A - with a hole drilled through its body and
a guard stay fitted with the aid of a nut and bolt. At first sight
it appears to be nothing less than vandalism, but if you look a
little closer it takes on a more interesting perspective. What
you see here is a vintage Selmer MkVI baritone sax - a very early
example, with a low A - with a hole drilled through its body and
a guard stay fitted with the aid of a nut and bolt. At first sight
it appears to be nothing less than vandalism, but if you look a
little closer it takes on a more interesting perspective.
What you have to bear in mind is that Selmer once thought it a good
idea to use two-point mounted bell key guards on some of their saxophones
(as opposed to the standard three-point mounts just about everyone
else uses). There's no structural advantage to a two-point mount,
so it would have been one of those 'natty ideas' that someone in
the company felt would add to the aesthetic appearance of the instrument.
However, there are significant drawbacks to the design - not the
least of which is that there is less load-spreading in the event
of a knock to the guard, and without the third foot the slightest
knock could tip the guard forwards or backwards.
The end result was that many players got so fed up
with the guards moving about that they had their repairer pop a
drop of soft solder over the securing screws to help keep the guards
in position. It was the only effective means of dealing with the
design flaw.
It brings to mind a 'discussion' I had on one of the saxophone forums
regarding the design of saxophone bell braces, in which I made the
point that truly effective bell braces didn't appear until around
the 1970s, when Yamaha came up with a design that looked like someone
had given more than a passing thought as to how damage to the saxophone's
body could be minimised in the event of an impact to the bell by
fitting a bell brace that was designed to absorb and deflect the
energy. I was assured most pointedly that the boffins at Selmer
knew what they were doing and that their original ring design would
have been a highly developed and tested piece of engineering (instead
of, as I maintained, just a pretty way of securing the bell to the
body).
If the boffins really were thinking about design, how on earth did
the two-point guard make it past the drawing board - and what possessed
someone to fit it to a low Eb key (a key that takes an awful lot
of knocks, inside and out of the instrument's case)...and on a hulking
great baritone saxophone?
 Anyway,
as the instrument was owned and played by a rather distinguished
professional, he had little choice but to address the problem of
the poor design and had someone attach a third foot to the guard. Anyway,
as the instrument was owned and played by a rather distinguished
professional, he had little choice but to address the problem of
the poor design and had someone attach a third foot to the guard.
The manner in which the foot is fitted to the guard is actually
quite neat, with a carefully shaped flare and a countersunk bolt
to secure it in place - but it all goes a bit wrong when it comes
to fitting the foot to the body. In all fairness I suspect that
the intention was to do the job without damaging the lacquer - which
meant no soldering...hence the use of a bolt to fit the foot to
the guard and another to fit it to the body.
It was decided to tidy the job up and make it more permanent, which
would also deal with the inevitable leak that comes from having
a bolt fitted though the body - but how to do the job with the least
amount of damage to the remaining lacquer?
Ideally I would have liked to have made up a small plug for the
bolt hole and silver-soldered it in place, but that would mean bringing
the area up to red heat...and that would have burned off a great
deal of lacquer. So, I went with the plug idea but silver-soldered
it instead to the guard foot so that it would locate in the bolt
hole. It had to be carefully made to ensure a snug fit in the hole
and to lie flush with the bore. The whole affair was then soft soldered
to the body, just like a standard guard foot mount - and the bolt
on the upper end of the foot would allow for removal of the guard
for access to the Eb key cup.
 A
little reprise now, in the shape of a 'spot the deliberate mistake'
exhibit. A
little reprise now, in the shape of a 'spot the deliberate mistake'
exhibit.
As many regular visitors to my site will know, I've been very interested
in instruments coming out of China - and it's been fascinating to
watch the rise in quality and development in the last few years.
However, there still remains something of a barrier when it comes
to a common language. It's quite clear to me that there are some
highly skilled craftsmen and women involved with woodwind instrument
manufacture in China, but there are times when confusion arises
over what the buyer wants and what the manufacturer thinks they
want.
What you see here is an alto saxophone crook. It's no ordinary crook
- the tube is hand formed out of solid silver. It's nicely made
too, not quite up to the standard of, say, a Gloger crook, but then
it comes in at less than the price of replacement standard brass
crook as churned out by one of the big manufacturers.
That's an astonishing prospect - being able to buy a handmade solid
silver replacement crook for less money than the one that originally
came with your horn.
The trouble is, something got lost in the translation, and the result
can be seen here.
Have you worked it out yet?
If not I can put you out of your misery.
Take a look at the tenon sleeve. Although the crook
itself is meant for an alto, the sleeve is for a tenor!
It's not that easy to spot at first - or rather it is, it's just
that most people can't imagine such a thing happening and so completely
ignore it...even when they're holding the thing in their hands.
It becomes quite apparent, however, when you hand the crook to someone
and ask them to fit it to their alto.
Perhaps the most intriguing aspect of this crook is the sleeve ring
(that sits atop the tenon sleeve). At some point during manufacture
someone will have needed to fit the sleeve to the crook tube. They
couldn't have used a sleeve ring off a tenor crook as it would have
been too large a fit over the crook tube, and one off an alto wouldn't
have accommodated the sleeve tube - so they would have had to make
one up especially for this crook. I would like to think that at
some point the maker thought "What the ****?", but then
he or she probably had a ticket on the bench that stated the buyer
wanted the crook built exactly to that design - and that's exactly
what the buyer got.
It's a well-known fact that it costs money to maintain
a collection of any kind. Museums often spend many hundreds of thousands
of pounds to secure important exhibits on behalf of the public at
large, and the shwoodwind black museum is no different.
I found this next item in a 'storage repository' and immediately
entered into difficult and drawn-out negotiations to secure the
item at a reasonable price, in order to display it for posterity
in this humble collection. Or, to put it another way - I spotted
it at the local tip and offered the guv'nor a fiver, on the basis
that it was so utterly appalling that I simply had to have it.
And so, showing once again that the black museum trawls the very
face of the planet to bring you the very best exhibits - I present
'The Indian Saxophone'.
 At
first glance this instrument looks very much like an original Adolphe
Sax saxophone. The small bell (to low B) is very indicative of a
sax from that era, as is the double octave key and the basic keywork. At
first glance this instrument looks very much like an original Adolphe
Sax saxophone. The small bell (to low B) is very indicative of a
sax from that era, as is the double octave key and the basic keywork.
A closer inspection reveals that this is, in fact, a copy. A very
poor copy. A very poor, modern, copy.
The story behind these instruments is that they are
knocked up in small sheds out in rural India. Whether that's entirely
true or not I have yet to confirm, but it seems a highly likely
state of affairs.
The true horror of an instrument like this is that they're sometimes
seen for sale on places like ebay. I suspect that there are few
visitors to this collection who would be foolish enough to buy one
of these - but there are still plenty of people out there who have
never really seen a saxophone 'up close', and are likely to be tempted
to buy one of these simply because of the cheap price (much cheaper
even than a basic Chinese saxophone). I suspect too that the tourist
trade accounts for a large number of purchases.
What's quite interesting about this saxophone is that
the body is surprisingly well-made. Although Adolphe Sax is rightly
revered as the inventor of the saxophone, his own examples weren't
as well-made as you might have imagined - and the body of this sax
is nearly as good as any I've seen on an original Adolphe sax.
But that's as far as it goes, because everything else is completely
and utterly dreadful.
 On
the left you can see a close-up of the top stack. It's quite plain
to see just how badly made the keys are. They appear to be a combination
of pressed (keycups), turned (pearl holders) and cast parts - none
of which really fit together with any kind of accuracy. Where there
are gaps (and there are gaps, some of them quite large) there are
generous blobs of soft solder. On
the left you can see a close-up of the top stack. It's quite plain
to see just how badly made the keys are. They appear to be a combination
of pressed (keycups), turned (pearl holders) and cast parts - none
of which really fit together with any kind of accuracy. Where there
are gaps (and there are gaps, some of them quite large) there are
generous blobs of soft solder.
Keys that don't quite fit have been hammered and roughly
filed into shape, and when even this hasn't worked they've been
fitted anyway. The rod screws, which on any half decent sax serve
as pivots for the action, merely hold the keys between the pillars.
If they move up and down it's a bonus, and if they're at all stiff
then this is overcome by the use of fiercely powerful springs.
To give you some idea of how strong they are, if you played more
than half a dozen scales on this saxophone you'd have to stop to
rest your hands.
Not that that's likely to happen, because neither
the tone holes or the key cups are level - which is academic anyway,
as the 'pads' that have been fitted have the consistency of the
back of a soft leather armchair, and are about as flat as a boxing
glove. I suppose it's a form of 'self-seating' pad - in a "seat
'em yourself" kind of way. To do this you must first overcome
the incredible spring tension and then press the keys down almost
half as much again to push the soft, squishy pads over the warped
tone holes. More often than not the pads on these Indian saxes are
bright red colour - but these are a drab brown. Perhaps this is
a 'mock vintage' model...
 So
if you saw one of these in a market, how would you distinguish it
from an original Adolphe sax? So
if you saw one of these in a market, how would you distinguish it
from an original Adolphe sax?
Well, as simple as the Adolphes are they're still much better made
than this example. The keys will still be relatively crude but they'll
be a great deal neater.
You also won't see such modern features as spatula key rollers,
such as those seen on the right. You can clearly see that no expense
has been spared on the key fittings. To be fair these rollers do
actually roll - but they're so thin that you can't get your finger
on them. They make a nice rattly sound though.
Perhaps the biggest giveaway is the tone holes - they're drawn.
Adolphe's original saxes were built quite some time before that
process was commonly used, and his saxes all had soldered-on tone
holes.
This is quite a surprise as it's by no means a simple
job to draw tone holes out of a tube - and it has me wondering whether
these things are made by more than one company. I said earlier that
the body wasn't too badly made, and if you add in the drawn tone
holes and the contrast them with the quality of the keywork it leads
me to suggest that people buy in the bodies from someone who's quite
good at making bodies, and then make and fit the pillars and keys
themselves.
Does it play?
This example is missing its top Eb key and a couple of pads - but
with the addition of a few lumps of Blu-Tack (thus doubling the
build quality, and the value of the instrument in one fell swoop)
it's just about possible to play a scale from mid to low C - assuming
giving up half way counts as a scale. From this it can be determined
that the sax is pitched in F, and that in the space of an octave
it's completely out of tune with itself.
I'm sure you will all agree that this terrifying exhibit
was well worth the small fortune paid to secure its rightful place
in the black museum .
The techniques used in the trade of saxophone repairing
are many and varied, and each exponent will have his or her preferred
methods - but by and large they all get the job done to the required
standard. However, there are those who have drifted to the dark
side of the force and make use of sinister and gruesome means by
which to torture and maim the instruments entrusted to their care.
 One
of the most labour-intensive tasks is that of tightening loose rod
screw action. This uses a technique called swedging (pronounced
sway-jing), which carefully compresses the worn key barrels so that
the rod screw fits snugly once again. It's a tough, time-consuming
job that can sometimes leave your hands blistered and aching. One
of the most labour-intensive tasks is that of tightening loose rod
screw action. This uses a technique called swedging (pronounced
sway-jing), which carefully compresses the worn key barrels so that
the rod screw fits snugly once again. It's a tough, time-consuming
job that can sometimes leave your hands blistered and aching.
So it's little wonder that some less scrupulous technicians will
be tempted by shortcuts.
This unfortunate key came off a stencil Martin alto
- a very badly worn instrument. That it was badly worn wasn't immediately
obvious to the casual observer - if you gave the keys a quick wiggle
while fitted to the instrument they appeared to be reasonably tight,
with little or no end or front-to-back play.
However, if you wiggled them up and down it was obvious that something
was very seriously wrong.
And this is why. You can see that someone has crimped
the very end of the key barrel.
This has done two things - it's compressed the tube in one plane
(you can see the bore is now oval) and it's pushed a nub of metal
over the end of the barrel.
It's an ingenious bodge really, very few players who might be a
bit savvy when it comes to checking for key wear would think to
check if a key barrel moves up and down - and for the unlucky owner
who paid to have this work done they'd probably have been none the
wiser. Until they tried to play the instrument.
You might just about get away with it on a standalone key (such
as a palm key), but on keys that are linked to others the up-and-down
play would have to be taken up first before the linked keys would
move. Disaster!
This 'fix' probably took someone five seconds, as opposed to the
five or ten minutes (and sometimes considerably more) to do the
job properly.
And now for a little culture. This exhibit is an 'installation
artwork' - which is a short way of saying "Hey! Look what we
found outside! Let's nail it to the wall and take bets on how long
before someone says 'I can see the underlying metaphor...'".
What it is, in fact, is a brand-spanking-new Selmer SA80 Series
III soprano saxophone.
I'll admit that it's not a very exciting exhibit on its own - after
all, if you've seen one soprano sax, you've seen 'em all. However,
there's a tale behind this one which dramatically alters the perspective
in which this object is viewed.
It was purchased from a well-known music shop in London - the sort
of shop I advise people to buy their instruments from. I do so because
I believe it's worth supporting our High Street retailers, and even
though you may pay a little more for the privilege you can at least
be assured of customer service and satisfaction. Right?
Unfortunately not, it would seem.
On the plus side this instrument was out of stock
when the buyer called in at the shop (they had previously arranged
to try one at another shop, who subsequently turned out to be also
out of stock), but a despatch-rider was duly summoned and a new
instrument was brought forth from the wholesaler. So far so good.
The instrument was unpacked and handed to the buyer, who tried it
and found there was a problem with it - some of the notes were rather
stuffy, and there was a warble down the bottom end. The in-house
repairer was called up from the dungeon and tasked with job of putting
it to rights. So far so gooder.
After half an hour or so the repairer returned, sweat pouring from
his brow, his mangled hands cradling the soprano as though it were
a new-born baby. The buyer played it again...but it still wasn't
right - it still sounded stuffy and it still warbled on the low
notes.
What to do? Well, when you've schlepped 60-plus miles to go shopping
and it looks like the horn you're holding in your hand is the only
example in town, what ya gonna do? They handed over the cash and
hoped that the advice on playing-technique (push the mouthpiece
on further!) given to them by the salesman would make everything
alright.
It didn't - and you can see why.
The soprano isn't a brute of an instrument. If you wield a baritone
in anger you might have to expect to put a bit more effort into
bringing those big key cups down - but the keys on a soprano are
small, and delicate...and should close with almost the power of
thought alone. Not much chance of that happening with this one.
It's quite clear that the A key isn't closing (and thus the Bis
Bb) - and this is because it's being held off by the adjuster screw
that sits atop the Auxiliary B key. This means that the moment you
play any note lower than a B, the horn leaks. What notes you might
be able to get out of the instrument below the B will be stuffy,
and if you can get anything out of the low notes at all it'll be
a major achievement.
And the fix for this? Back off the adjuster screw a tad, and thicken
up the buffer on the A key foot. About a minute's work.
Had this been a budget horn I might have been inclined to say 'these
things happen' - but this is a top-of-the-range professional model,
bought from an established retailer with on-site repairers on hand
- who spent half an hour tweaking it. And at this point you might
want to ask yourself exactly what would you expect for a shade under
£4000.
Which is why this installation is entitled "The Rise and Fall
of High Street Retailing" - though the museum night-watchman
calls it "The soprano of shame".
We're now entering the Natural
History section of the museum.
It's a relatively small department with a modest collection. In
fact there's just one exhibit in it - but what an exhibit!
 This
is an Aardvark. This
is an Aardvark.
I'll admit it looks a lot like a curved soprano saxophone - in fact
that's exactly what it is - but the nature of the problem which
earned it a place in this collection demonstrates perfectly a phrase
I've often used when examining Chinese-built instruments; "Check
bottom bow for Aardvarks".
On the face of it, it appears to be nonsense...surreal, even. I
mean, why on earth would you want to check a bottom bow for Aardvarks?
Has any sax ever had an Aardvark stuck to its bottom bow? Probably
not...but have you ever checked?
In years gone by things were a lot simpler. A cheap
instrument was built to a price. You knew it wasn't going to be
as good as an expensive one and you knew that as well as shortcomings
in the way in which it performed there might also be some mechanical
shortcomings. On the whole, though, everything was where it ought
to be and even if it wasn't that well made it was still what it
ought to be.
When the Chinese began building instruments in earnest, that changed.
Instruments were made with things where they didn't oughta be, and
in some cases nothing where they shoulda oughta be - and in some
extreme cases, the things that were where they were weren't what
they ought to have been. Such as an Aardvark stuck to the bottom
bow.
Still with me?
This particular Aardvark is the low D key. A cursory check reveals
nothing of note; it's a key cup, fitted with a plastic key pearl
and there's a pad fitted inside the cup. The key barrel is quite
well drilled, so it doesn't wobble around on its pivot. The spring
that powers it is fully functional...and the pad is quite well seated.
It all works.
It would be very easy, therefore, to tick all the boxes and move
on to the next key...unless you happened to take a peek at the lower
side of the key cup - at which point you'd see that there's a rather
large chunk missing from the side wall.
I didn't spot this immediately - mostly because I wasn't looking
for such a problem.
To be sure, I was looking for a number of other 'Aardvarks', such
as splits in the tone holes that had been taped over with sticking
plaster, or octave key pips fitted at a 45 degree angle to the body,
or loose key barrels that had been 'swedged' by crimping them with
a pair of wire cutters...or perhaps a missing key, or a superfluous
pillar. But a chunk missing out of a key cup? Nope, wasn't looking
for that.
 The
strange thing is, this isn't why the horn came in for a service
- so not only did the player not notice it but neither, I suspect,
did the seller. And who can blame them - it's quite hard to spot
unless you examine the horn from the bottom bow end - and even if
I handed the horn to someone, told them there was an unusual fault
with it and suggested they examine it from a particular angle, they
still might not have spotted it. The
strange thing is, this isn't why the horn came in for a service
- so not only did the player not notice it but neither, I suspect,
did the seller. And who can blame them - it's quite hard to spot
unless you examine the horn from the bottom bow end - and even if
I handed the horn to someone, told them there was an unusual fault
with it and suggested they examine it from a particular angle, they
still might not have spotted it.
It's rather like the solid silver crook you saw earlier. I've handed
that to many a client and said "Tell me what's wrong with this"
- and 90% of them won't spot it in spite of it being completely
obvious.
And the reason for the missing chunk? It all becomes dreadfully
obvious when you press the key down.
The rim of the key cup would have contacted the bell clamp ring,
thus preventing the pad from closing against the tone hole. Why
this has happened is up for debate. Perhaps the key cup diameter
is a little too large (looks about right though), or maybe the clamp
ring is too thick (seems OK) or too far up (nope)? I'm inclined
to think that they've been a bit careless when levelling the tone
holes and have taken too much 'meat' off the top. This means the
top of the tone hole is just a tad below the top of the clamp ring.
Had the tone hole been a couple of millimetres taller, there'd be
no problem.
So it's a manufacturing defect. It wouldn't have been spotted until
the horn was assembled, by which time the body would have been lacquered
- so rather than ruin the lacquer the builder decided to take a
chunk out of the key cup.
To be fair I've seen something similar before - a low D key cup
with just a little relief shaved into the cup wall for exactly the
same reason. But by relief I mean a very slight, shallow dish -
neatly finished and quite intentional. This one's been done with
a handheld mill and just left...teethmarks and all.
They say that bad things come in threes - and as if
to prove the adage, here's another soprano sax.
 Notice
anything strange about it? Notice
anything strange about it?
This 'A.N.Other' Chinese soprano was brought in for a setup just
after purchase. On the face of it, a pretty standard job - though
I've long since learned that when it comes to Chinese horns, nothing
much is standard.
Sure, it had the usual problems; a few iffy tone holes, a couple
of dodgy pads, a handful of indifferent corks - but nothing that
an hour's worth of tweaking couldn't put right...or at least put
into a state where it would allow the horn to work. And work it
did - and rather well at that, it has to be said.
However, it wasn't until I came to fit the crook that I noticed
this curious 'gotcha'...because I couldn't tighten the crook.
And it wasn't because the crook was too loose, nor that the clamp
screw thread was stripped - it was simply because there's absolutely
no provision for tightening the crook.
See where the clamp screw fits into the pair of brass
sleeves? See that little recess in the middle? That's supposed to
be a slot. Not only that, the slot is supposed to be cut right through
the socket (and you can see an example of this in the very first
shot of this page).
Without this slot, all the clamp screw can do is tighten
itself up against the sleeve; with a slot in place the screw will
allow the rim of the receiver to just pinch up a tad, thus ensuring
the crook is held securely in position.
Cutting a slot took a mere minute or so...but it took me a good
ten more before I stopped laughing.
We're now entering the Andy
Thomas Historical Memorial Archive, which houses one of our most
prized exhibits.
Its origins are uncertain, and much effort was expended in securing
it for the museum. Our admittedly non-too-reliable sources maintain
that this object was unearthed during the excavation of a beer garden
to the rear of a noted Portsmouth hostelry, and various experts
(in the saloon bar) have dated it to around 2000 BC - which puts
it in the Bronze Age.
 The
'craftsmanship' undoubtedly fits the period - its simple, hand-hammered
and fire-brazed construction certainly match other artefacts of
the period, and it clearly lacks the proto-elegance of later Iron
Age trinkets. But there are a number of problems with this theory,
the chief of which is that the wide band appears to be made from
steel - and there are two hexagonal nuts attached to it. Furthermore,
it's equally evident that it's a ligature. The
'craftsmanship' undoubtedly fits the period - its simple, hand-hammered
and fire-brazed construction certainly match other artefacts of
the period, and it clearly lacks the proto-elegance of later Iron
Age trinkets. But there are a number of problems with this theory,
the chief of which is that the wide band appears to be made from
steel - and there are two hexagonal nuts attached to it. Furthermore,
it's equally evident that it's a ligature.
Assuming, for a moment, that the date is right, it
would mean that Bronze Age artisans were considerably more advanced
in engineering terms than had previously been thought possible -
and what's even more incredible is the prospect that Adolphe Sax
had been beaten to the mark by about 4000 years. It all sounds,
I'm sure you will agree, rather suspect.
Another theory that's been put forward is that it's
a prototype of a new range of high-end bespoke ligatures, such as
those that are popular with players who have more money than gigs.
This makes more sense, given some of the absurdities that are foisted
on wealthy but gullible horn players as a means of holding a bit
of cane to a lump of metal - and I've no doubt that the 'rustic'
approach to construction would easily appeal to people who didn't
know any better (and who could afford the correspondingly eye-watering
price).
But perhaps the most plausible theory is that this
ligature was knocked up in a Pompey kitchen by someone who was too
tight-arsed to buy a proper one, and who had all the engineering
skills of a kebab.
We may never know for sure...
Here's another entry into the
ever-growing Hall Of Shame which, on the face of it, looks like
a simple case of a DIY tweak gone wrong. However, there's a back-story
to this which may well wobble your collys...
It seems it all began with a stiff palm D key. The apparent problem
was easily diagnosed and the best course of action seemed to be
to remove the key and inspect it. All very reasonable.
What was not spotted, however, was that the stiffness was due to
a bent key barrel - which meant that removing the rod screw would
prove to be rather difficult. And so it proved to be the case.
At this point the prudent DIYer would perhaps curse under their
breath, but take solace in the knowledge that they'd successfully
diagnosed the problem, attempted a repair and wisely thrown in the
towel when it became clear that the job was rather more involved.
But no, our erstwhile repairer battled bravely on and sought assistance
from the nemesis of all things mechanical - the Pliers Of Doom.
 Taking
inspiration from the historical battle of Marathon, the attack was
launched on two fronts. The first casualty was the poor old rod
screw. Having been partially coaxed out of the key barrel, the pliers
were brought to bear on its already mangled head - whereupon the
serrated jaws gave it a right old mangling. The outcome was inevitable
and, overwhelmed by superior forces, the rod screw gave up the struggle. Taking
inspiration from the historical battle of Marathon, the attack was
launched on two fronts. The first casualty was the poor old rod
screw. Having been partially coaxed out of the key barrel, the pliers
were brought to bear on its already mangled head - whereupon the
serrated jaws gave it a right old mangling. The outcome was inevitable
and, overwhelmed by superior forces, the rod screw gave up the struggle.
This left the key barrel exposed and defenceless, and no quarter
was given as the pliers ranged in on the unprotected tubing. Brass
and steel clashed and writhed - the once pristine plains of polished
brass were ravaged by the terrible steel jaws in a grim struggle
to exert might and strength over precision.
And as the dust settled and silence descended upon
the scene of battle, it became saddeningly apparent that if there
was any kind of victory at all, it was a wholly pyrrhic one. The
rod screw had indeed been removed from the key barrel, but it was
bent and mangled...and so too was the barrel.
Look now, upon the devastation, and weep the tears of regret (no
laughing at the back, please).
But the real horror (oh yes, there's more) is that
this poor horn belonged to a young student...and it's the teacher
who's responsible for this dreadful atrocity. Even worse, the teacher
is one of my regular clients.
Stern looks were given - and I may have even tutted a little (OK,
quite a lot).
But I am not unkind, and rather helpfully suggested that if they
wanted to dabble with minor repairs it might be an idea to purchase
a copy of the incredibly informative and useful Haynes
Saxophone Manual - which while containing much guidance on how
to carry out various everyday tweaks and adjustments, also contains
a wealth of knowledge with regard to what not to do. And knowing
what you shouldna didn't oughta do is often more valuable than knowing
what you shoulda did 'n done.
An excellent recommendation, I thought - but it turns out they already
have a copy.
"Well, didn't you read it??"
"Oh yeah, I did, once"
"Maybe you ought to read it again?"
I took on the repair - but on condition that the teacher
would not only pay to have the D key fixed, but for a bit of tweak
to the rest of the horn....by way of compensation to the student
for mangling the key, and as a pertinent reminder to 'RTFM'. And,
of course, that the whole sorry saga would be archived for all eternity
in the dreaded Black Museum.
A quick word of warning about
this next exhibit - it contains an item that many of you may find
rather distressing, especially those who have a passion for vintage
and historical saxophones.
What we see here is, or rather would have been, a very fine example
of perhaps one of the most important stages of the evolution of
the saxophone. It's a Couesnon soprano, and it dates from around
1925.
What makes it interesting is that it sits slap bang in the middle
of the period where saxophones changed from being period pieces
(i.e. of limited use in a modern context) to the early examples
of a design that we still enjoy today.
 I
think it's safe to say that playing such horns can sometimes be...challenging
- as can owning one - but this is offset by the rare pleasure of
playing an instrument that's nigh on 100 years old. And let's not
forget the street cred that comes with hoiking something like this
out of a case at a gig. I
think it's safe to say that playing such horns can sometimes be...challenging
- as can owning one - but this is offset by the rare pleasure of
playing an instrument that's nigh on 100 years old. And let's not
forget the street cred that comes with hoiking something like this
out of a case at a gig.
This particular horn's limitations are that it only goes down to
low B, and only up to top Eb. You don't get an articulated G# and
neither do you get a side F#. But you do get a horn that's been
built by one of the most important manufacturers in the business.
And it plays in tune. Make no mistake, they really knew their stuff.
So you'd think that such a grand old instrument would
be deserving of the utmost care when it came to restoring it to
its former glory. If you were going for the 'sympathetic' approach
you'd bring the mechanism up to scratch and deal with the inevitable
dings and bashes but leave the 'cosmetic history' intact (my preferred
approach) - and if you were going for the concours approach you'd
probably think about restoring the original finish.
What you certainly wouldn't do is slap a coat of yacht varnish on
it and bang in a cheap set of squidgy pads...unless you were the
'repairer' that got their hands on this unfortunate example.
I know, I know...it's awful, isn't it?
What you should be looking at is a fine old soprano finished in
a coat of glorious (if a little foxed in places) silver plate.
What we have instead is a silverplated soprano that's been sprayed
with a lacquer that has all the staying-power of a sausage in a
non-stick pan. You can see it peeling off inside the bell - and
if you rub a fingernail over it it just flakes off.
There are lots of problems with this, not the least of which is
why would anyone do such a thing in the first place? I suppose you
could be kind and say that they thought it would smarten up the
instrument, or you could be cynical and say that they thought it
would make the instrument sell for more - but as we'll soon see,
I think it's more likely that they didn't have a bloody clue what
they were doing.
 Feast
your eyes on this 'repadding' job. Feast
your eyes on this 'repadding' job.
There's a lot of work that goes into repadding a saxophone, and
an awful lot of that work has to be carried out even before a single
pad hits a key cup. And among that work is figuring out what the
thickness of the pads should be. This is an important consideration,
because pads that are too thick or thin are going to cause a lot
of problems...if they even work at all.
However, if you don't give a toss or simply don't
know what you're doing you can bung any old pads in and hope for
the best. And if that doesn't work, there's always the option of
the dreaded 'mallet seating'.
Just look at those bent key cups. The fitted pads are clearly way
too thick, which means they'll hit the toneholes at the rear and
won't stand a ghost of a chance of sealing at the front. What you'd
need to do is remove them and fit thinner pads...or you could just
bash the front of the key cups with a mallet until they bend down
and allow the pad to (sort of) seal. Of course, now that the key
cup is all bent up, the pad doesn't stand a hope in hell of seating
at the sides.
 At
which point the 'conscientious' mallet-setter will start beating
the crap out of the sides of the key cups...and so it goes on. At
which point the 'conscientious' mallet-setter will start beating
the crap out of the sides of the key cups...and so it goes on.
There's so much wrong with this poor old soprano,
and to be honest I dare not show it all...it's just too appalling.
Hulking great springs, barely any workable key height, keys that
wobble in the wind...and the real tour-de-force is that this horn
has soldered-on toneholes.
Over a (long) period of time the solder that holds these toneholes
in place deteriorates, through an electrochemical
reaction. While they might not drop off completely (though it
does happen) they will often spring a leak...usually at the rear
of the tonehole. It's seldom effective to try to patch up these
leaks, and the best course of action is to remove the toneholes
and resolder them.
And on a horn this old it's practically a certainty that you'll
find leaky toneholes...which indeed I did. Quite a few of them in
fact.
Sadly this isn't the only example of such poor workmanship
out there. Whilst researching a recent review on another vintage
soprano I came across an auction on ebay that was showing a similarly
mangled horn. Fat, squishy pads and a fresh coat of crappy lacquer
over the orginal silver plate. I wasn't impressed, but didn't think
any more of it...until this beast turned up on the bench about a
week later.
Unfortunately there's not a lot you can do about such abominations
- but you can at least make sure you don't buy one. I noted the
auction described the horn as having been repadded (which is true...ish)
and "mildly colour plated while restoring". Is this poor
Couesnon from the same source? I can't say for sure - but the colour
of lacquer over the silver plate was an exact match...as were the
evident runs and dribbles.
It put me in mind of the unfortunate Miss Masterson
- a character in Goldfinger who met a grisly end by being covered
entirely in gold paint.
But, unlike the golden lady, the Couesnon's not quite dead...it's
just very, very ill.
Any half-decent museum will
have a section devoted to the indomitable spirit of the human race,
in which can be found tales of sacrifice, personal courage and the
sort of fortitude that allows a person to saw one of their legs
off with an old spoon and still manage to hop thirty miles over
treacherous ground just to avoid being late for dinner. And so I
am proud - nay, honoured - to present this remarkable example of
grit and determination in the face of the dreaded....school baritone.
 When
I received the cry for help from the player's mum, I knew straightaway
what to expect. School baritones are often pitiable creatures; typically
of humble origins, unloved, much-abused and often eschewed by students
in favour of rather less bulky instruments. All school instruments
lead a tough life, but the baritone's size (along with all the bass
instruments) makes it something of a dent-magnet. In this instance
the fault was said to be a loose screw - which in layman's terms
can mean anything from a spot of maladjustment right through to
entire body sections having become detached. When
I received the cry for help from the player's mum, I knew straightaway
what to expect. School baritones are often pitiable creatures; typically
of humble origins, unloved, much-abused and often eschewed by students
in favour of rather less bulky instruments. All school instruments
lead a tough life, but the baritone's size (along with all the bass
instruments) makes it something of a dent-magnet. In this instance
the fault was said to be a loose screw - which in layman's terms
can mean anything from a spot of maladjustment right through to
entire body sections having become detached.
Credit where it's due, when the instrument duly arrived
in the workshop it was indeed suffering with a loose point screw.
In fact it was so loose it wasn't there at all...which is about
as loose as they get.
As you might imagine, it had 'a few other problems' - the most noticeable
of which was a dirty great dent beneath one of the feet of the low
C key guard.
Not only had it pushed the guard into the bottom bow, it had taken
half the tonehole with it. The palm keys up on the top bow had been
knocked about all over the place, the octave mech was binding, a
couple of others screws were on their way to falling out...and the
whole thing rattled like a bag of spanners. All bog-standard school
bari stuff.
It was meant to be an on-the-spot drop-in job - but
I couldn't just replace the missing screw and leave it at that,
so I agreed to do a Stevie-special and get the thing (sort of) up
and running in half an hour.
I got the bulk of the low C dent out and tweaked the pad to fit,
realigned the palm keys and reset the pads, freed up the octave
mech, gave the thing a drop of much-needed oil and tightened up
all the loose screws. It wasn't pretty, and it still leaked a fair
bit from the main stacks...but it would do for now, and would at
least get the player out of a tight spot.
"Not to worry," I said, as I dug out my mouthpiece "baritones
are very forgiving and I'm pretty sure we'll be able to get the
low notes out".
The client seemed delighted - apparently her lad had been working
on "Lullaby Of Birdland" on this horn...which, considering
the state of the horn when it came in was a truly heroic feat of
dedication.
And then I dug the crook out of the case.
Something wasn't right - there was no tenon sleeve on it. Where
was it??
It was in the receiver. I'd seen it there while I was fiddling with
the action, but I assumed it was just the end plug.
Not only had the poor lad been battling with keys falling off or
grinding to a halt, pads leaking like a sieve and a humungous dent
under the low C - he'd been wedging the crook tube into the broken
off tenon sleeve just so's he could do the Birdland thing. Lullaby?
More like LOLlaby.
Of course, with all that wedging the crook tube was properly bent
out of shape - but with a quick whizz with an expander, a cleanup
and a solder job, it was all good to go.
And it blew all the way to the bottom.
I dashed off a quick rendition of "Lullaby Of Birdland",
and completely fluffed it half way through - but the bari forgave
me, because that's what they do.
Step this way into our Hollywood
section, and feast your eyes upon our homage to one of the seminal
sci-fi/horror movies of the 1950s.
What you see here is a curved soprano - and you may be wondering
what the filmic reference could possibly be, because the number
of curved sopranos that featured in 50's horror movies is precisely,
er, nil. But step a little closer...and listen out for a faint cry.
There! D'you hear it? It sounds like "Help me! Help meeeeeeeee!!"
 This
rather macabre soprano was brought in by a player who complained
of some difficulty with the low notes. Somehow the horn had lost
some of its punch and clarity. This
rather macabre soprano was brought in by a player who complained
of some difficulty with the low notes. Somehow the horn had lost
some of its punch and clarity.
I gave it a quick inspection, spotted the problem and then spent
the next 30 seconds milking it for all I was worth.
"Are you getting a buzzing sound?"
"Yeah, yeah, I am"
"Is it bugging you?"
"Oh gawd, yeah"
"Are you finding the low notes don't fly out?"
"Absolutely!"
"So you're getting by on a wing and a prayer then?"
"You could say that, yeah"
I was all out of dreadful puns, so I showed the client
the cause of all the problems.
Somehow or other a fly had got caught between the Auxiliary F pad
and the tonehole, and came to a very undignified end. Crushed by
a soprano sax - what way to go.
It was somewhat desiccated, so it must have been there a while -
and it was quite firmly stuck in place. I removed the corpse and
gave the pad a good clean and a bit of a reset, and all was well
again.
There's no way to know how it got there. In all probability
the fly got trapped in the case and expired of its own accord, and
subsequently managed to come to rest on the pad - perhaps getting
stuck there due to some moisture. When the horn was next played,
it got pressed into the pad. The only other way it could have got
there was to have flown inbetween the pad and the tonehole right
at the moment when the key came down...which would have been a spectacular
feat of timing and bad luck.
It's time for a quiz - so let's
play a round of "How much??!"
What we have here is a rather lovely Conn 6M - a mid '30s model
in very fair condition that's just changed hands. It had recently
suffered a knock, so the previous owner took it to a popular London
shop to have the work done. He did so because he was labouring under
the illusion that while they probably charge more than most, the
quality of work justifies the price. He was half right.
 Now,
when I say this horn is in excellent condition I'm referring to
the cosmetics. It's got a fair amount of wear to the action, and
the pads have long since passed their best - but the silver plating
is in exceptionally good shape. Everything is almost as neat and
tidy as the day it rolled off the production line. Or at least it
was. Now,
when I say this horn is in excellent condition I'm referring to
the cosmetics. It's got a fair amount of wear to the action, and
the pads have long since passed their best - but the silver plating
is in exceptionally good shape. Everything is almost as neat and
tidy as the day it rolled off the production line. Or at least it
was.
Soldering a part back on to a horn neatly can be a tricky job; it's
a subtle blend of skill, preparation and a little bit of luck. What
we see here is the result of having none of these qualities. Several
things are apparent to me, the first of which is that no provision
was made to prevent the solder from flowing out of the joint and
away from it onto the body. This is a particular problem on silver
plated horns - doubly-so on frosted finishes, whereby the excess
solder fills the 'pores' and cannot be removed without removing
the plating on the peaks surrounding it.
I can also see that the surface preparation was insufficient; there's
no clean line of solder around the base of the pillar...it's all
a bit blobby. If you don't do good prep work (specifically cleaning
both surfaces thoroughly and ensuring they mate together well) you
nearly always end up having to keep the heat on the job far longer
than necessary, which results in the solder boiling out of the joint.
A good soldering job is a 'one time operation'. Prep, heat, apply
solder, get out. If you overstay your welcome, you end up with a
joint like this.
I can also see that no thought has been given to the
possibility that the job might not go so well - because the smear
at the front of the pillar looks to me to be the point at which
the solder was applied. On a job like this I'd flow the solder in
at the rear of the pillar, so that any 'witness marks' will be hidden
by the surrounding keywork.
I'm sure you'll agree it all looks a bit cruddy. But
that's not the worst of it.
Pillars and other fittings sometimes fall off of their own accord.
Usually it's due to the solder having broken down over the years,
but it can also be because the joint wasn't as good as it ought
to have been (more common with new cheap horns). It happens...but
nowhere near as often as an impact knocking something off. So the
golden rule of parted fittings is to check for impacts first. This
is important because refitting a part over a dent will mean that
the part won't line up correctly, and it's not likely to be that
easy a job. Fortunately it's always easy to spot the damage because
it'll usually be there right in front of you - in the spot where
the fitting used to be.
 So how do I know an impact caused this pillar to come adrift? Because
the dent is still there.
So how do I know an impact caused this pillar to come adrift? Because
the dent is still there.
See that little bump halfway down the bore? That's where the pillar
got driven into the body tube before it fell off. Whoever refitted
this pillar would have seen the dent....and did nothing about it
(or if they did, they didn't do enough). They just went ahead and
soldered it back in place.
Knocking a small dent like this out of the body would have taken
less than five minutes - plus another couple of minutes to reprofile
the base of the pillar.
Of course, whenever a horn's taken a knock there's
always some extra work that needs to be done; collateral damage,
if you like. In the case of a bashed pillar it's a fair bet that
the pillar at the other end of the key isn't going to be quite where
it's supposed to be, due to the 'hammer action' of the key barrel
during the impact. Double pillars (a pillar with two heads on it)
tend to highlight hammer action damage, given that the shorter of
the two keys mounted on the pillar tends not knock the opposing
pillar back quite so much as the longer key does.
In this instance the shorter key is the side C lever key and the
longer key is the top E. So you'd position the dislodged pillar
against the keys until one of them is nice and snug - and the one
that isn't nice and snug is the one that's had its opposing pillar
knocked back. You'd correct that - so that the dislodged pillar
sits flush with both key barrels - before resoldering the pillar
in place.
Has this been done? No.
 The
side C lever (the lower of the two keys) is nice and snug between
its pillars - with the ends of the key barrel nestling against the
face of the pillars. But there's a gap on the top E key, and this
is because the upper pillar has been knocked back. One light tap
with a mallet would have been enough to move it back into line.
What's even more disappointing about this state of affairs is that
the Conn has adjustable point screws; so even if there is a gap
between the barrel end and the face of the pillar, you can drive
the point screw into the pillar a little further to take up the
play. It's not ideal, but at least it means that the key doesn't
wobble. As it does on this horn. The
side C lever (the lower of the two keys) is nice and snug between
its pillars - with the ends of the key barrel nestling against the
face of the pillars. But there's a gap on the top E key, and this
is because the upper pillar has been knocked back. One light tap
with a mallet would have been enough to move it back into line.
What's even more disappointing about this state of affairs is that
the Conn has adjustable point screws; so even if there is a gap
between the barrel end and the face of the pillar, you can drive
the point screw into the pillar a little further to take up the
play. It's not ideal, but at least it means that the key doesn't
wobble. As it does on this horn.
So what's the quiz? It's very simple; can you guess
how much they charged to do this job?
Here's a breakdown of the work carried out, as listed on the invoice.
Strip instrument
Remove spring from loose pillar and surrounding area
Prepare pillar and body and re-solder
Oil keywork and reassemble
Test
'Strip instrument' is pushing things a bit. You'd
need to back the top stack rod out a way to remove the side Bb lever
on a 6M - and the side C and top E keys would already be loose -
so that hardly constitutes stripping.
Removing the springs is fine; you'd need to take three off in order
to give yourself some space.
Prepare pillar and body and resolder is where it all seems to go
very wrong - and the rest is academic really.
So whaddya reckon?
I reckon that a scrappy job like this (crusty soldering, no dentwork)
should come in at around £20.
Had you done the dentwork but still did a rough soldering job, maybe
£30...assuming you had no shame.
Chuck in the dentwork and a really neat job, I'd say £40 tops.
Let's be generous and round it up to £50.
Total they charged for this job? £108. That's more than double
what it should have cost at the very most. And the very worst of
it all is that I'll have to unsolder this pillar and do the job
over again. Properly this time...though my chances of achieving
a neat job are very much slimmer now that all that excess solder
has spilled out around the joint. On a horn like this that's a great
shame. I can at least promise to try my best...which is what should
have been the approach in the first place. Especially at that price.
We've seen a fair few bodges
on our way around the museum - but this one's interesting because
of the amount of sheer incompetence on display.
This is actually the second time I've seen this horn; it originally
came in for an inspection prior to the client purchasing it. At
the time I noted that while the structure of the horn was reasonably
good, many of the pads were very much on their last legs. But I
reckoned I could get it into gigging shape for a few hundred quid
- and my advice at the time was to broker a deal with the seller
(a music shop) and have all or at least some of the work done as
part of the asking price.
I heard nothing more...until a few days ago when the client returned
with the horn, having now bought it. It still had some problems.
And boy did it still have some problems. Let's have a run through
the major ones...
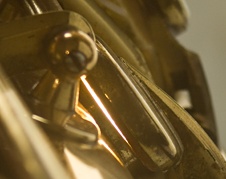 This
here's the auxiliary B key pad (or, if you want to be technically
correct, the upper C key pad). This
here's the auxiliary B key pad (or, if you want to be technically
correct, the upper C key pad).
There are two 'aux' keys on a horn - the B and the F - and they're
arguably the most important pads because they lie at the top of
each stack and are closed only when other keys in the stack are
pressed down. A lot of things have to be set just right for them
to close and seal properly...and if they don't close, they'll make
a noticeable dent in the response of the horn.
The Aux. B is especially critical because it's at the top of the
horn - and the nearer the leak is to the top of the horn, the more
of an effect it will have on the response of the whole horn. A leak
of this size will make the horn sound and feel dull and lifeless
- and you'll run into some big problems down at the bell notes.
 What's
really nasty about this leak is that if you look at the rear of
the pad you'll see that it's sitting on the tonehole. As far as
the key is concerned, it's closed; the pad has touched the tonehole
and come to a stop....and never mind what's going on at the front
of the pad. This is going to have a bearing on what comes next... What's
really nasty about this leak is that if you look at the rear of
the pad you'll see that it's sitting on the tonehole. As far as
the key is concerned, it's closed; the pad has touched the tonehole
and come to a stop....and never mind what's going on at the front
of the pad. This is going to have a bearing on what comes next...
Moving down the horn we see the Bis Bb and A keys.
Neither of them are closing, and the reason (or some of it, anyway)
that they're not is that they're linked to the Aux. B key - which,
as we just saw, thinks it's closed. It's not going anywhere further....and
neither is anything that's connected to it.
This is a classic case of 'holding off' - whereby one key is prevented
from closing by another one it's linked to.
If the problem lay solely with the Aux. B you could just press it
down real hard and it would allow the Bis Bb and A to close - but,
unfortunately, all it does is make the leaks a little smaller...because
neither of these two pads are seating anyway.
 A
little trip around the side now, to the side C key cup. A
little trip around the side now, to the side C key cup.
This is a 'closed cup' - in other words it's one of the keys that
are normally held closed (by a spring) and are opened when you want
to play that particular note. With all the 'open' cups you can work
around some of the leaks by simply pressing down harder on the keys.
This technique is known as 'gorilla grip'. But with closed cups
there's nothing you can do about it other than increase the tension
on the spring. Doing this halfway though a solo tends to confuse
both the audience and the rest of the band.
Leaks on the side keys are a real pain - they have a huge effect
on the whole horn but particularly affect the keys adjacent to them
(in this case the B).
 Moving
back to the front of the horn we come to the G#. Moving
back to the front of the horn we come to the G#.
The G# is perhaps the most problematic key on the whole horn. If
it's not leaking, it's sticking. And if it's not leaking or sticking
it's sluggish. And if it's not sluggish it's often out of regulation.
It's the single most common cause of bell note problems - so it
really has to be set right.
Here it's at rest - and as it's a closed key you'll probably already
have guessed that the little arc of light shouldn't be there. Indeed
it should not. A leak of the fraction of the size of this one will
cause problems - and one this big will pretty much kill the bell
notes dead.
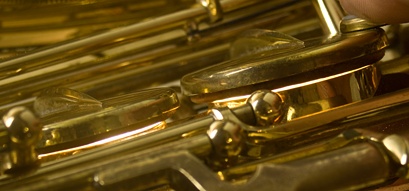 Onwards
to the lower stack, and here are the Aux. F and F keys. Onwards
to the lower stack, and here are the Aux. F and F keys.
Remember what I said about the Aux. B? This is a truly massive leak.
If I play this horn with the same grip I use on my own tenor I get
to A before the horn craps out on me. If I use the old gorilla grip
I can get down a bit further - but once I hit F I practically have
to be crushing the horn under my fingers to make it speak properly.
Those of you who're clued up about keywork regulation might suggest
that these leaks are due to the adjusters over the G# cup and Bis
Bb arm being set too far, leading to 'holding off'. And you'd be
right - at least partially.
In an effort to 'cure' the leak on the G# someone's set the adjuster
real heavy so that the Aux.F pushes the G# closed - but in so doing
it simply creates an even bigger leak on the Aux.F (because of our
old nemesis, 'holding off'). Back the screw off and the key closes
reasonably well. Funnily enough, the regulation for the Bis Bb arm
was so way off that the adjuster hardly touched the key arm when
the F was closed. No 'long Bb' on this horn, matey.
The F, on the other hand, simply doesn't close at all - even with
the Aux.F rammed down hard onto the tonehole.
And now for the low D.
 This
one's just a dead loss. The pad is so old and knackered that it
was past its use-by date decades ago. It's shrunk, and the right
hand side has long since broken away from the shellac that's supposed
to be holding it in place. It almost might as well not be there
at all for all the good it's doing. This
one's just a dead loss. The pad is so old and knackered that it
was past its use-by date decades ago. It's shrunk, and the right
hand side has long since broken away from the shellac that's supposed
to be holding it in place. It almost might as well not be there
at all for all the good it's doing.
 "Ooohh"
I hear you cry, "that's gonna ruin the low C!" - and so
it is. But you needn't worry because the low C's not going to be
much use to anybody anyway. Never mind getting a cigarette paper
feeler in those gaps - you could get a copy of the Sunday Times
in there...and still have room for all the supplements. "Ooohh"
I hear you cry, "that's gonna ruin the low C!" - and so
it is. But you needn't worry because the low C's not going to be
much use to anybody anyway. Never mind getting a cigarette paper
feeler in those gaps - you could get a copy of the Sunday Times
in there...and still have room for all the supplements.
I shan't bother with the rest of the bell keys as I think by now
you'll have got the picture. The horn's in a truly dreadful state
of repair - desperately in need of a jolly good tweaking.
But here's the thing; it's just had one.
No, really - the horn came with a nifty graphical
jobsheet, all labelled up and scribbled on. They'd even used highlighter!
I looked at the horn, looked at the jobsheet and felt an emotion
that I really don't think there's a word for...it was a combination
of pissing myself with laughter and deep, deep horror.
See all those green splodges? They indicate that the repairer has
reset the pads. Yup - almost all those pads shown above have been
reset.
Let me say that again. Almost all those hideously leaking and knackered
pads have been reset. And gawd only knows what happened to the Aux.B,
the Bis Bb and the A key pads - because they don't even get a mention.
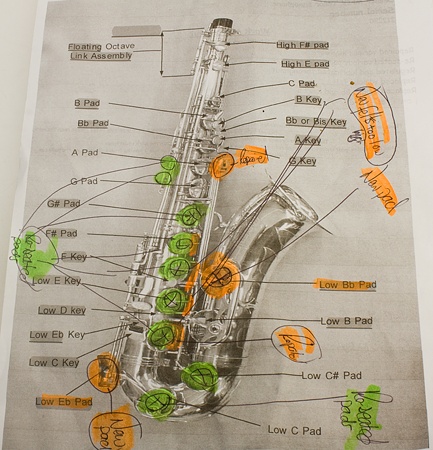 It's
not even an attempt at a repair. It almost looks like someone's
done absolutely sod all to the horn and simply scribbled a load
of rubbish on a jobsheet. It's complete and utter bollocks. It's
not even an attempt at a repair. It almost looks like someone's
done absolutely sod all to the horn and simply scribbled a load
of rubbish on a jobsheet. It's complete and utter bollocks.
In point of fact the client reckons the horn played better before
it was 'serviced'.
So how did it come to this sorry state of affairs?
Who knows? At a guess I'd say that the seller didn't want the cost
of the repairs to eat into the profit margin - but then that assumes
they're a mean-spirited cheapskate. Or perhaps they entrusted the
horn to someone they thought would be capable of sprucing the horn
up, paid out the repair fee and handed the horn over to the buyer
with a friendly though unknowing smile.
And what of the person who carried out the work?
Now I know we all have off days, but c'mon. There's stuff on this
horn that someone with just a few hours repair training could have
at least spotted. I've seen some rubbish work in my time but this
job pretty much wins the Golden Turkey.
What's truly galling is that were I forced to do a
bodge job on this horn I reckon I could get it to blow reasonably
comfortably down to at least low D with just a few tweaks.
The first thing to sort would be the Aux.B. Stick a new pad in there
and close that leak. That'll help with the Bis Bb and the A - and
a spot of heavy resetting would improve them.
Then reset that side C or, if it comes to it, replace the pad. That
more or less sorts out the upper stack and gives you more of a chance
of getting some of the lower notes out.
Tweak the G#, reset the regulation to the Aux.F, reset the F and
replace the D...try to give the low C a tweak or two and give the
low B/Bb pads a poke. It wouldn't be pretty, but with a bit of a
grip you could probably tease a subtone low Bb out of it on a good
day.
You'd think the client would be properly angry about
it, but he'd already more or less accepted my quote on the initial
examination and just reckoned it would be a bonus if at least some
of the work could have been done ahead of bringing it to me. If
anything he was just amazed that they actually managed to make it
worse.
And so am I.
I'm sure you'll all agree that the Black Museum hosts
some pretty nasty exhibits - but this latest addition is perhaps
the most horrific of all.
I must caution you beforehand that what follows will send a chill
down the spine of vintage horn aficionados and contemporary fans
alike. Yes, this gruesome horror story truly spans the ages.
 What
we have here is a crook from a Conn Chu Berry (AKA New Wonder) alto
sax. Nothing too extraordinary about that - but those of you with
an eye for detail might be thinking that the tenon sleeve looks
a little bit odd. What
we have here is a crook from a Conn Chu Berry (AKA New Wonder) alto
sax. Nothing too extraordinary about that - but those of you with
an eye for detail might be thinking that the tenon sleeve looks
a little bit odd.
And so it does. Step a little closer...if you will...
 Pretty
nasty, eh? Pretty
nasty, eh?
A good tenon sleeve is supposed to be smooth and cylindrical - and
this is neither of those fine things. In fact it's not even close.
How did it come to be in this state?
Because someone tried to fit this crook to a receiver.
For the average repairer this is a very common job. A client turns
up with a crook that's a bit loose and the repairer will use a variety
of tools to first expand the diameter of the tenon sleeve and then
perhaps use another tool to bring it down to size and to ensure
that it's perfectly round and parallel all the way along its length.
And if they're going the extra mile they may well gently lap the
tenon into the receiver to ensure a perfectly airtight fit. This
really improves the response of a horn - and if the job's done properly
there'll be no indication that any work was carried out other than
the crook is now a nice, snug fit.
If, however, you're a Billy Bodger with all the engineering nous
of a pot noodle, you might well just take a file to the tenon sleeve
and have at it.
"Ah" I hear you cry "If the crook joint
needed tightening, why would anyone file the tenon? Surely that
would make the joint looser?"
Well-spotted. Indeed, there's only one reason you might need to
remove metal from the sleeve (assuming your tenon compressing tool
couldn't do the job) and that's to fit the crook to a narrower receiver.
But why would anyone want to do that? Well, it's often the case
that horn players want to experiment with different tonal soundscapes
- and one way of doing that is to fit a different crook...typically
one from an entirely different brand of horn. So you might see someone
with, say, a Yamaha 62 and a Selmer SA80 crook...or vice versa.
At this point I'd like to flesh out what follows with
a bit of the backstory behind this exhibit.
One of my regular clients dropped me an email a few days ago to
say that 'he may need some more repairs'. I was a little surprised
because I'd only recently carried out a major service on his horn,
and I briefly wondered if perhaps he'd had a terrible accident and
dropped the poor thing. But no, it was much worse than that.
It seems that although he'd been otherwise happy with his modern
horn, he really wanted to see if he could get more of a vintage
tone out of it - and this was something that had bugged him ever
since he'd tried out an old Conn Chu Berry. All good and well -
many players have found themselves in that boat. And then he happened
upon a colleague whilst on a gig who'd taken a Chu Berry crook and
fitted it to his modern horn. My client was, quite naturally, intrigued
- at which point his colleague declared that he'd taken a course
in repairing and would be happy to do the job for him.
Ooooh yes, I know what you're thinking - believe me
I do - but you haven't seen the half of it yet...
So the horn in question is a very fine TJ RAW. An
excellent (and expensive) modern horn that has a fair bit of that
vintage vibe going on. And the Conn Chu Berry is no slouch either.
Put the two together and what have you got? Well...the client reckons
it's made a nice difference to the tone - but, and I quote, "However
I think he has taken a little too much off and it moves a little
and unless pushed completely in leaks a little."
And now it's time to reveal the full, gruesome horror of it all.
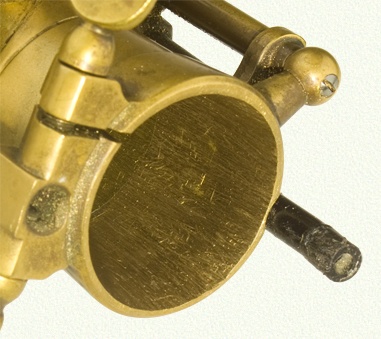 Here's
the crook socket/receiver of the RAW. Clearly the Conn's tenon sleeve
was far too big to fit - and as the butchery on the tenon sleeve
hadn't taken enough material off, the bodger had attacked the socket....with
a file! I mean, there's just no way you could ever in a million
years hope to file a tenon sleeve down and retain its roundness
- and that applies more than doubly so for the socket. Not a bloody
hope in hell. Here's
the crook socket/receiver of the RAW. Clearly the Conn's tenon sleeve
was far too big to fit - and as the butchery on the tenon sleeve
hadn't taken enough material off, the bodger had attacked the socket....with
a file! I mean, there's just no way you could ever in a million
years hope to file a tenon sleeve down and retain its roundness
- and that applies more than doubly so for the socket. Not a bloody
hope in hell.
But that didn't stop him. It's all over the place, and if you look
at the rim of the socket you can see that it's thicker in some places
than in others. And is it parallel all the way down? Well, what
do you think?
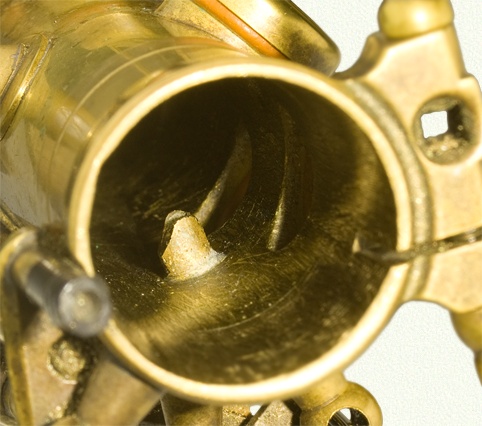 But
hey - we're not done yet. Oh no. Because while our erstwhile 'craftsman'
has been so busy concentrating on getting that receiver nice and
round, he's completely ignored where the other end of the file is
going. But
hey - we're not done yet. Oh no. Because while our erstwhile 'craftsman'
has been so busy concentrating on getting that receiver nice and
round, he's completely ignored where the other end of the file is
going.
That there, down the bore of the horn, is the tube
that extends from the body octave key pip. On a good day it's just
a plain old piece of tube. On a bad day - after it's been properly
mullered by an idiot with a file - it's, well, it's all over the
sodding place. And if you look closely you can even see that he
didn't even bother to clean the brass filings off the horn. That's
like someone stealing your car...and then crashing it into your
house. How much more painful can it get?
Well, probably quite a bit. My brief is to put this
mess right - but with so much material having been removed from
the relevant parts, there's pretty much bugger all I can do about
it without starting again. So that means a new receiver, a new tenon
sleeve and a new octave key pip. Hopefully I'll be able to get the
RAW parts - but the tenon sleeve will have to be a custom job. And
if I have to make a new receiver...well, that's really going to
hurt.
And what of Bodger Bill?
People often ask me about what it takes to get into repairing, and
I often mention that repair courses can be a good way to start.
But here's the thing - when I left college all those decades ago
I was convinced that I'd been taught exactly what to do. It was
only some years later that I realised that I'd not been taught what
to do so much as what not to do...and the rest I had to find out
for myself.
Gawd only knows what course that bloke went on, but it's clearly
failed...in every single respect.
If you'd like to see how I fixed this mess, I've detailed
the process on the Benchlife
Blog.
Something a little different
now, but no less awful than the previous exhibits. In fact this
one might just be one of the worst...
What we're looking at here is a flute. Quite a nice flute. Quite
an expensive flute. It's a Muramatsu. I'm not sure what model it
is (is anyone ever?) but it features a solid silver head and body
- so it's not the cheapest, and certainly not the most expensive.
At a rough guess an equivalent modern model is likely to set you
back five grand or so. In the world of saxes five grand would get
you a very nice professional quality instrument - but out there
in flute land an instrument of this price is considered to be of
intermediate quality. Yeah, I know - right?
But still, five grand is five grand - and most of that cost relates
to the design and integrity of the body tube (and head joint). This
is why players of expensive flutes get very antsy when their flute
picks up a small dent or - horror-of-horrors - a bit of a bend.
Understandably so, I'm sure you'll agree.
 So
what do you make of this? So
what do you make of this?
If you look down the body tube at the base of each tonehole you
should see...well, nothing. Just a uniform surface that reflects
the light or shadow seamlessly. This would indicate a tube with
no lumps, bumps or ripples. And yet at the base of each tonehole
there are a pair of 'reverse dents'. Now, we've seen these before
- on the Selmer Reference 54 alto that had some dentwork done on
it. In the case of the Selmer the reverse dents were due to carelessness,
and were the result of a dent ball hitting the opposite side of
the body tube while a dent on the other side was being removed.
These dents are deliberate, and they've been put there in an effort
to level off the toneholes.
I can very well understand the frustration of a flute
repairer who has to try to set pads on warped toneholes because
it's even more of a pain in the nether regions than it is on a sax
- but there's a right way to sort such issues out, and a wrong way.
And then there's a very wrong way.
 In
effect, this work has ruined the flute. OK, sure, it'll still play
- and there's even a chance you might not notice any tonal anomalies.
But you just try selling a five grand flute with this kind of body
damage in evidence. You won't get a fraction of its true (used)
value. If you took it into a high-end flute shop by way of a trade
in, they'd just laugh at you. In
effect, this work has ruined the flute. OK, sure, it'll still play
- and there's even a chance you might not notice any tonal anomalies.
But you just try selling a five grand flute with this kind of body
damage in evidence. You won't get a fraction of its true (used)
value. If you took it into a high-end flute shop by way of a trade
in, they'd just laugh at you.
And here's the kicker. After all those dents were
knocked into the body tube, what was the result at the tonehole
face?
Not much to speak of. Here's the low D, and you can see that both
the front and rear of the tonehole are dipped down below the apex.
I suppose it begs the question "What on earth were they like
before??"
We will never know.
There are methods for dealing with warped toneholes
on flute - and yes, they're fiddly and time-consuming (and thus
expensive)...but knocking dirty great dents into the body is not
one of them.
Can they be removed? I really wouldn't like to say (and I sure as
hell wouldn't take that job on) because they're so close to the
tonehole wall that there's a substantial risk of damaging them.
They're also quite 'sharp' dents, which will mean that the metal
has been quite stretched - so when you work the dents down you're
essentially left with a greater surface to deal with...and nowhere
for it to go. It's a proper headache.
That just about wraps up the tour of the Black Museum
for the time being - a small but stomach-churning selection of nasties,
I'm sure you'll agree. Don't forget too that, for someone, these
examples will undoubtedly be 'wallet-churning' too...
Feel free to drop by the Black Museum from time to time, where further
horrors will be presented for your edificatory queasification.
|