A rolling blog of everyday life
on and around the workbench (Archived - March 2017)
29/03/2017:
I've spent most of my working life dealing with other people's annoying
squeaks - but today saw me having to deal with one of my own, and
on something rather larger (and more complicated) than a saxophone.
Yep, my car was giving me gyp.
I think it's been squeaking for some time now, but I only noticed
it when the sun came out. How could this be? Simple...it was the
first time for many months that the weather's been decent enough
to drive with the window down. It's a big ol' car - and with all
the windows up you'd be hard put to hear Armageddon breaking out
let alone an annoying squeak from somewhere underneath the rear
of the car.
I guess the answer would be to wind the window up - but now that
I know the squeak is there I can almost hear it even when I can't
(if you get my meaning). Besides, I really don't like driving around
in a car that sounds like a rusty old pram. And putting vanity aside,
it probably means that something's a bit worn out and needs replacing
- so it's just as well to track it down.
Given that the squeak occurs when the car goes
over a bump it's a fair bet that it's something to do with the suspension
- probably a rubber bush...of which there are very, very many.
So it's out with the jack and off with one of the rear wheels. Unfortunately
it all looks pretty standard....lots of complicated suspension arms
and lots of dried-up Hampshire mud. I gave things a good poke and
a prod, but when a bushing starts to fail there's often very little
that's easily visible. So it's a job for the garage then - but in
the meantime it wouldn't hurt to spray a bit of rubber lube here
and there. It won't fix anything, but it might cure the squeaking
for a while. And yeah, it's a bodge - and I hate not being able
to find a smoking gun - but what might take me an hour to track
down will take a mechanic five minutes...and I'd be better off fixing
your horn while the mechanic fixes my car.
With the bushes all thoroughly lubed I refitted
the wheel and dropped the car down. I then put one foot on the rear
passenger sill and grabbed the roof rack rail and rocked the car
up and down.
No squeak!
But...now I had a hiss.
 Well,
I knew what that was. My car has self-leveling suspension - two
heavy-duty rubber bags that are inflated by a compressor...the idea
being to keep the car nice and level even when it's fully loaded.
But those bags don't last forever, and while they're not terribly
expensive to replace, they're also not terribly cheap. I could hear
the damn thing leaking...every time I pulled the car down. Psssshhhht...pshhhhhhttt....psssshhhhht. Well,
I knew what that was. My car has self-leveling suspension - two
heavy-duty rubber bags that are inflated by a compressor...the idea
being to keep the car nice and level even when it's fully loaded.
But those bags don't last forever, and while they're not terribly
expensive to replace, they're also not terribly cheap. I could hear
the damn thing leaking...every time I pulled the car down. Psssshhhht...pshhhhhhttt....psssshhhhht.
It struck me as a bit odd that the air compressor didn't fire up
(it's always on even when the ignition's off) - but hey ho, that's
another thing to get checked out.
So with a heavy heart I set about putting all
the tools away. After five minutes of grunting and groaning (I swear
that trolley jack has got heavier over the years) I was all done.
Or was I?
Where's that tin of spray lube? I looked here...I looked there...I
looked all over the place. I've got used to looking for things I
only just put down, and I find it's easier to focus less on where
something might be then it is to retrace my steps and look for the
thing in all the places I've been in the last half hour or so. But
I still couldn't find it.
And then I spotted it.
I'd left it under the car - and in accordance with the Laws Of Sod
I'd left it standing in such a position that when I dropped the
car down off the jack, the nozzle was almost touching the underside.
As I rocked the car up and down I'd been closing that gap and pressing
down on the nozzle. That pssssshhhttt wasn't the suspension...it
was all my lovely rubber lube being sprayed over the underside of
the car.
I still have to get one or other of the bushings replaced...but
now I also have to buy another tin of spray lube. Bloody typical.
 25/03/2017:
Starting a youngster off on a musical instrument is often a risky
business. There's the expense of the instrument, the cost of the
lessons and the prospect of having to spend the next year or so
listening to wheezy/scratchy renditions of simple melodies...many
of which would sound bloody awful even if played well. Then there's
the worry about whether you bought the right brand/model. It might
have been affordable, but is it good enough to inspire the student
or too cheap to be of any use? 25/03/2017:
Starting a youngster off on a musical instrument is often a risky
business. There's the expense of the instrument, the cost of the
lessons and the prospect of having to spend the next year or so
listening to wheezy/scratchy renditions of simple melodies...many
of which would sound bloody awful even if played well. Then there's
the worry about whether you bought the right brand/model. It might
have been affordable, but is it good enough to inspire the student
or too cheap to be of any use?
And on top of all that there's always the possibility that they'll
just give it all up in a year or so's time...and you're left wondering
where on earth you can sell a lightly-used Chinese euphonium. But
there's another risk - that of the dreaded temper-tantrum. Your
normally placid and studious child can suddenly turn into the Incredible
Hulk at a moment's notice, and anything in reach that's breakable
is liable to end up in bits on the floor.
They say (if they get the quote right) that music has charms to
soothe a savage breast - but this rather washes over the years of
toil and practice it takes to achieve the level of proficiency required
to produce soothing tones, as opposed to piercing squeaks and squawks.
And this means that, at some point, some 'stern encouragement' may
be required.
Music is an emotional force - and a youngster is, essentially,
a seething cauldron of the same...and when you add a pinch of stressed-out
parent into the mix you get what's known in chemistry circles as
'a rather large conflagration'. And so it is that every few months
or so I'll get a call from a distressed parent who tells me that
there's been a 'domestic incident' and their child's instrument
needs a bit of attention.
It happens. It's just one of those things. Nine times out of ten
the child will slam a door or throw their geography book across
the bedroom, and not much harm is done. But when the red mist descends
during practice time, the result is often pretty much what we have
here.
It looks quite nasty but it's by no means the worst I've seen.
In fact you can often tell how keen the student is by how little
damage they do to their instrument when they throw a wobbly. A relatively
keen student will have their temper tempered (did ya see what I
did there?) by a couple of dents...but a disinterested one will
practically flatten the poor thing.
It's at this point that the wise parent ought to intervene. Not
to scold, mind you - as that will likely make things worse (and
you can always do that later...when they least expect it) - but
rather to save the instrument from the effect of the inevitable
guilt-trip. Yep - it's often the guilt that does the most damage.
The child knocks the crap out of the instrument, feels suddenly
calmer and then panics at the thought of the inevitable telling-off
they're in for - at which point they try to put things right. This
is like trying to fix a cracked window by tapping the glass with
a hammer...it can only go one way.
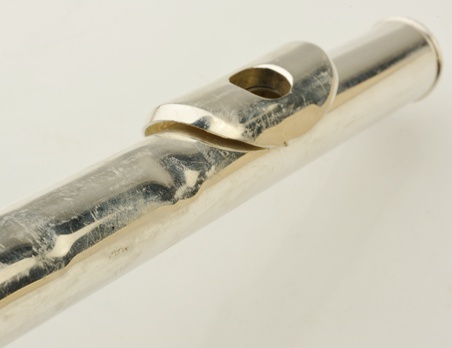
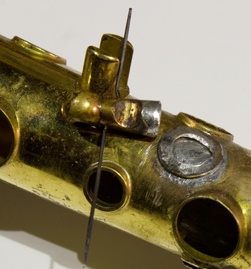
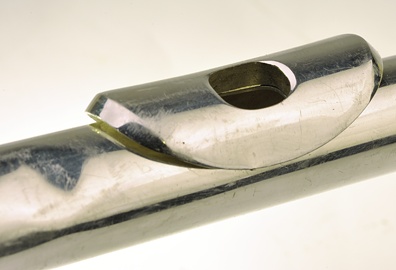 This
poor old flute (quite a decent student model, a TJ10x) stood up
pretty well to the beating it received. A couple of nasty dents
in the head joint and a bent lip plate, a very slight and gentle
bend in the body and a few keys shaken out of regulation...and the
inevitable bent G# key arm. No big deal really - in fact not much
worse than many youngsters' flutes suffer in the course of a normal
year. This
poor old flute (quite a decent student model, a TJ10x) stood up
pretty well to the beating it received. A couple of nasty dents
in the head joint and a bent lip plate, a very slight and gentle
bend in the body and a few keys shaken out of regulation...and the
inevitable bent G# key arm. No big deal really - in fact not much
worse than many youngsters' flutes suffer in the course of a normal
year.
But it was made all so much worse by sticking something underneath
the lip plate in an effort to straighten it out...which it did,
mostly, but not before it tore the chimney off the head.
You can just see a chink of light shining through the soldered joint
at the rear - and if you look carefully you can see where the plate
was levered at the front (just left of centre). It must have taken
one hell of an effort because that joint is around 3mm (1/8")
wide all the way round.
So the moral of this sorry tale is that parents should perhaps
explain to their children that no matter what they do to their instruments,
it can always be sorted out...but it will always cost much, much
more if they try to fix it themselves.
It might also be a smart move to check under their beds for crowbars...
22/03/2017:
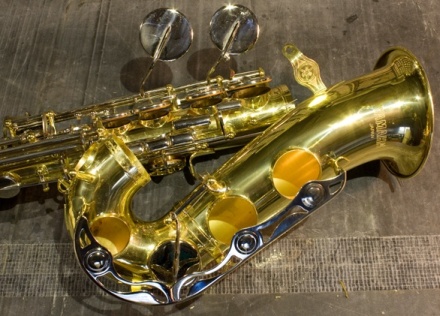
It's always heartbreaking when you get that call. "We brought
our child's saxophone in to you a couple of months ago and you did
a lovely service on it...but now it's been dropped and doesn't work
anymore".
I remember this horn. It's a funny thing, but I'm absolutely terrible
at remembering people these days. They can rattle on all they like
about how they came to see me last week, and I simply don't have
a clue who they are...but as soon as they mention a horn - bang!
I'm right there.
 So
this wasn't "Mr so-and-so" or "Mr very keen to support
his child's musical progress" but rather "Mr Japanese
275 that put up a right old fight, but played like a demon when
sorted". So
this wasn't "Mr so-and-so" or "Mr very keen to support
his child's musical progress" but rather "Mr Japanese
275 that put up a right old fight, but played like a demon when
sorted".
It might sound a bit callous, but believe you me...it's far better
that I remember you this way than as "Mr struggles with the
top notes but prefers to splash out on fancy mouthpieces instead
of practising".
So - all my lovely setup work gone to pot.
The young lady that plays this horn, bless her little heart, had
an unfortunate slip 'twixt sling and the ring - and the poor old
Yamaha hit the deck...bell dead centre.
Credit where credit's due, she did what any sane young musician
would do and swore blind it must have happened while the horn was
in the case (probably overheard me talking about the dangers of
case shock on the last visit). Nice try - but a large dent in the
front of the bottom bow that had been neatly textured with the grain
of tarmac was a bit of a giveaway.
But here's the thing - I'm always banging on about
the design of bell braces, but this trusty Yamaha had taken a proper
tumble onto a rock-hard surface and got away with a dent in the
bottom bow and a misaligned bell...and just a wee bend to the front
lip of the bell.
No body damage at all...save for the lower key stack having been
shocked out of alignment a touch.
Almost all of what would have been a considerable impact has been
absorbed by the bell brace - and as such it has performed its function
perfectly. However, there's a price.
When you fit a brace that's able to deform so effectively, it has
to come at a cost of rigidity - which means it's that much easier
to knock the bell slightly out of alignment with careless handling
than it is with a horn that has a more substantial brace. Swings
and roundabouts, though - had the Yamaha been fitted with a sturdier
brace it, I'd probably be posting a shot of a bent body.
What you really need is something that's stiff
enough to keep the bell in position during normal use and that can
shrug off light knocks...and yet cope with all the energy resulting
from a drop. A shock absorber, in other words.
It'd be fiddly to design - but it'd mean that if you dropped your
horn it wouldn't be me you'd be ringing....it'd be Kwik Fit.
20/03/2017:
Made a start on an 'underhaul' on
an old Borgani soprano. This was of those dreaded 'borderline' calls.
If someone brings in a nasty old banger that needs a rebuild or
a fine old Selmer in need of an overhaul, it's always very clear-cut
choice. The cheap old banger is beyond economic repair and the Selmer
gets the go-ahead. Simple.
 But
there's often quite a large grey area inbetween the extremes in
which lie any number of horns that aren't, on the face of it, worth
a great deal of money - but which have a saving grace. That might
be something as intangible as the memories it evokes (your first
horn, perhaps, or one that's been passed down) or a particular quality
that the player finds useful. Strip that away, though, and you're
often left with a horn that appears to have nothing going for it
at all. But
there's often quite a large grey area inbetween the extremes in
which lie any number of horns that aren't, on the face of it, worth
a great deal of money - but which have a saving grace. That might
be something as intangible as the memories it evokes (your first
horn, perhaps, or one that's been passed down) or a particular quality
that the player finds useful. Strip that away, though, and you're
often left with a horn that appears to have nothing going for it
at all.
This was the case with the Borgani.
Modern Borganis are very nice horns. Granted, the build quality
can be a bit hit and miss around the edges but the playability is
generally right up there with the best of them. Older Borganis,
however, have something of a reputation of being...shall we say...not
very nice. And in build quality terms this soprano is certainly
not very nice. But - it's a soprano, it's sort of on its way to
being vaguely vintage (circa 1970s at a guess) and if nothing else
it's reasonably uncommon.
 It
needs a lot of work. It's been knocked about a bit and there's some
evidence of less-than-wonderful repairs - and as the owner has no
real attachment to it, it fell to me to make the call as to whether
it was worth doing up. Well, on paper it ticked all the wrong boxes
- but I gave it a few emergency tweaks and managed to get it to
(sort of) blow. And, you know, it wasn't bad at all. Definitely
had that 'thang'. It
needs a lot of work. It's been knocked about a bit and there's some
evidence of less-than-wonderful repairs - and as the owner has no
real attachment to it, it fell to me to make the call as to whether
it was worth doing up. Well, on paper it ticked all the wrong boxes
- but I gave it a few emergency tweaks and managed to get it to
(sort of) blow. And, you know, it wasn't bad at all. Definitely
had that 'thang'.
So it was decided to go ahead with the job.
Having stripped it down and sorted out the dents
and the bent body, I decided I didn't like the look of that pillar
in the middle of the top stack. There wasn't really anything mechanically
wrong with it on sight - it just looked messy. Strictly-speaking
fixing it wasn't part of the deal, but hey...it's just a spot of
messy soldering - how long could it take to whip it off, clean it
up and put it back all nice and tidy?
You know what they say - if it ain't broken, don't fix it - and
halfway through removing it I found out that the post of the pillar
had broken away from the base. That's why it was so messy, someone
had built up a shedload of soft solder to secure the post to the
base.
 So
it needed cleaning up and silver-soldering back together, but it's
not just a case of plonking the post in the base and making large
with the gas gun - oh no, it's all got to be correctly aligned so
that when it's refitted to the body the hole for the rod screw lines
up with all the others on the stack. If it could be placed on the
horn and held in position with the rod screw, it'd be a breeze...but
as it'll need to be brought up to red hot it'll mean all the surrounding
pillars will fall off...as will most of the lacquer in the general
area. So
it needed cleaning up and silver-soldering back together, but it's
not just a case of plonking the post in the base and making large
with the gas gun - oh no, it's all got to be correctly aligned so
that when it's refitted to the body the hole for the rod screw lines
up with all the others on the stack. If it could be placed on the
horn and held in position with the rod screw, it'd be a breeze...but
as it'll need to be brought up to red hot it'll mean all the surrounding
pillars will fall off...as will most of the lacquer in the general
area.
You could 'eyeball' it over on the brazing hearth - but if you're
even a fraction out it'll mean the rod screw will jam in the hole
and you'll spend more time sorting out a problem you created than
it would have taken you to do the job properly in the first place.
What's needed is some sort of a jig, so that you
can set up the alignment away from the horn and solder up the pillar
without fear of damaging the horn. I keep meaning to make up some
nice all-purpose jigs. Ideally they'd be fitted with interchangeable
clamps to accommodate a variety of key parts and these would be
mounted on slides so that you could adjust the orientation of the
clamps in every possible axis...and all with micrometer accuracy.
Back in the real world the only critical dimension is the height
of the rod screw from the body. So I measured this and made up a
pair of brass bars and drilled them appropriately, then fixed them
to a base. I could now feed the rod screw through these bars and
suspend the broken pillar from it. Some allowance would have to
be made to accommodate the curve on the base of the pillar. This
would mean having to ensure the base of 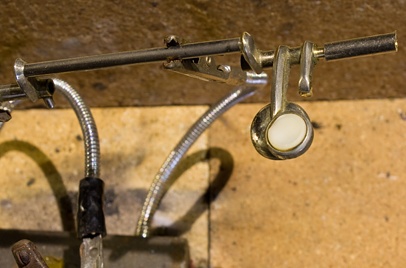 the
jig matched the curvature and taper of the body section beneath
the broken pillar - which could be done by taking the time to turn
up a tapered bar of the correct diameter...or you could just take
a file to the jig's base and give it your best guess. Provided you're
sensible you should be able to get the position of the pillar base
within a fraction of a millimetre or so...easily enough tolerance
to adjust with a file later, or for the soft solder to take up when
refitting the pillar. the
jig matched the curvature and taper of the body section beneath
the broken pillar - which could be done by taking the time to turn
up a tapered bar of the correct diameter...or you could just take
a file to the jig's base and give it your best guess. Provided you're
sensible you should be able to get the position of the pillar base
within a fraction of a millimetre or so...easily enough tolerance
to adjust with a file later, or for the soft solder to take up when
refitting the pillar.
Must have been my lucky day, because I got it
bang on.
However, I had to make a decision with regard to the placement of
the pillar. The keywork isn't very well fitted, and there's a lot
of end-to-end play in it. If I placed the pillar back in its original
position I'd have to take up this end play over four keys. But if
I moved the pillar slightly I'd only have to take up the play on
one key...but it would be quite a lot of play.
 It
helps to think a little way down the line. I have to address the
end-to-end play, and the existing rod screw has a broken thread
- so I'm going to have to make a new one. I can kill two birds with
one stone by fitting a slightly oversized rod screw, and this will
take up the free play on the rod in the key barrels and in the pillars.
I'd have to ream the keys a tad, and this will also stretch them
slightly - so it should sort out most (if not all) the wear issues
in one operation...leaving the barest minimum of swedging to take
up any remaining discrepancies. It's easier on the hands and on
the plating, and provides a much more accurate and longer-lasting
fix than trying to swedge around all those key arms. It
helps to think a little way down the line. I have to address the
end-to-end play, and the existing rod screw has a broken thread
- so I'm going to have to make a new one. I can kill two birds with
one stone by fitting a slightly oversized rod screw, and this will
take up the free play on the rod in the key barrels and in the pillars.
I'd have to ream the keys a tad, and this will also stretch them
slightly - so it should sort out most (if not all) the wear issues
in one operation...leaving the barest minimum of swedging to take
up any remaining discrepancies. It's easier on the hands and on
the plating, and provides a much more accurate and longer-lasting
fix than trying to swedge around all those key arms.
So I opted for the single key option - and this
meant fitting a barrel extension to the Bis Bb key.
What's needed is a constantly adjustable jig with a variety of clamps
that...etc. etc. - but a simpler method is to turn a piece of brass
rod to a very snug fit in the key and the barrel extension tube,
then drill a hole through its centre. This is poked into the key
and the extension slid onto it. Now everything lines up a treat
and the extension can be silver-soldered in place.
It's always nice if you can do 'invisible' repairs, which is why
the extension tube is nickel plated (to match the finish on the
existing key. Nickel plating is tough stuff, and with the right
choice of solder it ought to be possible to make the joint without
losing it...though I'll admit a degree of luck is called for. A
quick visit to the scrap bin turns up an old key off a Weltklang
alto. It's nickel plated and it's the exact dimensions of the existing
key barrel. How cool is that?
Once done it's a simple job to drill out the rod (that's why it's
pre-drilled...stops the drill from wandering out of true) and then
ream the joint to size. Cut the extension to size and Bob's yer
uncle - job done. Here's the almost finished key - it'll need a
spot of polishing, and I've got to make a domed pearl for it
Just goes to show...there's more than one way to get jiggy with
it...
 18/03/2017:
I thought I'd try out something new. 18/03/2017:
I thought I'd try out something new.
Like many people out there I'd been posting informal updates and
photos to various social media platforms, and while this is all
good fun I've always had some misgivings about the way those places
are run - and I've not been all that keen about my content being
used as a platform for data gathering and advertising.
Yeah, I know - it's quick and easy, and it provides a way to keep
in contact with friends and associates...and to make new ones. Well,
I can relate to the quick and easy...but if I want to catch up with
friends I can just fire off an email. And if I want to make new
friends I can do much the same thing.
And then, if you're any good at it, it gets to be quite demanding
work - keeping up with what everyone else is up to, liking this
and sharing that...and that's before you add any of your own content.
It's all rather noisy - like the bit before the conductor taps the
baton on the stand and blissful silence falls.
I also have the luxury of being reasonably well
established. The site's been up for almost twenty years now, and
in that time I've collected a very large number of followers worldwide.
I regularly get quoted and/or linked to which means I really don't
have to go looking for new viewers.
So I thought I'd bring it all back 'in house' and see how it goes.
If no-one likes it...well, I might just carry on anyway...
It's going to be a pretty relaxed section. There's
a lot of stuff I do which (some) people might find interesting,
but which doesn't really merit an article by itself - and there's
also a lot that goes on behind, say, the drafting of a review. And
then there's the stuff I do that's not really related to instruments,
but which comes as part of the package when you have a workshop,
a box of tools and a couple of scary machines. It won't be Twitter,
and it won't be Facebook (I did think of calling it Twatter or Arsebook)
- but that's kind of the point...it's mine, and I can do what I
bloody well like with it.
We'll see how it goes.
And to kick off, what better than a job that's
as far away from a horn repair as you're likely to get - unless
you've always had a hankering to knock out a solo on an aircon pump.
I picked this one up a few years ago by way of a spare for the one
that's fitted to my car. Didn't cost me much, and as mine is a tad
noisy at times I thought it might not be a bad idea to get a spare
in and give it a good service. This appeals to my philosophy of
having stuff around 'that I might need one day' on the basis that
if you've got a spare, you won't ever need it. Zen insurance, I
call it.
Not that I know owt about servicing aircon pumps - but if someone
put it together it means it must come apart...and someone else out
there will have already done exactly this kind of job already, and
very probably bunged a video up on Youtube. What could possibly
go wrong?
 Well,
as you can see, I didn't get off to good start. Barely two minutes
into the job and I've busted my wire cutters. Well,
as you can see, I didn't get off to good start. Barely two minutes
into the job and I've busted my wire cutters.
Damn and blast these cheaparse tools - they're about as much use
as a chocolate spanner...which, incidentally, is exactly what we
have here.
C'mon - admit it, you were completely fooled.
Ain't no shame in that - when I first saw these they fooled me too.
They're made by a company called The
Amazing Chocolate Workshop - and these three items are just
a tiny fraction of the stuff they make. They do nuts and bolts,
hammers, chisels, scissors, monkey wrenches...you name it, they
do it - though, strangely enough, they don't seem to do a chocolate
teapot (as in 'As much use as').
They also don't seem to do a chocolate lathe -
which brings me neatly back to 'proper' work.
Had an email from a chap in the States who'd just bought a TJ
RAW tenor. Loves it to bits but, like me, he suffers with a
touch of arthritis in his thumbs. The upshot of his email was that
his old horn, a Yamaha 475, gave him no trouble at all - and would
it be possible to fit the thumb rest off a Yamaha on to the RAW?
Good question.
 The
Yamaha has a plastic thumb rest that's a press fit over a solid
stub that's fixed to the horn - and the RAW has a detachable thumb
rest that sits in a sort of brass doughnut...and is held in place
with a small grub screw. This makes it a breeze to remove the thumb
rest - unlike the Yamaha's one, which has to be prized off. Still,
at least it comes off...on many horns the rest is soldered to the
body. The
Yamaha has a plastic thumb rest that's a press fit over a solid
stub that's fixed to the horn - and the RAW has a detachable thumb
rest that sits in a sort of brass doughnut...and is held in place
with a small grub screw. This makes it a breeze to remove the thumb
rest - unlike the Yamaha's one, which has to be prized off. Still,
at least it comes off...on many horns the rest is soldered to the
body.
I have a few Yamaha rests in stock, and with the aid of my own RAW
I did a few measurements.
Turns out it wouldn't be a straight swap, the socket in the Yamaha's
rest is larger than the diameter of the stub on the RAW.
However, the RAW's rest is a simple enough design (looks a bit like
a mushroom) - which got me thinking about knocking up custom thumb
rests. It's a job I do from time to time, but usually to replace
one that's busted or worn down - and it's usually a job for a repairer
because there's often a certain amount of glueing or soldering to
be done. No such problems with the RAW...you just undo the grub
screw, pull the rest out of the stub and replace it with whatever
you like.
Emails passed to and fro. The project interested
me because I fully understand how you can have something completely
wonderful but not be able to use it because it sets off your damn
arthritis (which is why I have several pairs of posh walking boots
that I can't wear - bought before I found some that I could). We
established that he thought the horn felt 'big' in his hands, and
that he prefers to 'reach up' for the octave key rather than roll
down onto it - so it appeared that a thinner rest would be just
the thing. He confirmed this by nipping out to a hardware store,
buying a metal disk and glueing to the top of the stub on the RAW.
I wasn't having any of that! Gluing a shonky old bit of metal to
a RAW? Perish the thought. So I fired up the old lathe and knocked
up a couple of custom thumb rests.
 I
did one in black Delrin (which is a kind of hardwearing plastic)
and another in nickel silver - because it's always nice to have
a choice and, frankly, while I had the lathe running it made sense
to make two rather than one. I
did one in black Delrin (which is a kind of hardwearing plastic)
and another in nickel silver - because it's always nice to have
a choice and, frankly, while I had the lathe running it made sense
to make two rather than one.
It also gave me a chance to try out a new lathe tool. I'd been toying
with the idea of getting some 'insert tooling'. It's not generally
recommended for small(ish) lathes like my Maximat V10P, nor for
non-ferrous work - but quite a few guys out there seem to be getting
good results with it.
As luck would have it I scored a bit of a bargain at the local tip
recently and picked up an old toolbox with a few engineers' tools
in for a couple of quid. In among the bits and bobs was a handful
of carbide inserts which, as I later found out, can be brazed onto
a steel shaft. Seemed like the perfect (i.e. cheap) way to suss
out how effective they'd be.
And I'm pretty pleased with the results. They work as well on nickel/brass
as they do on mild and stainless steel - and with more careful selection
of inserts I ought to be able to improve the results still further
(I've no idea what this insert is for - but it looks like one designed
for Aluminium...which seems to be a good bet for smaller lathes).
At least I will when I've stopped borking at the prices.
I'll test these on my RAW and then send them
off to the chap as a bit of a surprise, and I might give some thought
to knocking out bespoke RAW thumb rests in a commercial basis.
It's on my To Do list.
|