A rolling blog of everyday life
on and around the workbench (Archived - April 2017)
 29/04/2017:
Metal sling hooks. Why are people still using 'em? 29/04/2017:
Metal sling hooks. Why are people still using 'em?
Fair enough - skip back fifty or so years and you really didn't
have much choice. You could have a metal sling hook or metal sling
hook with a lock. And if you didn't fancy either of those, well...tough.
If you were canny you'd use a metal hook with a plastic sleeve fitted
over it. These offered a degree of protection...at least while the
sleeve remained intact. Unfortunately it tended to wear away - and
players paid as much attention to it as they did the ever-widening
groove in the sling ring.
When the first plastic (nylon) hooks appeared
I can well understand that some players were reluctant to trust
their pride and joy to a 'piece of plastic' - but technology and
materials have moved on, and there's now no reason whatsoever to
use a metal sling hook.
But people do, and time and again I get to see
(and fix) the results - and I thought it might be kinda fun to take
you through the process.
 We'll
take it as read that I've given the client the standard lecture
about the folly of using a steel hook in a brass ring, and that
I've asked then why on earth they didn't switch to a plastic hook
the moment they noticed the groove being chewed through the sling
ring - and we'll also take it as read that I've done that 'sucking
in of the breath' when they've asked if the repair will affect the
finish. We'll
take it as read that I've given the client the standard lecture
about the folly of using a steel hook in a brass ring, and that
I've asked then why on earth they didn't switch to a plastic hook
the moment they noticed the groove being chewed through the sling
ring - and we'll also take it as read that I've done that 'sucking
in of the breath' when they've asked if the repair will affect the
finish.
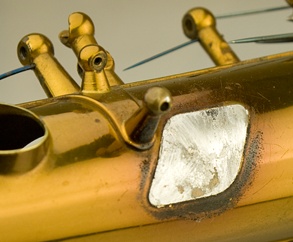
In this case the patient is a lovely old Selmer
Balanced Action alto. It's in fairly good shape - a bit tired and
worn in places, but otherwise looking quite presentable in its relacquered
coat. Sad to say, it's not going to like being heated up; this old
cellulose lacquer is quite brittle and borders on the flammable
- and whereas with a modern horn you might speculate as to how likely
you are to be able to do the job with no loss of lacquer, on a horn
like this it's very much a case of just how much lacquer you're
going to lose. Some? Much? A lot? Depends how much of the damn stuff
catches fire.
It's very common to see such horns sporting burnt key cups - you
only need a second or two of carelessness and pwooofff...there goes
the lacquer.
 So,
the first job is to remove the sling ring. It can't be repaired
in-situ; the groove needs to be filled with silver solder...which
requires bringing the ring up to red heat. You simply can't do that
while it's fitted to the horn (it would fall off...and so would
everything adjacent to it). So,
the first job is to remove the sling ring. It can't be repaired
in-situ; the groove needs to be filled with silver solder...which
requires bringing the ring up to red heat. You simply can't do that
while it's fitted to the horn (it would fall off...and so would
everything adjacent to it).
The ring has come off reasonably neatly. At this point you might
think that it bodes well for refitting it without too much lacquer
loss...but it'd be a vain hope. It's not just the heat that matters,
it's the length of time it's applied - and we're only halfway through
the job. And it's going to take a lot more heat to refit the ring
than it does to remove it.
The hook's been cleaned up (it's important to
remove the old solder) and the groove has been lightly filed to
give it some 'key' - and it's been mounted in the 'jaws of doom'
ready for soldering. Getting the 'hang' right is crucial - you want
the solder to pool dead centre in the groove. If you put just the
right amount of solder on it'll fill the gap and the surface tension
of the molten solder will force it to take on the profile of the
ring. This means a lot less cleaning up later.
If you overdo it you'll end up with a barrel-shaped lump in the
ring - and if you don't use enough solder you'll leave a notch in
the ring.
 The
next step is to mount the ring on a piece of tube. The
next step is to mount the ring on a piece of tube.
It's going to need some cleaning up, and - if you were a bit heavy-handed
with the solder - some filing down to size. Soldering the ring onto
a finishing tube makes it a lot easier to handle, and it can be
mounted in a vice. It also kills two birds with one stone, as the
base of the ring will need to be tinned (coated with a thin layer
of soft solder) to ensure a reliable joint when it's fitted back
onto the horn - and this can be done by wiping away the excess when
the ring is unsoldered from the finishing tube. I reckon I got the
silver soldering just about spot on - there's little if any excess,
and the most it'll need is a bit of smoothing off and blending in.
 And
here's the completed job. And
here's the completed job.
As per my usual practice, I like to flip the ring so that the repaired
section is at the rear. Although silver solder is pretty tough stuff,
it's not usually as tough as plain brass. You could argue that I
might just as well simply flip the ring around without filling in
the groove - but if you've gone to all the trouble of taking the
ring off, it's not much extra work to restore it before refitting.
And on a horn like this, it's worth the effort.
Note the graduation in colour at the bottom tip
of the patch, just before it hits the reflection of the studio light
- there's a slightly lighter coat of lacquer beneath the top coat.
This horn's clearly had a relacquer (the engraving on the bell is
quite faded in places, which suggests it's been polished out), but
it looks like it was a two-coat process. A lower 'colour coat' and
a gloss top coat. I doubt anyone would simply apply fresh lacquer
over an existing finish, as it would look bloody awful.
I don't think I did too badly with the flammable
lacquer. I could have got away with a slightly smaller bare patch,
but it would have meant leaving an area of rather discoloured lacquer...which
would have flaked off fairly quickly anyway. Better to go for a
slightly wider but neater patch that won't grow of its own accord.
I'll knock some points off because the Bb pillar took a bit of a
hit from the heat and the lacquer flaked even though I kept a direct
flame away from it. But that's the nature of this kind of job -
it's part technique, part luck.
26/04/2017:
Finishing up the 'Underhaul' on the old Borgani soprano, and one
of the very last jobs was to sort out the manky thumb rest.
It's clearly seen better days, and in an effort to keep it all together
someone's slapped what appears to be a load of tar over it...and
when this hasn't worked they've topped it off with a dollop of old
toffee. As a thumb rest it looks bloody awful - but as a small cake
it looks exactly like the sort of thing I'd buy. But even I can't
fix this mess - so it's out with the old and in with the new. Unfortunately
such parts aren't exactly available off the shelf - so it's a job
for the lathe and a lump of Delrin.
 Easy-peasy
- you just need a rod of Delrin turned to the diameter of the original
rest with a hole drilled in it to sit over the body stub. But I
figured that if I was going to go to all the trouble of making a
new rest I might as well tweak the design a little. The original
rest is a bit poxy, being about the same diameter as a standard
key pearl, and wouldn't have been very supportive or comfortable
on a long gig. So I decided to up the diameter a little. Easy-peasy
- you just need a rod of Delrin turned to the diameter of the original
rest with a hole drilled in it to sit over the body stub. But I
figured that if I was going to go to all the trouble of making a
new rest I might as well tweak the design a little. The original
rest is a bit poxy, being about the same diameter as a standard
key pearl, and wouldn't have been very supportive or comfortable
on a long gig. So I decided to up the diameter a little.
This makes things a little more complicated because the distance
between the stub and the octave key touchpiece limits the maximum
diameter - so if you want to make the thumb rest any larger you're
going to have to offset the stub hole. Put simply this means more
'meat' at the rear of the rest than at the front.
As any DIYer knows, it's a complete doddle to
drill an off-centre hole...you can do it with your eyes closed (which
is probably why so many holes end up off-centre) - but when you
want to do it all 'officially', like, it's a task for the four-jaw
chuck.
The chuck on a typical drill is a three-jaw self-centering job.
As the name suggests, it has three jaws...and when you put a drill
in the chuck the three jaws close equally so that the drill is automatically
centred. A four jaw chuck has an extra jaw, and they all move independently
of each other - and this means you have to manually adjust each
jaw in turn in order to centre something. It's a lot more hassle
but tends to be rather more accurate than the average three-jaw
chuck, and it allows you to hold parts that wouldn't fit in the
three-jaw chuck (such as square bars). It also means you can choose
to set something off the centre. AKA wonky.
 Here's
the thumb rest stub hole being turned out. The Delrin bar was set
to turn on centre and then turned to the required diameter. The
chuck was then adjusted to shift the centre of the piece slightly
over before cutting the stub hole. As you can see, it looks a bit
cockeyed - the wall of the rest near the toolpiece is thinner than
the wall on the other side. Here's
the thumb rest stub hole being turned out. The Delrin bar was set
to turn on centre and then turned to the required diameter. The
chuck was then adjusted to shift the centre of the piece slightly
over before cutting the stub hole. As you can see, it looks a bit
cockeyed - the wall of the rest near the toolpiece is thinner than
the wall on the other side.
Having turned out the hole the only thing left to do is to cut the
piece to the correct height and we're good to go.
Well, not quite - because it won't look very nice...so the next
job is to turn a taper from the base of the rest to its top.
Good to go now?
No, not quite - because the base of the new rest is dead flat...and
if you look at the shot above you can see that the bottom of the
rest needs to follow the shape of the horn's body tube.
 I
say 'needs to' because it doesn't really need to (yeah, I know)
but it would look a bit odd if it didn't - so the last part of the
job is to file away the base until it sits flush with the body.
Once that's done, and everything lines up nicely, it can be glued
in place. I
say 'needs to' because it doesn't really need to (yeah, I know)
but it would look a bit odd if it didn't - so the last part of the
job is to file away the base until it sits flush with the body.
Once that's done, and everything lines up nicely, it can be glued
in place.
It's a surprising amount of work for what looks
like a chuckaway part but I think you'll agree it looks the business.
It's nicely proportioned and the slight taper has a sympathetic
resonance with the taper of the body tube. And yes, that's bullshit...but
what's the betting it'll turn up in some manufacturer's blurb down
the line?
Was it worth the effort?
I think so. It seldom takes much longer to add these little touches
over making a basic but wholly functional part, and it brings an
extra sense of satisfaction with the job. I also quite like the
fact that no-one (at least no-one who hasn't read this blog) will
know that there's an offset hole underneath the rest. It's the sort
of thing that may, one day, cause another repairer to raise an appreciative
eyebrow in a sort of "Oooh, look what he's done there"
kinda way.
As opposed to an "Oooh, look what he's done there!"...which
is an entirely different reaction.
And as my forthcoming review of this Borgani will
show...it was definitely worth spending a few bob on it to get it
going again.
20/04/17:
As many regular readers will know, I've always tried to take a balanced
approach the issue of cheap horns. I mean - what else can you do?
I often see rants about these things - and for sure, I'm not averse
to pointing out some spectacularly bad examples in The
Black Museum - but the hard fact is that there's a ready market
for instruments on a very tight budget. T'was ever thus, t'will
ever be.
The most common argument against them is that they're likely to
be so crappy they'll put people off playing, but I think the more
powerful counter-argument is that instruments that are genuinely
affordable has resulted in a very much larger user base. Anyway,
the things are here - so you either deal with them or you don't.
And if you don't, there are others who do.
 But
another common argument against them is that they won't last - they'll
fall apart in no time at all. The first part of the argument has
some merit, because (let's face it) spending £300 on a brand
new horn is always going to mean some compromises have been made.
And with such a low purchase price you're going to run into the
economics wall that much sooner than you would had your horn cost
£600, or £1000. No point in spending a couple of hundred
quid to fix up a horn that can be bought brand new for not much
more. But then that's not how these things are supposed to work.
You buy 'em, you try 'em, and if you make any progress you ditch
'em and go buy something better. But
another common argument against them is that they won't last - they'll
fall apart in no time at all. The first part of the argument has
some merit, because (let's face it) spending £300 on a brand
new horn is always going to mean some compromises have been made.
And with such a low purchase price you're going to run into the
economics wall that much sooner than you would had your horn cost
£600, or £1000. No point in spending a couple of hundred
quid to fix up a horn that can be bought brand new for not much
more. But then that's not how these things are supposed to work.
You buy 'em, you try 'em, and if you make any progress you ditch
'em and go buy something better.
As for the second part - I've often wondered about
that. Horns don't routinely fall apart. In fact they don't really
fall apart at all. Things sometimes drop off, but that's been true
of cheap horns ever since Weltklang
dominated the student market back in the '70s...and people are still
quite happy to recommend these mediocre old bangers as viable starter
horns. It's unfortunate, but it's seldom a very big deal. It might
surprise you to learn that the worst-built horns I've ever worked
on were those made by Adolphe Sax himself - and yet many of them
are still plodding along 150 years later.
So I was quite keen to have a look at an Ultra
Cheap horn that a client brought in the other day, because it's
about ten years old. In Ultra-Cheap horn terms that makes it practically
vintage. And it's been no closet queen either - it's had to pay
its dues down the decade.
Would it be a pile of bits? Will it have any lacquer left on it?
Will the pads have evolved into a strange new life-form??
Well, no - in fact it was just like any other horn...a few pads
had gone west, some of the corks had got tired and ten years of
use had left some wear and tear behind. But it still (mostly) worked.
It just needed a general service to put it back in good working
order, and maybe it'll see another ten years worth of use. Assuming
the pads last (and I don't see why they wouldn't) there really isn't
much else that's going to stop it in its tracks - and just like
any other horn I'm sure it'll have its issues...but I really don't
think it's going to magically dissolve into a pool of metallic goo
any time soon.
But what a bargain, eh? Ten years of use for a
little over £200. I think that deserves a medal - though I
think the owner deserves one too...I noticed they'd been using the
stock mouthpiece all this time. I suggested that a new (decent)
one would be an improvement - and despite the horn having done so
well, I also suggested that it might just be time to think about
a better horn.
After all, if you've been playing for a decade I think it's safe
to say it's not likely to be just a fad.
12/04/2017:
D'you like gadgets? I do. I'm a sucker for a good gadget - in fact
even a cheap one can bring a smile to my face...at least until it
breaks (the gadget, not my face). And one of the best gadgets I've
got my greasy paws on in the last few years is one of those very
snazzy tablet computers.
Like all the best gadgets it should have more than one purpose -
and while having a relatively powerful touch-screen computer that's
thinner than a magazine is a whole lot of fun, my main interest
in it was to see whether it'd form the basis of a digital manuscript
engine. I've been using computers to write scores on for years now,
and while I wouldn't say it's faster (for me) than handwriting them,
it does tend to mean that I (and everyone else) can at least read
them. It also means it's much less of a hassle when changes have
to be made to the score.
However, such setups have never been that portable - or at least
terribly functional 'in the field'. Even the slimmest laptop is
a bit of a handful, and seldom sits well on a music stand...and
you can pretty much forget about doing any editing on the fly.
Which is where the tablet comes in. The model I have, a Lenovo Miix,
comes with a Wacom pen - and with the right software it becomes
almost as easy to use as a sheet of paper. It's light, compact and
has a good battery life - and a screen that's just about large enough
to show an A4 sheet at full size. Perfect.
And it was too, up until the point where it suddenly
stopped working. I thought (hoped) it might be a Windows hiccup
- but a few days of poking the power button didn't help, and I resigned
myself to having to send it back to Lenovo for a warranty repair.
Bit of a nuisance, but these things happen. Having seen what couriers
can do to a horn I decided not to take any chances with the tablet
and set about double-boxing it - and just for good measure I thought
I'd take some shots of the blank screen. It's always good to have
some evidence that the box of shattered bits that arrives at the
destination was in good condition when it was shipped.
Taking a photo of a highly reflective piece of black glass isn't
easy...at least not if you want to be able to show that there are
no cracks in it. I tried a few 'backgrounds', but eventually decided
that the reflection of a sunlit brick wall would be the ideal way
to highlight the integrity of the screen - which is when I traipsed
outside, with the Miix in one hand and my big 'ol Nikon in the other.
And it was at this point that the tablet slipped out of my hand.
 Well,
sort of...y'see, I still had hold of half of it. I comes with a
detachable keyboard, which is held in place by a bunch of strong
magnets. These are easily strong enough to keep the keyboard secured
during normal use - but not so strong that they can safely support
the weight of the screen. I'd fumbled my grip, managed to hang onto
the keyboard...but the business end hit the garden path. The one
bloody part of the garden that's stone. Typical. Well,
sort of...y'see, I still had hold of half of it. I comes with a
detachable keyboard, which is held in place by a bunch of strong
magnets. These are easily strong enough to keep the keyboard secured
during normal use - but not so strong that they can safely support
the weight of the screen. I'd fumbled my grip, managed to hang onto
the keyboard...but the business end hit the garden path. The one
bloody part of the garden that's stone. Typical.
It landed face down...so not only did I have that awful slow-mo
'Noooooooooooooooooooo' moment, I also had to endure the cringeworthy
process of lifting the screen up and turning it over. I had my buttocks
clenched as tightly as I could, but to no avail...the screen was
a goner. And so was my warranty.
Given that I'd reported the fault a few days before, I supposed
there might still be some grounds for sending it back - but it essentially
boils down to my word against theirs as to when the tablet was dropped...and
I'm pretty sure that's an argument I'm unlikely to win.
So - plan B. If I can at least find and fix the
fault I can still use the thing with an external screen...and with
its HDMI output it'd make a decent media centre. But first I'd need
to fix that fault.
I'd had some encouragement inasmuch as the damn thing started up
after I dropped it, which suggests the issue is a dry joint somewhere.
And now that the warranty's toast I guessed I had nothing to lose
by taking it apart. Which I did.
Couldn't find a dry solder joint though, even after an hour of peering
at the motherboard through a loupe. And then I remembered that I'd
picked up a shonky old microscope from the tip a couple of years
ago that had a USB camera attachment. This could, potentially, make
an ideal tool for examining the board in detail. However, there
was no way the board would fit under the lens - so I'd have to rig
something up.
It's a very simple affair - there's a lens at the top of the viewer
(which you can replace with the camera), a prism to bend the light
and then the magnification lens. I wouldn't need the prism - so
all I really wanted was a tube with a lens in one end at the camera
at the other. A quick spell on the lathe with a lump of Delrin sorted
out a nifty adapter, and with the aid of a table vice I was in business.
Sort of. It kinda worked...in fact it kinda worked
very well, and would have done had there not been hundreds of components
to examine. If you've ever used a microscope you'll know that the
depth of field (the amount of stuff actually in focus) is minute
- fractions of a fraction of a millimetre. This is why microscopes
have an adjustable table...so you can tweak the focus as you go.
All I had was a cheaparse table vice, which made the whole operation
painfully slow.
But between the microscope lash-up and more peering through a loupe
I think I'm pretty confident that the issue isn't a dry solder joint,
and is more likely to be a broken trace in one of the (many) layers
inside the board. Which means it's a write-off...or a Miix fix nix.
I'm not going to chuck it away though - at some point these things
will start turning up on ebay at sensible prices, and I might be
able to snag a replacement board on the cheap. And then I can think
about that broken screen. In the meantime it can sit on the pile
with all the other laptops I keep meaning to sort out...
10/04/2017:
Terrible news! One of my 'regular' clients (and he'll get that reference,
even if no-one else will) has nipped off to sunnier climes for an
extended stay...and has taken his baritone sax with him (as you
do).We discussed the risks and problems when he popped in to get
the horn serviced prior to the trip. Shipping a horn in the hold
of a plane is always a risky business, but the risk increases proportionally
to the size of the instrument. One thing's for sure, you need a
pretty solid case (which he has) and a fair amount of good luck.
As it turns out his luck wasn't quite firing on all four, and just
after his arrival I got an email requesting urgent help. I dropped
everything, called the travel agent and booked a flight...then set
about packing a selection of tools and my swimming trunks. And then
I noticed the email said "Can you just give me some advice?".
Damn.
Well, it seems the horn's had a bit of a knock
and the top F# key sticks open occasionally. Could be a minor problem,
could be a major one. If it's minor it probably means the cup key
(which sits right on the top bow) copped a whack and the key barrel's
been bent a little. Not enough to stop it working, but just enough
to make it catch every now and again. Upping the spring tension
would probably overcome the friction in the short term. If it's
major it might mean the entire top bow's been knocked out of line...but
then that usually means that the horn stops working altogether.
 But
I digress - because that's not the terrible news. Oh no. But
I digress - because that's not the terrible news. Oh no.
Y'see it's well known that I appreciate the finer things in life...such
as single malt whisky and cakes. Every once in a while a client
will feel that I've done them a particularly good service and will
surprise me with a nice bottle or a sticky bun. And when it comes
to cakes I have a particular passion for custard slices (or vanilla
slices, if you must). And I'm not the only one. It seems that the
search for the perfect custard slice is a popular pastime around
the world - and there's even an entire
blog devoted to it.
And I understand it completely. The custard slice, while quite simple
on the face of it, is fiendishly difficult to get right. It's also
complicated by virtue of everyone having their own idea as to what
constitutes the perfect specimen. One layer of custard...or two?
Thick icing, or thin? White or pink? Solid, gelatinous custard...or
soft and creamy? Stiff pastry..or pliable and crumbly?
My personal preference is for crisp, crumbly pastry with a thin
layer of white icing and one or two layers of medium firm custard.
Not too sweet. At least that's my preference today. It may change
tomorrow.
I've had some truly great slices (there is, or
was, a small cafe on one of the Welsh railways that currently holds
a gold medal) and some truly awful ones...but the ones the baritone
client would always bring with him were among the very best, made
by an independent baker down on the south coast.
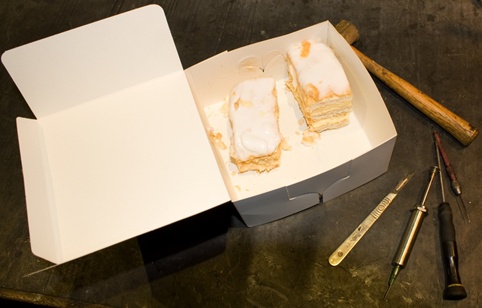
These are utterly, utterly gorgeous. The perfect balance of pastry
to custard, with just enough 'ooze factor' to make them fun but
not too messy to eat...and not so sweet that it drowns the subtlety
of the custard and the freshness of the pastry. And the 'rustic'
presentation is a tour de force. No artisan slices are these - they're
hewn from the slab and need no fripperies to detract from their
honest perfection. A ten out of ten, every time. Just take a moment
out of your busy day to gaze upon their beauty. Feel free to drool,
I know I am.
So it was with incredible sadness that I reached
the end of his email and saw the dreadful P.S. The lady who makes
these beauties has retired. They are no more. The sun has set on
a corner of the custard slice empire, and it may never rise again.
I'm heartbroken. And he's pretty worried too...because he knows
that turning up with a bag that says 'Greggs' on it ain't gonna
cut any mustard come bari servicing time.
Oh, and the bari? Upping the spring tension solved
the immediate problem. Sorted (for now).
06/04/2017:
Had an email from a chap a couple of weeks ago who wanted some advice
on whether to get his Yamaha 275 tenor fixed...or simply throw it
away. Sounds like simple enough question to answer - but here's
the rub...he'd already had it fixed recently. Three times.
The low notes were giving him gyp, so he took it along to a repairer
and had £80's worth of work done to it...but still it warbled
down the bottom end. The standard advice when a repair fails to
fix the problem is to take the horn back. We all make mistakes,
we all have bad days - but anyone who cares about their work will
always welcome the opportunity to correct such errors. The chap
decided not to go back, which is kind of understandable - it's that
"If they can't get it right first time, are they going to do
any better the second time?" thing. Maybe? Hopefully?
Anyway, another repairer was entrusted with the work - and another
£80 shelled out. And still the low notes were gyppy. This
time he went back - and after some remedial work failed to cure
the problem he was handed a couple of wine corks to pop down the
bell. This ol' trick upsets the standing wave in the bore of the
horn and can tame a slight warble...but it's still a trick, and
not a fix.
£160 down, and still no reliable low notes.
So he tried again.
This time it cost an eye-watering £200 - and guess what? Yep,
still warbled. Which is why the poor bloke emailed me to ask whether
he should give up any hope of ever getting the damn thing working.
 Now,
I won't say I took pity on him - but I'll admit I was incredibly
keen to see what three repairers and £360 had left him with.
I mean, you would, wouldn't you? Now,
I won't say I took pity on him - but I'll admit I was incredibly
keen to see what three repairers and £360 had left him with.
I mean, you would, wouldn't you?
So the horn was lugged all the way down to Hampshire and hoisted
onto the bench - and the first thing I noticed were lots of little
marker pen marks on a number of the key cups. He'd been so frustrated
with the outcome that he'd built
a leaklight (using my article on building the same) and gone
right down the horn, marking the leaks. He'd got most of them.
I knew there was a problem before the horn even
hit the workbench. As soon as I lift a horn out of its case I run
my fingers down the action and listen/feel for the response - it
should be percussive, a distinct pop-pop-pop as each pad hits home.
It got down to G before the mushiness set in. The client and I set
about diagnosing the problems and drew up a list of all the issues:
Top Eb slight (leak), Aux. B slight, B middling, BisBb middling,
A middling overthick and undersized, G# slight overthick, Aux. F
major, F major overthick, E middling, low D slight, low Eb major,
low C major, low C# slight, low B major and low Bb major. And the
new crook cork was too thin. I also felt the palm key springs were
too light, as was the Aux. F spring. That's quite a hefty list for
a horn that's seen £360's worth of recent repairs.
The last repairer had put the pads he'd removed
in a bag, and I noticed that seven of them were original and three
were previous replacements. I had a bit of a chuckle at the A key
pad. It had previously been replaced with a Pisoni Pro pad (a good
pad) - but this had been removed and replaced with a Martin Chanu
pad. It's a good pad - but it's way too thick for a Yamaha, and
was rather undersized. And it leaked.
So there were clear problems even before the hapless player got
anywhere near the low notes. And then it got worse. Now, whenever
I see 'a quartet of bell leaks' my first instinct is to suspect
a knock to the bell. Such a knock will typically throw out the low
Bb, B, C and Eb pads. But none of the leaks fitted the pattern.
The pads were simply the original ones that probably hadn't been
thoroughly seated in the first place and had thrown leaks as they
shrank slightly over time (and it wasn't a very old horn).
 Take
a look at the low C. This is a classic Yamaha low C leak. They haven't
quite got the length of the low C cup arm quite right (too short)
- or the position/angle of the lower pillar - which means the low
C key pad is always trying to seat right on the area of the pad
where it begins to roll off down the sides. It's doable, but it's
not ideal...and it takes a lot (and I mean a lot) of prodding and
poking to achieve a reliable and stable seal. This level of work
is not something you typically get with a factory pad job. Take
a look at the low C. This is a classic Yamaha low C leak. They haven't
quite got the length of the low C cup arm quite right (too short)
- or the position/angle of the lower pillar - which means the low
C key pad is always trying to seat right on the area of the pad
where it begins to roll off down the sides. It's doable, but it's
not ideal...and it takes a lot (and I mean a lot) of prodding and
poking to achieve a reliable and stable seal. This level of work
is not something you typically get with a factory pad job.
The big question is how the hell did this one (and it's the original
factory-fitted pad) get past the last repairer - and perhaps the
previous two? Looking at the leak I can see that it's not even across
its width...which it would be were it a bent key or body tube. There's
a noticeable 'hump' in the centre. That'll be down to shrinkage.
I also don't like the way the leak drops out rapidly at the sides
of the key cup - it's a dead ringer for a slightly warped tonehole
(which it was).
We agreed on a price - on two conditions; that
I would guarantee - so help me God, hand on heart and a copy of
the Haynes Saxophone Manual - that I would return the horn in working
order...low notes and all - and that the client would divulge the
names of the previous three repairers. Which he did. I raised an
eyebrow, and then raised another - and not having anything else
to raise I settled for a quiet "Well ^&%$ me!". And
were I to tell you who they were, I think that'd be your reaction
too. Suffice to say they should all have done better.
I'm all for giving the benefit of the doubt, and there may be many
reasons why a successful repair wasn't forthcoming - but when you
see factory-fitted pads with leaks it does rather suggest that the
problems have been there for quite some time.
I set about sorting the thing out. I removed the
low Bb, B, top B, Eb and C pads - all original. Very surprised at
the low Eb being original...it's a pad you almost replace at every
service as a matter of course because it lives a very hard life.
I also whipped out the undersized A pad and the overthick G#. I
figured I could work around the slightly fat low F pad.
The G# key barrel was bent. I suspected a naughty tap with a mallet
to try to cure the leak at the rear.
I won't say the job was easy - in fact I lost out big time on this
one. The low C proved to be its usual difficult self, and despite
spending more than an hour trying to get a new pad to seat I eventually
had to call it a day and fit another one. It happens. You can really
only move a pad around so many times before it gets messy, and despite
losing the cost of a pad (around a fiver) it's cheaper to whip it
out and start again with a fresh one.
And then I cocked up the A key pad (entirely my fault) and had to
start over (meh).
 And
it's always tricky sorting out someone else's work. You never really
know what they've done, what corners they've cut, what their approach
was. If you're trying to reseat a pad, do you know what's behind
it...has the key been bent to fit? And
it's always tricky sorting out someone else's work. You never really
know what they've done, what corners they've cut, what their approach
was. If you're trying to reseat a pad, do you know what's behind
it...has the key been bent to fit?
I wasn't at all surprised, though, to see that the Chanu pads had
been fitted with shims (bottom left in photo). This is precisely
what happens when you fit pads that are too thick or thin - you
end up having to take up a gap of a millimetre or more at the front
or back of the pad. Some repairers refuse to use shims, but like
most techniques they have a time and a place - but if you end up
using them on a modern horn like a Yamaha then there's a problem.
Note the low C key pad (bottom right) - and note
how close the tonehole impression is to the edge of the pad (and
how far away it is at the opposite end).
They don't look too shabby though, do they? The Eb and B pads (centre)
are visibly grubby, but the rest look quite clean. That's pretty
typical of shrinkage...the pad looks fine, but on proper inspection
it fails the test.
I got the Yamaha back together and gave it a blow,
and after a couple of regulation tweaks the low notes popped right
out of the horn.
There's a very distinct feel to the way these basic Yamahas punt
out the low notes - it's quite a light horn with a strident tone,
and when you hit the bell notes you should feel the horn almost
trying to vibrate itself out of your hands. You should also hear
the note ring; it's almost as if it carries on for a fraction of
a second after you stop blowing. It's immensely satisfying - which,
given the amount of time I spent on this job, is all I got to take
home with me. And sometimes...just sometimes...that's enough.
When the client called to collect the horn I turned off all the
workshop lights and handed him my leaklight. "Knock yerself
out" I said. Given the poor service he'd received in the past
I wanted to make sure he could see, hear and feel the difference.
He spent a few minutes looking for leaks, then I blew the horn and
then he blew it. I don't know who was more relieved, but he hit
the low notes bang on. I made him a promise when I took the job
on - that I'd return the horn in 100% working order. No ifs, no
buts - it'd work, and it'd work properly. And it did.
04/04/2017:
It's school holiday time again, and while the actual holiday is
only a fortnight long I find it often means an influx of work in
both the week preceding it and the one following it. This is because
there's a mix of state and private schools around here and their
term times often differ - but it's also down to conscientious parents
seeking to get ahead of the rush (very wise) and (shall we say)
rather busy ones who choose to come in after the break. And then
there are those parents whose children forget to inform them until
the start of the new term that Smythe minor stamped on their flute
during band practice a couple of weeks ago.
It's also time for the 'Uni crowd' to pitch up...or
rather for their parents to be left with the job of getting their
horns sorted - while they themselves take the opportunity to nip
abroad for a spot of potclimbing or caveholing, or whatever it is
that the bright young things get up to these days. This often puts
an interesting slant on the relationship between responsibility
and cost, because uni students are generally old enough not to have
to answer to their parents (quite so much, at least) and yet are
still young enough to claim 'income support'. Which simply means
they go out and have lots of a fun while their parents foot the
bill.
They're also savvy enough to write little notes about what needs
fixing, which sometimes leads to some interesting conversations
with the parent who's been assigned the duty of 'Chief Courier'.
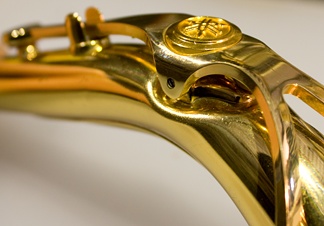 Here's
a typical example. It's the crook from a Yamaha 62 alto. The note
accompanying the horn referred to a problem with the Bis Bb key,
which was highlighted by the placement of a large elastic band.
The spring had gone. In fact it hadn't gone, it had simply come
off its cradle. This was a bit of a puzzle. Sure - springs can sometimes
be dislodged from their cradles if, say, the horn has copped a whack.
If a spring is poorly aligned (i.e. it tends to point downwards
when at rest, unhitched from the cradle), a knock can provide enough
energy to 'bounce' the key and thus in turn flick the spring off.
But this spring was set pointing upwards...which means it'll never
fly off on its own accord. I was suspicious - and then I noticed
that the Bis key's lower point screw was half out of the pillar.
Had someone been fiddling with the key? Seems a likely bet - Yamaha
point screws have a nylon locking collar and don't usually work
loose all by themselves. Here's
a typical example. It's the crook from a Yamaha 62 alto. The note
accompanying the horn referred to a problem with the Bis Bb key,
which was highlighted by the placement of a large elastic band.
The spring had gone. In fact it hadn't gone, it had simply come
off its cradle. This was a bit of a puzzle. Sure - springs can sometimes
be dislodged from their cradles if, say, the horn has copped a whack.
If a spring is poorly aligned (i.e. it tends to point downwards
when at rest, unhitched from the cradle), a knock can provide enough
energy to 'bounce' the key and thus in turn flick the spring off.
But this spring was set pointing upwards...which means it'll never
fly off on its own accord. I was suspicious - and then I noticed
that the Bis key's lower point screw was half out of the pillar.
Had someone been fiddling with the key? Seems a likely bet - Yamaha
point screws have a nylon locking collar and don't usually work
loose all by themselves.
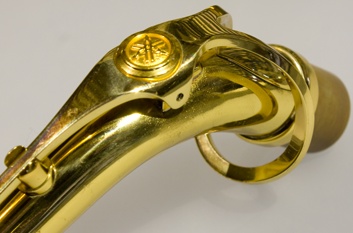
Anyway, an easy-peasy fix. And then I looked at the crook.
Oh my. Was this the smoking gun? Well, it's certainly
had a bit of a whack, and such an impact could well explain why
the Bis key was out of sorts...but a couple of things didn't add
up.
For a start there was no other damage to the horn. The sort of knock
that can put a dent like this in a crook indicates a hard impact...and
if you're lucky that's going to mean your main stacks will be shunted
out of regulation. If you're less lucky you'll have another dent
(or two) where the horn came to rest - and if you're really unlucky
you'll have a bent body too.
But apart from the Bis key spring there really wasn't much else
wrong with the horn, aside from a year's worth of fair wear and
tear.
 The
real telltale, however, was the crook key pad. There were two impressions
in it; the original one in the centre of the pad and a secondary
one at the rear - the latter cause by the dent shunting the key
cup forward. And it had been there for quite some time. Clearly
the horn had been playable up until recently (when the Bis spring
failed) - but there was no mention of a mangled crook on the player's
list of things that need fixing. But how d'you get such a whack
in the first place? Drop the crook? I think it's unlikely - the
crook isn't very heavy, so it doesn't have a particularly large
'terminal velocity'. Sure, you'd dent it if you dropped it, but
I don't think you'd stove the tube in. The
real telltale, however, was the crook key pad. There were two impressions
in it; the original one in the centre of the pad and a secondary
one at the rear - the latter cause by the dent shunting the key
cup forward. And it had been there for quite some time. Clearly
the horn had been playable up until recently (when the Bis spring
failed) - but there was no mention of a mangled crook on the player's
list of things that need fixing. But how d'you get such a whack
in the first place? Drop the crook? I think it's unlikely - the
crook isn't very heavy, so it doesn't have a particularly large
'terminal velocity'. Sure, you'd dent it if you dropped it, but
I don't think you'd stove the tube in.
There's a slight pause here, because it suddenly
occurred to me that I'd never actually tested that statement...so
I dug out a couple of old crooks and spent a very entertaining few
minutes dropping them from various heights. And no - even a drop
from ceiling height wouldn't cause anywhere near that level of damage.
Which means either something hit the crook (that's possible, I once
had a speaker fall on mine at gig) or there was more mass behind
the crook when it hit the deck. I'm inclined to go with the latter.
Maybe the player was tipping out the condensation at the end of
the gig and the thing slipped out of the hands. It'd hit the floor
crook end first, but probably saved from tumbling over.
 There's
another pause here while I dug out those poor old crooks again and
a scrap alto...and yeah, if dropped from chest height you'd put
a dent like this into a crook. It's a hell of an impact though,
and I'd really expect to see the regulation shot to buggery afterwards
as well as the bell key pillars shunted out of line. There's
another pause here while I dug out those poor old crooks again and
a scrap alto...and yeah, if dropped from chest height you'd put
a dent like this into a crook. It's a hell of an impact though,
and I'd really expect to see the regulation shot to buggery afterwards
as well as the bell key pillars shunted out of line.
Anyway. I sorted the damage out. It didn't go
too badly...I was expecting worse. Big dents like this often have
creases around the edges. A dent is a gentle thing, as curvaceous
as any of England's rolling hills. Removing them is also a gentle
process, one of easing the metal back where it belongs. But a crease
is an entirely different kettle of fish - it's a sharp bend...and
when you bend a piece of brass like that it hardens on the apex.
Being gentle with a crease just isn't going to work, but you always
have the added complication of the adjacent dent. I won't go into
detail as to the whole approach of tackling such things - suffice
to say that 'good cop - bad cop' fits the bill nicely.
I'm pretty pleased with the results. There's always a degree of
luck involved...you just never know how the metal will behave, so
I always expect the worst so that I can be surprised when it all
goes to plan. The crease and the dent are mostly gone. When you
put a dent in metal you're effectively stretching it, and when you
take the dent out you're left with slightly more surface area than
you started with. Unless you're prepared to file it (you can also
shrink it slightly by bringing it up to red hot) you'll nearly always
have stretch marks and ripples. But the lacquer's held up very well,
even through the soldering process.
The only thing left to do...is to find out how that dent got there
in the first place.
|