Custom key risers
 I'm
always on the look-out for new products that might prove useful to woodwind
players, and this often involves looking a little further afield than
retail catalogues of musical instrument accessories. I'm
always on the look-out for new products that might prove useful to woodwind
players, and this often involves looking a little further afield than
retail catalogues of musical instrument accessories.
A good example would be the use of cigarette lighter fluid as a pad
degreasant, or vinegar for cleaning built-up crud from mouthpieces and
removing corrosion spots from brass.
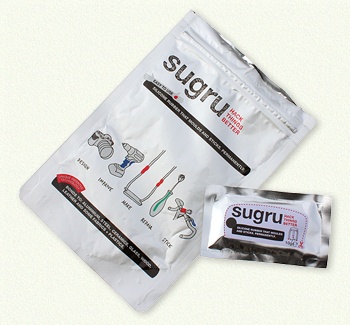
So I was rather excited when I chanced across a new product called Sugru
that's being marketed as a ready-made silicone rubber putty.
Silicone putty itself isn't a new idea, modellers have been using it
for years to make casts and moulds, but it's generally only available
as a two-part pourable mix. It's too thin to be of much use for hand-shaping,
and works out quite expensive because of the size of the pots it's sold
in. It also doesn't quite have the density of Sugru, which is an important
requirement in this case.
The product has thousands of uses - you can use it to fix things, adapt
or improve things, make, stick and generally have a good time bunging
on almost anything - and it occurred to me that it might be an answer
to a particular problems that's been the bane of many saxophone players
for years now...the palm key riser.
Palm key risers are used to increase the height of the palm keys - typically
the top D, Eb and F keys, but can also be found on the side trill keys
too. Many players find these keys have their touchpieces set too low for
speed and comfort, and the addition of a riser can help matters considerably.
 The
riser itself is typically a rubber 'sock' that slips over the key's touchpiece,
and hangs on by friction alone. The problem is that friction isn't always
enough, and many players resort to gluing the risers on. This leads to
worries about whether the glue will damage the finish, or whether it will
be strong enough. The
riser itself is typically a rubber 'sock' that slips over the key's touchpiece,
and hangs on by friction alone. The problem is that friction isn't always
enough, and many players resort to gluing the risers on. This leads to
worries about whether the glue will damage the finish, or whether it will
be strong enough.
It also tends to be a one-size-fits-all solution. If you need a larger
riser - tough. Likewise if you only need a small riser.
In an effort to overcome this problem some players have resorted to gluing
cork and other materials to the touchpieces - or have opted for quite
expensive (but good) solutions such as the Oleg
range of key enhancers.
Sugru overcomes all these issues by virtue of providing almost limitless
customisability. If you want a taller riser - no problem. Shorter? Easy.
Need to extend the touchpiece a tad? Simple.
But what about the problem of damage to the finish?
Well, one thing Sugru doesn't do very well is bond to brass (or silver,
or any non-ferrous metal) or lacquered surfaces. This might well be considered
a drawback in other applications but it suits our needs perfectly, as
we'll see shortly.
 In
this example I'm going to make a custom riser for a top D key. In
this example I'm going to make a custom riser for a top D key.
The first step is to ensure that the key touchpiece is clean - a wipe
over with a cloth is sufficient, but it wouldn't hurt to use a little
cigarette lighter fluid to clean off any oil or grease residues. You must
also ensure your hands are clean too - probably to prevent contaminating
the compound with dirt or oil, which might diminish its adhesive properties.
Not really an issue in this case - I didn't wash my hands prior to using
it and I didn't notice any adverse effects.
The manufacturers warn that some people might be allergic to the product
and find that it irritates their skin, in which case wearing a pair of
latex or vinyl gloves would be a sensible option. I didn't bother with
gloves and didn't find the putty too messy, though if it gets under your
nails it can be quite difficult to remove without the aid of a stiff nailbrush.
I used a 10g packet, which contains sufficient compound
to make two generously sized risers. If you don't need such large risers
you might find a 10g packet will be enough to modify all three palm keys.
 Now,
I mentioned that Sugru doesn't stick well to brass, lacquered or otherwise,
so although it would be convenient to simply place a blob of it on top
of the key and push it into shape, it won't stick well enough to stand
up to heavy use. I tried it and found that with enough sideways pressure
my custom riser simply peeled off. I also tried a small 'lip', just curling
under the touchpiece - but this wasn't enough either. So, what you have
to do is fully enclose the touchpiece. Now,
I mentioned that Sugru doesn't stick well to brass, lacquered or otherwise,
so although it would be convenient to simply place a blob of it on top
of the key and push it into shape, it won't stick well enough to stand
up to heavy use. I tried it and found that with enough sideways pressure
my custom riser simply peeled off. I also tried a small 'lip', just curling
under the touchpiece - but this wasn't enough either. So, what you have
to do is fully enclose the touchpiece.
Start by placing a blob of Sugru on the touchpiece and working it roughly
into shape. Push it around over the edge of the key and work it underneath
the touchpiece. You don't need a lot underneath - I found a layer a couple
of millimetres thick is plenty .
Once this is done you can concentrate on shaping the riser.
 The
choice of profile is completely up to you, and it's not a decision you
have to make in a hurry as the compound takes a long time to set. You've
got time to hold the sax to see how the riser fits under your fingers,
modify the height, the width, the profile and the length - you've even
got time to have a cup of tea and a sticky bun... The
choice of profile is completely up to you, and it's not a decision you
have to make in a hurry as the compound takes a long time to set. You've
got time to hold the sax to see how the riser fits under your fingers,
modify the height, the width, the profile and the length - you've even
got time to have a cup of tea and a sticky bun...
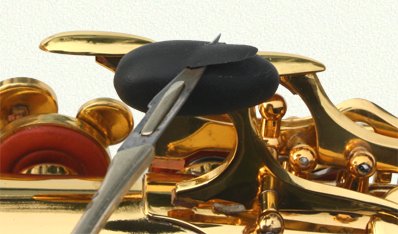
Once you're happy with the shape you can tidy it up. I found that tapping
the compound with my finger helped to smooth out any wrinkles, as did
stroking it - and you can certainly use tools to help make for a neat
job...the flat of a knife blade is excellent for tidying up the underneath
of the touchpiece.
If you're not happy with your riser you can add more Sugru or remove some
of it - or simply pull the whole lot off and start again.
You might find that it's a bit of a fiddle trying to work in quite a confined
space, in which case it might be easier to remove the palm keys. This
isn't difficult, all you have to do is remove the rod screws. In general
you would start by removing the D key, then the Eb and finally the F -
though on some horns you may have to vary this order depending on the
design of the palm keys.
Refitting is simple too, just reverse the sequence. The only 'gotcha'
is to ensure that you seat the flat spring in its channel on the
body before fitting the key between its pillars. If there isn't
a channel just make sure the spring is aligned centrally to the
key (it's often a good idea to check that the spring retaining screws
are done up snugly).
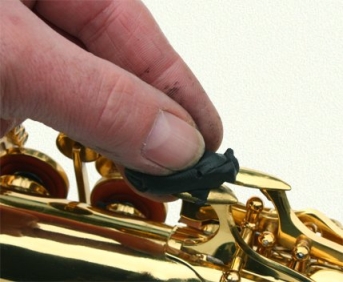
 Here
you can see how I've enclosed the touchpiece, thus ensuring the riser
won't be able to slip off sideways or backwards. Here
you can see how I've enclosed the touchpiece, thus ensuring the riser
won't be able to slip off sideways or backwards.
Once you're happy you can move on to the next key - or leave the Sugru
to set.
This is where the product's biggest (perhaps only, in our case) drawback
comes into play - it takes a long time to set.
The makers say it cures 3mm deep in 24 hours at 21 degrees C (70 deg.
F), but with an average riser being around 5mm thick I found it takes
a good 48 hours before the compound is hard enough to take any use. Even
then I noticed a slight squishiness in the 'core' of the riser - so the
longer you can leave it, the better.
Heating the Sugru speeds up the cure time, and this can be done by placing
a small desk lamp over the touchpieces.
Clearly this product isn't a quick fix, so before you use it you'll need
to be sure you'll have a spare couple of days when you won't be needing
your horn.
Once set the compound is quite tough - it has a little bit of give in
it which provides a touch of cushioning, but it's firm enough to feel
very positive. Better still, because the riser is in complete contact
with the touchpiece it feels a lot more immediate than the push-on risers.
 If
at this stage you want to modify the riser still further you have a couple
of options. To make the riser smaller you can slice the hardened compound
with a sharp blade - in fact it cuts very well. This will leave edges
though, which might prove to be uncomfortable when pressing the key down
- but with a little care and patience I found it was possible to sand
them down with some medium/fine sandpaper. If
at this stage you want to modify the riser still further you have a couple
of options. To make the riser smaller you can slice the hardened compound
with a sharp blade - in fact it cuts very well. This will leave edges
though, which might prove to be uncomfortable when pressing the key down
- but with a little care and patience I found it was possible to sand
them down with some medium/fine sandpaper.
If you want to increase the size of the riser you can simply stick more
Sugru on.
It bonds to itself reasonably well, though I found it performed considerably
better if I roughened up the surface with a bit of medium/coarse sandpaper
first. Bear in mind that thin layers will take considerably less time
to cure, so you won't have to wait a couple of days before you can use
the instrument.
 If
all else fails and you're staring at a hardened riser that isn't anything
like what you were hoping for, all you have to do is tear it off. If
all else fails and you're staring at a hardened riser that isn't anything
like what you were hoping for, all you have to do is tear it off.
It's that simple. Just grip it firmly and tear it away. It'll probably
leave a few bits behind, but these can be rubbed off easily enough with
a finger - and a couple of minutes later you'll be left with the original
touchpiece, all nice and clean.
I've tested the product on a number of surfaces likely to be found on
woodwind instruments and haven't noticed any adverse effects. There's
no tarnishing to brass or silver and it doesn't seem to do anything to
vintage or modern lacquers.
I also tested it on a number of plastic bodied instruments, as well as
ebonite (hard rubber) and the various tropical hardwoods that are commonly
used.
It grips rather better to these materials than it does brass, but it's
still by no means permanent. It holds on well enough to make it a viable
option for custom hand rests, and can be removed at a later date with
a firm tug.
The only adverse effect noted was that it left a dark stain on rosewood,
one that couldn't be removed with solvent or gentle abrasion with fine
grade wire wool. It's quite possible that it left a stain on ebony, but
as both the wood and the compound are black in colour there was no visible
sign of it. If using Sugru on ebony it would perhaps be wise to avoid
the other colours the product is available in, and unless you don't mind
it leaving a stain you should avoid using it on any lighter tropical woods.
 If
there's a 'killer application' for this product I suspect it's in the
modification of vintage palm keys with the domed type touchpiece. It offers
the prospect of being able to effectively convert them into oval touchpieces
on the cheap, without ruining the original design. If
there's a 'killer application' for this product I suspect it's in the
modification of vintage palm keys with the domed type touchpiece. It offers
the prospect of being able to effectively convert them into oval touchpieces
on the cheap, without ruining the original design.
The possible uses for Sugru on saxes don't stop at key risers.
Here you can see a vintage style thumb hook to which Sugru has been applied.
Such thumb hooks are very simply made and can be notoriously uncomfortable
- and if you want to adjust them it usually means unsoldering them and
refitting them in a new position, which doesn't do a lot for the horn's
finish.
This custom cushion was made by wrapping a blob around the hook and holding
the horn in playing position to imprint the desired position and angle
of the thumb.
The bottom of the cushion has been tucked under the hook to help secure
it, though the curvature of the hook itself will help to hold the cushion
in place.
This kind of modification can be used to great effect on clarinets, which
often have mediocre and static thumb rests - and it offers the possibility
of making thumb rest for flautists who have trouble supporting the instrument.
 Staying
with thumbs, you can use Sugru to mod the octave key thumb rest too. Many
players find the thumb rest a touch too small - especially on vintage
horns. It's a simple matter to pack the compound around the thumb rest
to increase its upper surface area. Staying
with thumbs, you can use Sugru to mod the octave key thumb rest too. Many
players find the thumb rest a touch too small - especially on vintage
horns. It's a simple matter to pack the compound around the thumb rest
to increase its upper surface area.
Players with hand problems could find the product invaluable. Many repairers
will have been asked to fit cushions and hand rests to instruments for
clients who perhaps suffer from a spot of arthritis or tendonitis. Such
modifications are usually quite simple, such as a shaped piece of cork
glued to the upper joint of a clarinet to help support the player's arched
hand.
It can be quite difficult to get these cushions exactly right, as no-one
really knows what's required better than the player. A couple of sachets
of Sugru and a few minutes' work would result in the player being able
to fashion a cushion that fits perfectly.
You can buy Sugru from almost anywhere these days (Amazon, Ebay, local
stores etc.), but if all else fails there's always the company's website
- sugru.com.
A small pack, which contains five 5g sachets, costs £7 (or just
over $11) - which isn't much more than a packet of three push-on rubber
risers. It's available in a range of colours too, so if you want to jazz
your risers up you can make them in green, red, blue or a combination
of colours. If you find you have a bit left over, why not have a go at
making a Sugru octave key pad?
Sugru's 'catchphrase' is "Hack Things Better" - and their website
runs a blog on which inventive 'Sugruers'
can post their ideas. Perhaps in time we'll see a number of instruments
featured!
Addendum: Since this article was published, Sugru have changed
the compound slightly to improve its setting time. They very kindly
sent me samples of the new batch and I repeated the tests with the
new compound and found that it cures slightly more quickly. This
upgrade to the product caused a few delays for people wanting to
get hold of the stuff, but I'm told that supplies are now readily
available.
Update: Two years after this article was posted I asked players
who'd used Sugru to mod their horns how well it was standing up to wear
and tear. The response indicated that the mods were holding up well. This
ties in nicely with the mod I made to one of my screwdrivers - fitting
a new rubber swivel cushion to the handle. This sees daily use, and is
still going strong.
'Sugru' and 'Hack Things Better'
are registered trademarks
|