

Oiling the actionWhat follows are details of how to go about the process of oiling the keywork (or the 'action') of a woodwind instrument. I have divided this guide up into three parts:1. The Basics
- an explanation of the terminology and the reasons for lubrication In order to successfully oil the action of a woodwind instrument it's necessary to know where to place the oil. The action is made up of the keys, which are held in place on the body by means of pivots supported between posts (known as 'pillars') sticking upwards from the body of the instrument. The keys themselves are made up from many components, but the part we're interested in is the 'key barrel'. This is a length of round rod or tube that sits between the pillars - it's this tube that's pivoted, and it's here where the wear takes place which leads to a sloppy action and noisy keywork. The pivots can be of two types - either a rod
or hinge screw (a straight steel rod that goes through a
hollow key barrel), or a point or pivot screw (a small,
pointed screw that sits in the pillar - the point of which extends
out of the pillar and sits in a corresponding hole in the solid
key barrel), and you'll often find point screws in pairs - one in
a pillar at each end of the key barrel.
In many cases you will find that there are several
keys that sit next to each other on a single rod screw - and where
this happens you must apply oil where the two key barrels meet.
On some woodwind instruments there will be what are known as 'compound
keys'. Although these are usually held in place with point screws,
they have an internal rod running through all the keys in the group.
Again, oil may be applied at the joins between the individual key
barrels. The right hand keys of the flute are a good example of
a compound key. The last four cups on the main body are joined together
on one key. There are two very good reasons for oiling the action; in the
first case the oil is needed to prevent undue wear and tear on the
mechanism. Without oil the screws and pivots will rub against the
barrels of the keys, and over a period of time this action will
cause the barrel of the keys to wear. As the screws are usually
made of steel the wear will be seen in the key as opposed to the
pivots. Such wear is repairable, but it tends to be labour intensive
- so it's expensive. Point screws are fairly easy to adjust, but
rod screws require rather more complicated procedures to tighten
them up.
Although the choice of oil to use is not critical, there are some ways in which it is possible to make the job of oiling the action a great deal easier, a less frequent pastime and a lot less messy by choosing an appropriate lubricant. Thin oils are to be avoided. By thin I am referring to what you might know of as 'sewing machine oil' or maybe even 'clock oil' - i.e. a general household oil. These oils have a consistency ('viscosity') that is almost the
same as water. The problem with thin oils is that they are, well,
thin - and therefore runny. Whilst this makes them good in terms
of penetration it also means that they tend to 'migrate'. Migration
describes how the oil, over a period of time, will flow out from
the key barrels, down the pillars and onto the body of the instrument. As a general rule you should avoid using the typical key oils you can buy over the counter at many music stores, no matter how distinguished the name on the bottle. These are often far too thin and runny. That said, Yamaha key oil is of the right sort of viscosity. If in doubt, give the bottle a shake and watch how the oil moves - if it sloshes around like water then it's too thin, if it moves more like olive oil then it's likely to be about right. Incidentally, you should never use vegetable oils (olive, corn, groundnut etc.) as an action lubricant - and clarinettists should never use bore oil on the action.
It might seem surprising to be recommended a motor oil for use
on your instrument's keywork, but the harsh truth is that the action,
in engineering terms, is really a rather crude mechanism - and aside
from the need for the lubricant to be sufficiently viscous (so it
stays put), long-lasting and non-damaging, there's very little else
that's realistically required. You can, of course, buy specialist oils for the job - such as
those sold by Musicmedic (the Ultimax range), Hetman, Alysin and
The Doctor's Products. Such oils are usually offered in a choice
of grades (i.e. light, medium and heavy). Light oil will be suitable
for high-end flutes etc, medium for clarinets and heavy for anything
larger. It's also the case that the lubrication system on a woodwind instrument
has the seeds of its own destruction built in. Unlike many lubrication
systems that are 'closed' (i.e. they have seals and gaskets to prevent
the ingress of dirt etc.), the action is open to the elements. It's worth noting, though, that if you're in the habit of leaving your instrument out on a stand between practise session, it's a good idea to keep it covered. A piece of well-washed cotton sheet will be fine for the job. Some people advocate the use of grease for lubricating the action;
indeed, many manufacturers use grease for their new instruments.
This is fine, though care is needed to select the appropriate grade
of grease otherwise it may be too heavy. The biggest disadvantage
of grease is that you will need to entirely dismantle the instrument
in order to apply it.
Having chosen our lubricant we need to be able to apply it. I oil instruments every day of my working life - so I need a system that can deliver a suitable amount of oil as quickly and as cleanly as possible. For this I use a glass syringe and a large hypodermic needle (with the tip squared off - unmodified hypodermic needles are extremely dangerous). It's ideal for the job, but glass syringes are expensive and fragile. Plastic syringes are unsuitable as the oil degrades the rubber plunger - and as the action of these syringes is a little unpredictable you can end up squirting a lot of oil over your keys. Some hobby shops sell little plastic 'oilers' - little flexible plastic bottles with a thin hollow tube sticking out of the bottle. These are ideal.
As for grease, I find an effective way of applying it is to decant
some into a disposable plastic syringe. It can be a very messy job
- so here's a handy hint. Get two syringes of the same size (3ml
in this example) and cut the tip off one. Push this syringe into
the grease and slowly draw the plunger up - taking care to avoid
getting too many air bubbles into the tube. When the syringe is
full, scrape off as much grease as you can back into the tub and
wipe the remainder off with a clean tissue. Now remove the plunger
from the second syringe, place the end of the grease-filled syringe
against the top of the second syringe and slowly press the plunger
down to fill it with grease. Refit the plunger, press it down until
the air is expelled and you're good to go. Wipe the cut-off syringe
down and store it with the pot of grease - you'll need it again
some day. It's a good way to keep your grease clean, and it prevents contaminating a whole pot - and the nozzle on the syringe is ideal for forcing grease into small holes, such as the ends of key barrels. You can use this method for all kinds of grease, but petroleum-based greases will eventually degrade the plungers. There is a potential problem when applying oil if the action is
covered with dust. Start at the top of the instrument and work methodically downwards. Take your oiler, or pin, and get a small drop of oil on the end of it. By small I mean a drop about the size of, well, a small raindrop perhaps. In time you'll get the hang of this and you'll instinctively know whether you are using too much or too little. Too little is best at first - it's less messy. Experiment, if you like, with a key that is easily accessible, so that you can clean up afterwards.
You can also grip the key and try to move it from side to side along the barrel, and back and forth across the barrel (be gentle). There perhaps won't be a great deal of movement here - which is good - or there might be quite a bit - which is bad, and indicates that your action is either worn or out of adjustment (bad luck). Remove any excess oil with a wipe of the tissue. Continue down the instrument. While you're doing this, take a peek at the springs that power the keys - the thin, blue-black line at centre-right in the above shot. If you see any spots of rust on them it might be a good idea to wipe a little oil on them too - it might just help to make them last a little bit longer. Not too much mind, just a smear (use a cotton bud or a pipe cleaner), and the tiniest drop of oil applied to the spring post (or cradle) at the end of the spring can quieten a squeaky spring. For saxes in particular don't forget to oil the little rollers on the bell keys and the low C/Eb keys. You'll be amazed at how noisy these rollers can be - and equally amazed at the difference a small drop of oil can make. For old Selmers, make sure that you also oil the little side Bb and C pegs on the ends of the cup arms. These are very prone to wear and a little oil here helps enormously. Similarly, for Yamaha saxes with the nylon pegs on the side keys, a drop of oil will help to quieten the mechanism. For those of you with counterbalanced (or swivel/see-saw) octave key mechanisms, a drop of oil on the central pivot and on the tips of the balance arm will make the action here a great deal quieter. If you're feeling really brave you might like to place the tiniest drop of oil on the feet of the flat springs that power the top D, E and F keys (the 'palm keys') of a saxophone. Don't forget to oil the crook key too - and a little drop on the thread of the crook screw wouldn't go amiss either. And that's about it. As for how often this job needs to be done,
well, it depends on how much use the instrument gets...how worn
the action is...what environment the instrument is used in etc...
The only risk from over-oiling is the mess from excess oil running
down the pillars; the risk from under-oiling is wear and tear on
the action. Bear in mind too that most oils are not meant to be
ingested, so it's a good idea to ensure you clean up afterwards.
Wash your hands before handling the mouthpiece, and if you do contaminate
the mouthpiece wash it in warm, soapy water and dry thoroughly. If you're feeling decidedly geeky and wish to know more about the
science of oiling the action, have a look at the article on Oiling
The Action - For Geeks...but be warned, it'll be ten minutes
of your life you won't get back...
|

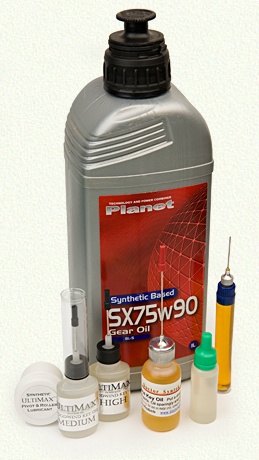 The
oil I recommend for maintenance is synthetic gear oil, of the type
used in cars. There are a variety of such oils on the market, but
all you really need to look out for is that the bottle says 'Synthetic'
(or sometimes 'fully synthetic) and that the grade of oil is 75W90
(there may be other letters before and after these numbers).
The
oil I recommend for maintenance is synthetic gear oil, of the type
used in cars. There are a variety of such oils on the market, but
all you really need to look out for is that the bottle says 'Synthetic'
(or sometimes 'fully synthetic) and that the grade of oil is 75W90
(there may be other letters before and after these numbers). Most
of this dust will be pretty harmless, being made up of relatively
large but soft soft particles such as cloth fibres, hair and organic
matter (dead skin, bits of insects etc.) - however, some of it will
be tiny, tiny particles of sand and dirt...which is abrasive. Once
this gets in the action it's likely to stay there until such times
as the keywork is dismantled and degreased.
Most
of this dust will be pretty harmless, being made up of relatively
large but soft soft particles such as cloth fibres, hair and organic
matter (dead skin, bits of insects etc.) - however, some of it will
be tiny, tiny particles of sand and dirt...which is abrasive. Once
this gets in the action it's likely to stay there until such times
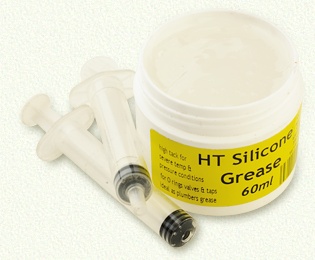
as the keywork is dismantled and degreased. Silicone
greases are popular these days and make sense for lubricating rollers
- and joints where two keys rub together (though not where felt
is used as a buffering material). If you're prepared to do a little
dismantling, such greases can be used to lubricate the keys that
pivot on point screws...and to quieten the ball and socket or fork
and pin links typically found on the side Bb/C keys on most saxes
and on most octave mechs. MusicMedic make a range of such greases,
but I think you'll find ordinary High Tack (or HT) silicone grease
to be just as effective and rather cheaper. It's widely available
from plumber's merchants, hobby shops, ebay etc.
Silicone
greases are popular these days and make sense for lubricating rollers
- and joints where two keys rub together (though not where felt
is used as a buffering material). If you're prepared to do a little
dismantling, such greases can be used to lubricate the keys that
pivot on point screws...and to quieten the ball and socket or fork
and pin links typically found on the side Bb/C keys on most saxes
and on most octave mechs. MusicMedic make a range of such greases,
but I think you'll find ordinary High Tack (or HT) silicone grease
to be just as effective and rather cheaper. It's widely available
from plumber's merchants, hobby shops, ebay etc.
 Some
branded key oils come in a bottle with an oiling needle built in
- but if you're a bit of a cheapskate (and why not?) you can simply
use an old jam jar lid and a large sewing needle. You will also
need an artist's flat-headed paint brush (I find one with a head
about 15 millimetres across is fine - any old cheap one will do),
and a quantity of kitchen towel, or tissues.
Some
branded key oils come in a bottle with an oiling needle built in
- but if you're a bit of a cheapskate (and why not?) you can simply
use an old jam jar lid and a large sewing needle. You will also
need an artist's flat-headed paint brush (I find one with a head
about 15 millimetres across is fine - any old cheap one will do),
and a quantity of kitchen towel, or tissues. Apply
a drop of oil at the junction between each key barrel and the corresponding
pillars (or the next key barrel in the case of keys that sit next
to each other). The photo shows just the right size drop being applied
to a joint on a sax key stack.
Apply
a drop of oil at the junction between each key barrel and the corresponding
pillars (or the next key barrel in the case of keys that sit next
to each other). The photo shows just the right size drop being applied
to a joint on a sax key stack.If you've enjoyed this article or found it useful and would
like to contribute
towards the cost of creating this independent content, please use the button
below.