Lupifaro Platinum Vintage tenor saxophone
 Origin:
Italy (mostly) Origin:
Italy (mostly)
Guide price: £4000
Weight: 3.22kg
Date of manufacture: 2017? (Serial range: IT002xx)
Date reviewed: May 2019
A Borgani on a budget?
Boutique horns (essentially unbranded horns that
are bought and badged by resellers) have been popular for a number
of years now, and with good reason.
If you're prepared to put aside any concerns about where such horns
are built, they offer the potential to bag yourself a decent horn
at a significant saving over the cost of a comparable big name brand.
However, you are, to some extent, taking something of a leap of
faith - given that such horns are often sold by companies who have
little or no history, and there's always the spectre of eventually
finding out that the horn you splashed out for is identical to one
that costs £300 less under a different brand name.
However, at the midrange price point (around two grand) such horns
are pretty much all that's available to buy - given that even some
of the larger manufacturers are buying in their lower ranges from
out of town.
But when the asking price starts rising, so too do
the questions - if only because there are competing offerings from
established companies - and the biggest of these questions is "Is
it worth it?"
That can often be quite a hard question to answer because boutique
horns seldom have a reassuringly large user base from which to draw
some 'herd comfort'. More often than not you have to make do with
a handful of endorsements from fresh-faced young jazzers you've
likely never heard of, and a few promising posts on a saxophone
forum. You could, of course, simply try the horns out and make up
your own mind - but that takes a degree of prowess in the chops
department, and still leaves the vast majority of players in the
dark with regard to the build quality of the horn...unless, of course,
an example has found its way onto these hallowed pages...
And that's exactly what we have here. Or do we?
The Lupifaro brand is a relative newcomer to the scene and is a
partnership between ex-Borgani design and product manager Luca Cardinali
and a Swiss company of some description (admittedly I lost interest
at this point) - and appears to offer a two horn range...the cheaper
of which (the Gold range) seems to be an Asian-built boutique brand.
The more expensive option, however, is the Platinum range - and
this is distinct from a boutique horn insomuch as the body is crafted
in Italy and the keywork is bought in from elsewhere.
I've no doubt some of you will be mumbling about that, but it's
a manufacturing technique that's not without precedent - as we'll
see later - and what it means is that the example shown here is
a rather different beast than your bog-standard rebadged and blinged
up boutique jobby.
I could probably witter on at some length about the
ins/outs/pros/cons and the politics of where and how horns are made
- but that would probably take up a page and half...and wouldn't
make for very interesting reading - so let's just get on with taking
the horn apart and seeing how it's been put together.
Before we get started I should apologise in advance
for what's going to be a rather 'cramped' review. There are lots
of things to say about the various features I found, and thus rather
a lot of photos to squeeze in. I generally try to pad things out
a bit for the sake of tidiness, but this horn had me beat good and
proper - so you'll have to do your best and read around the photos.
I'll kick off with a quick word about the finish
- 'Jazz Vintage', apparently. They've taken the bare horn and put
it into some sort of acid/chemical bath before applying a coat of
clear lacquer. Whether that was to impart a specific hue to the
metal or simply to clean it up after assembly is anybody's guess
- but as far as such finishes go it brings out the crystalline structure
of the brass and doesn't look too bad at all. That being said, the
process appears to have blackened the silver solder that's been
used to assemble the keys and fittings, resulting in black rings
around the base of the pillars and on the keywork - which, I feel,
makes the horn look a little untidy.
This model is keyed to top F only; there's another model, the Classic,
that's keyed to top F# and features a clear lacquered polished brass
body.
 The
construction is ribbed (multiple pillars fitted to plates, which
are then fitted to the body as a single item) along with a few smaller
plates and a handful of individually-mounted pillars on suitably
large bases. You get an adjustable metal thumb hook and a large
flat plastic thumb rest. The
construction is ribbed (multiple pillars fitted to plates, which
are then fitted to the body as a single item) along with a few smaller
plates and a handful of individually-mounted pillars on suitably
large bases. You get an adjustable metal thumb hook and a large
flat plastic thumb rest.
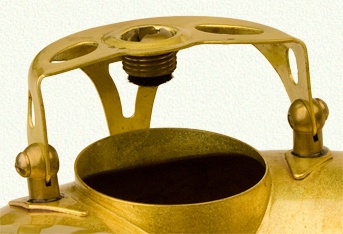
From the outside the horn appears to feature a
detachable bell, complete with a vintage Selmer-style two-point
bell brace and a substantial clamp around the bottom bow joint.
The bell brace is fixed to the bell but bolts onto a stub on the
body section.
However, if you removed this bolt and the bottom bow clamp, the
bell still wouldn't come off because it's been soldered on.
This, according to the blurb on several retailers' sites (though
I couldn't find any mention of it on the manufacturer's site) is
explained thusly: "A key feature of the Platinum series is
the soldered bow to the bell which promotes unrestricted air flow,
unique among modern saxophones. With no interruption between the
bell and body, the instrument blows more easily and expresses a
fuller tone." (I take this to mean that the bottom bow is soldered
to the body - because a bell that's soldered to the bottom bow isn't
unique at all. In fact it's completely standard practice, and always
has been).
This is complete hogwash. Sure, a soldered joint
is likely to be more reliable than a hot-melt glued joint (or simply
a clamped joint) in the long term - but it won't have any mechanical
or acoustic benefits over a joint that's been properly expoxied
in place.
And what about promoting unrestricted airflow? I can't see how,
given that the joint is exactly the same as every other bottom bow
joint, whereby one tube fits inside another. I guess if you really
took some time when designing the horn you could come up with a
joint that was virtually seamless - but this ain't it. No - what
we have here is your plain old bog-standard detachable joint...that's
simply been soldered together.
 And
pretty badly at that. Unrestricted airflow? What about that dirty
great mass of solder sticking up over the seam? And
pretty badly at that. Unrestricted airflow? What about that dirty
great mass of solder sticking up over the seam?
I suppose you could say that at least it shows the joint is good
and properly soldered - there's no way that lot's going to give
way in a hurry. But if you look a little further around the joint
it's quite clear that the solder hasn't run evenly around the entire
joint.
 You
can see that the line of solder peters out on the left and then
picks up again on the right, leaving an apparently unsoldered section
in the middle. Thankfully it appears that at least some solder has
flowed beneath the joint because I tested it with cigarette light
fluid and found no leaks. But how much solder is in this section?
I don't know. Might be plenty, might only be enough to seal the
gap....for the time being. You
can see that the line of solder peters out on the left and then
picks up again on the right, leaving an apparently unsoldered section
in the middle. Thankfully it appears that at least some solder has
flowed beneath the joint because I tested it with cigarette light
fluid and found no leaks. But how much solder is in this section?
I don't know. Might be plenty, might only be enough to seal the
gap....for the time being.
The thing is, it ain't difficult to do a decent job of soldering
a bottom bow joint up - especially if you haven't got to worry about
any lacquer or plating. In fact it's quite a fun job to do (well
it is for me, anyway), and there's a lot of job satisfaction to
be had from watching a neat and shiny seam of solder follow the
heat from the gas torch around the joint.
It raises an interesting question though. Why
bother with a bottom bow clamp if you're going to solder the joint
together? You could also ask "Why bother with a detachable
bell stay too?" - but I suppose there's a case for making things
slightly easier in the event that the bottom bow ever has to be
taken off. If you intended the joint to be soldered while you were
at the design stage you'd make it like most vintage horns and have
a permanently-fitted decorative ring to act as a socket. I could
be entirely wrong, but it looks very much like an afterthought to
me...though perhaps there were some issues with the old-fashioned
two-point bell brace being a touch on the weak side?
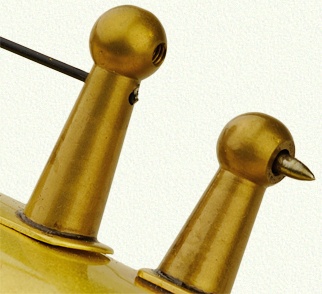 Elsewhere
on the body the solderwork is incredibly neat. In fact it's almost
impossibly neat, and I wondered whether the pillars and fittings
might have been spot-welded to the body. Normally you'll always
see at least a faint grey line around the base of a soldered-on
fitting even on the neatest job (and quite a lot more on a scruffy
one) - but I really had to trawl up and down the body to find any
'witness marks'. I found some eventually, which settled the question
- and then I saw this. Elsewhere
on the body the solderwork is incredibly neat. In fact it's almost
impossibly neat, and I wondered whether the pillars and fittings
might have been spot-welded to the body. Normally you'll always
see at least a faint grey line around the base of a soldered-on
fitting even on the neatest job (and quite a lot more on a scruffy
one) - but I really had to trawl up and down the body to find any
'witness marks'. I found some eventually, which settled the question
- and then I saw this.
It's the low C/Eb upper pillar, and it's clearly
taken a bit of a knock because it's canted very slightly forward
and the base has lifted away from the body. That's not the problem
- slightly displaced pillars are part and parcel of the light knocks
and dings that any horn accrues during its working life - no, the
problem is that there's no solder underneath this part of the base.
You can see right underneath, and it's nothing but bare brass.
This throws up a rather disconcerting thought; what if the reason
there are no witness marks around the pillar bases is because there
simply isn't enough solder underneath them? And why would they be
so neatly fitted when the bottom bow joint soldering was so bloody
awful? It doesn't make any sense.
 The
toneholes are all plain drawn, and on the whole were mostly level
- which is to say they were no better or worse than those on just
about any other modern horn these days - except for the low C, Eb,
E, G and side C, which had noticeable warps. The
toneholes are all plain drawn, and on the whole were mostly level
- which is to say they were no better or worse than those on just
about any other modern horn these days - except for the low C, Eb,
E, G and side C, which had noticeable warps.
The low C# had a "Buffer's dip". This is caused by being
bit heavy-handed on the buffing machine, and you can see there's
a polished section to the rear of the tonehole where the buffing
mop has ground a dip into the rim. This is essentially why the horn
came in for a service. Over the last couple of years the response
and performance had dropped off - and this was entirely down to
the pads losing some of their elasticity and/or shrinking slightly
and thus no longer being able to accommodate the discrepancies in
the worst of the toneholes.
There's a full set of detachable bell key guards,
complete with bumper felt adjusters - and there's also a fixed guard
around the side F#.
I was very surprised at the thickness of the low C and Eb guards
- or should I say the thinness? The brass is just 0.8mm thick, which
is typical of the sort of guards you'll find on an Ultra-Cheap Chinese
horn. This really is very under par at this price point, unless
they're intentionally thin so as to act like a crumple zone on a
car. It kinda makes sense given that the bell key guards take most
of the knocks, and a stiff guard is likely to stove the body tube
in before it gives way and crumples.
 As
such it's an inspired design feature...which is why it's odd that
they don't shout about it in the blurb (like the soldered bottom
bow joint). As
such it's an inspired design feature...which is why it's odd that
they don't shout about it in the blurb (like the soldered bottom
bow joint).
It's also odd that they gave up on the idea when it came to the
low B/Bb guard, which is 1mm thick. That's still a touch on the
thin side; the spare Selmer guards I have in stock all measure out
at 1.2mm thick. I'll leave you to make up your own mind as to the
merits of fitting thin bell key guards...
So much for the body then - now it's time to take
a close look at the keywork, which, apparently, is bought in from
elsewhere.
Now, I know a few people will huff and puff about this - but I completely
understand why it makes sense. If I ever had a desire to build a
horn I'm pretty damn sure that my main focus would be on the body.
That's the heart and soul of the horn - anything else is just so
much mayonnaise. Loads of players have made comments about the particular
tonal qualities of various horns - but when was the last time you
heard one say "...and oh my, that Bis Bb key! What a beauty!!".
I rest my case.
In any event it's not unheard of. For example, Mr. Inderbinen makes
horns that practically play themselves - but chooses to fit Yamaha
professional keywork on them. He make no secret of it, and why should
he? It's good keywork, after all.
With that said, it makes little sense to go to
all the trouble of pouring your heart and soul into forming the
most exquisite body...and then chucking on a set of keys that were
built by a short-sighted wrestler with a headache and an especially
nasty case of the old farmer's...
Or so you'd think - because this is where it all goes tragically
wrong for the Lupifaro.
 There
are lots of places you can buy keywork from in Taiwan/China - but
as with any industry there are companies which excel, companies
that do OK...and companies that manage to scrape by because they're
cheap. And, I'm sure, there are a number of companies that pretend
to be something they're not. If you're as curious about such things
as I am you won't be satisfied with a glib "keywork from Taiwan/China".
Oh no, you'll want names, dates, prices...the whole shebang. Unfortunately
I don't have that kind of information...but what I do have is some
experience of fixing 'boutique horns' - and there's much about this
Lupifaro that I've seen somewhere before. There
are lots of places you can buy keywork from in Taiwan/China - but
as with any industry there are companies which excel, companies
that do OK...and companies that manage to scrape by because they're
cheap. And, I'm sure, there are a number of companies that pretend
to be something they're not. If you're as curious about such things
as I am you won't be satisfied with a glib "keywork from Taiwan/China".
Oh no, you'll want names, dates, prices...the whole shebang. Unfortunately
I don't have that kind of information...but what I do have is some
experience of fixing 'boutique horns' - and there's much about this
Lupifaro that I've seen somewhere before.
Now, I'm not saying I've nailed this thing bang to rights - so I'm
simply going to go over what I found and finish up with an interesting
comparison. From that point on it'll be up you to use your skill
and judgement to draw your own conclusions.
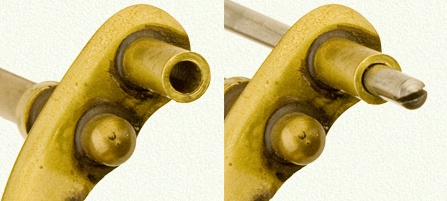
The very first thing I noticed was how wobbly
much of the keywork was.
Here's the top D key ('scuse dirty thumbnail).
There's significant play in the key, such that the cup moves quite
some distance side-to-side. This is down to play in the key barrel
- but note the ends of the barrel, how they are free to move back-and-forth
between the pillars.
I see this sort of wear on a regular basis - and there are two ways
it occurs; it either comes as a result of years of use, or it was
built in at the factory. There are ways to tell the difference,
but all I had to do on this horn was remove the rod (or hinge) screw.
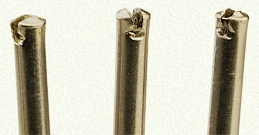 Here
it is, along with the two others from the palm key group. Here
it is, along with the two others from the palm key group.
It was quite clear (though you can't see it in the photo) that the
head of the rod screw was moving in the pillar. This is a sure-fire
sign that the rod screw is undersized...either through wear or poor
manufacture. The very big giveaway in this instance is that someone
knew these rods were undersized and took (ahem) steps
to rectify the situation - by squeezing the rod screw heads with
a pair of wire cutters so as to flare out the ends. It's as bodgey
a bodge as you'll ever see, and about the only place you might expect
to find it is on the worst of the Ultra-Cheap horns.
Oh, it works well enough - it forces the head of the screw into
an oval and thus takes up most of the free play. But not all - and
it does bugger all for the free play in the key barrel. In short,
it's crap.
But hey, it's only the palm keys - what's a little
wobble between friends? And besides, those pads more or less self-centre
themselves, don't they?
 OK,
let's have a look at the top stack then. The stack key are the very
heart of the action, and while you might think you can get away
with a few wobbly ancillary keys, you sure as hell can't play fast
and loose with the stacks. Can you? OK,
let's have a look at the top stack then. The stack key are the very
heart of the action, and while you might think you can get away
with a few wobbly ancillary keys, you sure as hell can't play fast
and loose with the stacks. Can you?
The technical term for what you see here is "Flapping
about in the breeze".
As per the palm keys the rod screw is undersized for both the key
barrels and the pillars. It may look as though the only result of
this is that the Auxiliary B key wobbles about a bit, but as with
any play on the main stacks it'll have a knock-on effect down the
line. So when you play an A, the A key comes down and also closes
the Aux.B key - but it can never do so properly because as soon
as the A key pad hits the tonehole and stops the key dead in its
tracks, the Aux.B key will take up the free play in the key barrel
and pillar...and open just a tad. Oh, it won't be by much, to be
sure, but it'll be enough to knock a percentage off the tone and
response.
You could compensate for it by adjusting the regulation of the A
key so that the Aux.B key will always close...but this will mean
that the A key will now always leak slightly. And the same thing
will be happening to the B key. So you lose a bit on the B, you
lose a bit on the A...and you lose more and more as you go further
down the horn and encounter similar play on the lower stack.
It's like trying to drink tea from a mug that has a hole in it.
You'll drink some...for sure, but you'll never drink it all. And
you paid top dollar for that mug too.
 Every
rod screw mounted key exhibited the same issue - though to be completely
fair, the side Bb and C keys, the octave key swivel and the front
top F auxiliary lever only needed a bit of swedging to snug them
up. Here's the low Eb key, and you can see that the barrel's been
drilled/reamed off centre - and it wasn't the only key so affected.
In itself it's not that much of an issue, it won't alter the functionality
of the key in any significant way, it just shows a lack of attention
to detail and accuracy. Every
rod screw mounted key exhibited the same issue - though to be completely
fair, the side Bb and C keys, the octave key swivel and the front
top F auxiliary lever only needed a bit of swedging to snug them
up. Here's the low Eb key, and you can see that the barrel's been
drilled/reamed off centre - and it wasn't the only key so affected.
In itself it's not that much of an issue, it won't alter the functionality
of the key in any significant way, it just shows a lack of attention
to detail and accuracy.
The accompanying shot shows the original rod screw sitting in the
barrel, and you can clearly see it's undersized. It might not look
like much, but this amount of free play will translate into a significant
amount of movement at the key cup - easily enough to knacker any
hope of achieving a precise and repeatable pad seat.
 But
there's an extra kick in the teeth because there's just as much
play between the rod screw and the pillar, which effectively doubles
the amount of play at the key cups. But
there's an extra kick in the teeth because there's just as much
play between the rod screw and the pillar, which effectively doubles
the amount of play at the key cups.
It's less serious here than it is on the main stacks, but this sort
of sloppiness can make the difference between a low C that's solid
and resonant, and one that's inconsistent and unstable. And it'll
do much the same for the notes below it. The G# rod screw was similarly
sloppy, and if there's one place on the whole horn where you don't
want any sloppy action, it's on the G#. Trust me on that. It's difficult
enough as it is to keep the damn key from opening fractionally when
the bell key table is in play - even when the setup is a tight as
the proverbial drum. The slightest bit of play in the key barrel
and all bets are off.
It's patently obvious that this play was built
in from new, and as it was my job to make the horn work properly
I had to decide what I was going to do about it.
The undersized rod screws presented me with something of a quandary.
I could elect to fit bushes to the pillars and this would solve
the poor fit of the rods in them, but it would mean a certain amount
of cosmetic damage and I'd still have to take up the play in the
key barrels...which would require a great deal of swedging.
I could peen the pillars to reduce the diameter of the hole, but
this technique only works on the outer edges of the pillar and isn't
really what I call a proper fix. It also still leave the play in
the key barrels to deal with.
So I decided to go with making oversized rods. The original stack
rods measured 2.78mm and the overdrilled pillars would accommodate
a 2.84mm rod screw with a nice snug fit. This would leave me with
a few pillars to ream out slightly (easy-peasy) and likewise a few
keys (no big deal). Or at least half of them - in some cases the
oversized rod would slide halfway along the key barrel before it
jammed...which in itself is rather worrying on a horn that's practically
new. This is the neatest fix and restores full contact between the
rods and the barrels, as well as the pillars, and requires the minimum
amount of key swedging to sort out the axial (end-to-end) play.
In other words exactly as it should have been when it came off the
production bench.
Similarly, the palm keys rods were upgraded from 2.46mm to 2.56mm
- and I also had to upgrade the G# and low C/Eb rod screws.
 Few,
if any, of the key barrel ends were finished off square. Here's
a typical example, on the low C key. If you had any doubts as to
whether the wobbly keys were down to poor manufacture or wear, this
ought to seal the deal. There's simply no way you could wear the
key in this fashion, with the end of the key barrel set at an angle. Few,
if any, of the key barrel ends were finished off square. Here's
a typical example, on the low C key. If you had any doubts as to
whether the wobbly keys were down to poor manufacture or wear, this
ought to seal the deal. There's simply no way you could wear the
key in this fashion, with the end of the key barrel set at an angle.
Part of the problem with poorly squared barrel ends is that it concentrates
the friction over a smaller surface area than if the barrels had
full face contact. This leads to early and rapid wear of both barrels
- so a key fit like this starts off bad and just gets progressively
worse unless it's dealt with.
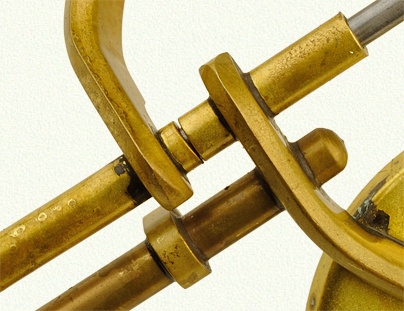
 Up
at the other end of the horn we have the crook key. The key barrel
was too short to fit snugly between the key barrels but it's clear
that some sort of 'fitting' has been carried out on it because both
ends were burred over (it's easier to see on the outer end). It's
rough as guts and twice as nasty. Up
at the other end of the horn we have the crook key. The key barrel
was too short to fit snugly between the key barrels but it's clear
that some sort of 'fitting' has been carried out on it because both
ends were burred over (it's easier to see on the outer end). It's
rough as guts and twice as nasty.
I guess by now you kinda get the picture, but
it doesn't stop there. All of the keywork issues above are pretty
serious, but the slap-dash build quality continues down the scale
to issues that are far less critical but still rather naff.
Here's the bell key table, and as you can see
it's a standard tilting table affair. Nothing wrong with that.
The compound bell key pillar is of the semicircular type and is
soldered to the body. The bases are a touch on the small side, so
I wouldn't say that it's a particularly sturdy setup - but otherwise
it seems to work well enough.
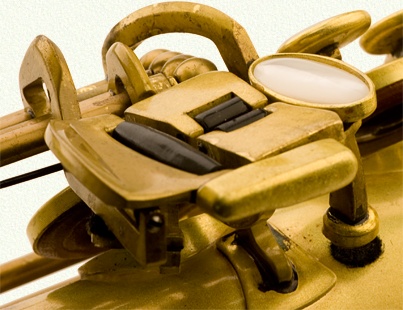 Take
a look at the G# key pearl though. In common with the rest of the
pearls it's proper mother-of-pearl, which is nice. The main stack
pearls have a flat profile on them, which I feel lends the horn
a distinctive and retro feel under the fingers. They missed a trick
by putting a flat pearl on the Bis Bb though, but both the oval
pearls on the G# and side F# are slightly domed. Take
a look at the G# key pearl though. In common with the rest of the
pearls it's proper mother-of-pearl, which is nice. The main stack
pearls have a flat profile on them, which I feel lends the horn
a distinctive and retro feel under the fingers. They missed a trick
by putting a flat pearl on the Bis Bb though, but both the oval
pearls on the G# and side F# are slightly domed.
But look at the discrepancy between the thickness of the pearl and
the depth of the pearl holder. The top of the pearl barely rises
above the height of the pearl holder, and the sides are nowhere
near high enough.
Granted, you won't notice it for much of your playing but once you
start sliding back and forth across the table your finger is going
to have to cross that gap on the nearside of the pearl. And over
time that gap will fill up with icky finger grease.
It's all just a bit 'bargain basement', and you have to wonder how
anyone could have thought "Hey, that looks just fine and dandy".
 But
if it's of any consolation, the fit of the rollers is just as pants
as the G# pearl. They're a good couple of millimetres to short for
the touchpieces - but presumably they're 'close enough for jazz'. But
if it's of any consolation, the fit of the rollers is just as pants
as the G# pearl. They're a good couple of millimetres to short for
the touchpieces - but presumably they're 'close enough for jazz'.
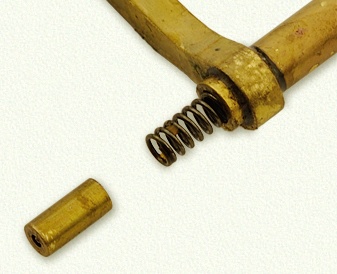
Another minor flaw is the spring on the top Eb
key - it doesn't sit in the channel that's been cut into the palm
key plate. It might not look like much of an issue but it means
the profile of the spring is all wrong, and so the bottom of the
key hits the spring when the key is pressed down.
This makes the action feel very spongy, and you get none of the
typical 'snap' you'd expect from a palm key. It's an easy fix -
simply cut a few millimetres off the end of the spring so that it
sits in the channel, tidy it up and bend the tip upwards...and hey
presto, one snappy Eb key.
It took as long to fix is as it did to type the last two paragraphs,
it's that simple. So why was it left like this?
 The
point screws use the crappy Selmer type sprung inserts. I've no
love for this system and feel that its drawbacks far outweigh its
advantages. The
point screws use the crappy Selmer type sprung inserts. I've no
love for this system and feel that its drawbacks far outweigh its
advantages.
Yes, it ensures that any wear and tear is taken up by the sprung
inserts, but it also means that the action can never be really tight...there's
always going to be a degree of play in it.
However, on Selmer's implementation of the system the inserts have
a short stub on the rear end that wedges them into the spring...so
the insert and spring are effectively a single unit. On the Lupifaro
they're quite separate. When the keys are fitted to the horn it
makes no difference at all - but when you start to remove the keys
you might find that you're in for a very nasty surprise...because
as soon as the end of the barrel clears the head of the pillar,
those poxy inserts are likely to ping off into the sunset. Which
is exactly what happened when I removed the first point screw mounted
key.
 I
saw the bloody thing fly off and heard the dreaded double-ping -
which means it hit something, bounced off, hit something else and
bounced off again. The chances of finding the thing were next to
zero, but I gave it my best shot for a good 15 minutes before firing
up the lathe and turning a new one in less than a couple of minutes.* I
saw the bloody thing fly off and heard the dreaded double-ping -
which means it hit something, bounced off, hit something else and
bounced off again. The chances of finding the thing were next to
zero, but I gave it my best shot for a good 15 minutes before firing
up the lathe and turning a new one in less than a couple of minutes.*
The inserts proved to be a right pain in the arse all the way through
the job because even if they don't spring off into the wide blue
yonder, they simply drop out of the barrels as soon as you pick
the key up. If you're tempted to do any home maintenance on one
of these horns you'd be very well advised to do so in a spartan
room with a spotless white floor.
*Just before publishing this review I got a
text message from the owner, showing me a photo of a small brass
tube he'd found in the case. I guessed it was a barrel insert but
didn't immediately put two-and-two together, so had him drop by
with the horn for a checkover. I was expecting to find a key hanging
loose, but everything seemed to be intact.
It was only then that I remembered one of the inserts had shot off
into the distance - so it must have hit the wall of the workshop
and bounced back to land in the case that would have been open on
the table behind the workbench. What're the chances of that!?
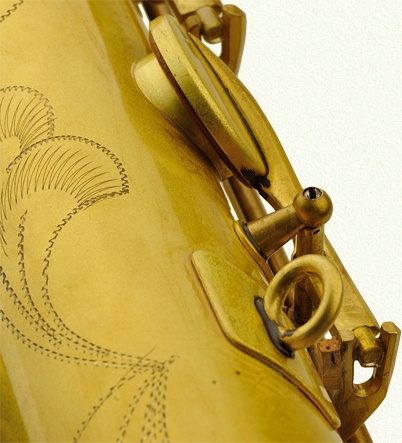
On a lighter note (and gawd knows we could do
with it), what d'you reckon's been going on here?
I mentioned earlier that the finishing process highlighted the silver
soldering by turning it black - and if you look at the end of the
top E key barrel you can see a distinct ring around it.
That's because an extension piece has been fitted. It's no big deal
in itself, but I have to wonder why it was necessary. Was the supplied
key too short, or was the pillar moved back for some reason? It's
highly unlikely that the pillar was moved because it's fitted to
a plate that houses the body octave key pip and the G key upper
pillar. So perhaps the octave key pip placement was moved?
 This
makes more sense. Maybe they noticed some issues with the tuning
between the octaves and had to punt the pip back five or so millimetres
- leaving the stock E key that much short of the pillar. This
makes more sense. Maybe they noticed some issues with the tuning
between the octaves and had to punt the pip back five or so millimetres
- leaving the stock E key that much short of the pillar.
As I say, it's no big deal...but for all the sax geeks out there
I guess this might mark this example out as a 'transitional' model.
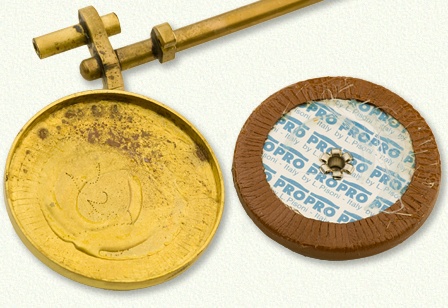 There's
a good set of pads fitted - Pisoni Pro, no less. These are excellent
pads, worthy of any decent horn - but it seems silly to spec a top-quality
pad and then fit it carelessly. There's
a good set of pads fitted - Pisoni Pro, no less. These are excellent
pads, worthy of any decent horn - but it seems silly to spec a top-quality
pad and then fit it carelessly.
As you can see, the "Li'l dab'll do ya" method had been
used - with a squirt of hot-melt glue around the perimeter of the
key cup and an ineffectual swirl in the centre of the key cup which
isn't thick enough to touch the rear of the rest of the pad. There's
not even a half-hearted attempt to seal the rivet.
You could get away with this if you were sure that the cup, pad
and tonehole were completely level, and you focussed on achieving
the correct cup angle - but as we've already seen, the toneholes
simply aren't level enough to cope with this method of seating the
pads.
In other words you're going to have to float the pad seat in, and
work the pads around the discrepancies...and you can't do that unless
there's a decent bed of glue for the pad to sit upon.
Well, I don't know about you lot but I'm properly
fed up of poking this horn with a stick, so I'll wrap up the technical
stuff by saying that there are no adjusters on the main stacks (there
are the usual ones on the Bis Bb, G# and low C# though), the side
keys feature plain fork and pin connectors and the corkwork is scruffy
and mediocre (not a sign of composite cork anywhere) - and, finally,
the action is powered by blued steel springs.
 I
said earlier that there was much about this horn that I'd seen elsewhere
before, and at this point I refer you to my review of the Rare
TS-7306L tenor (which you might want to open in a new tab). I
said earlier that there was much about this horn that I'd seen elsewhere
before, and at this point I refer you to my review of the Rare
TS-7306L tenor (which you might want to open in a new tab).
In terms of the bodywork fittings there's a lot that matches up.
There's the two-point bell brace, which is fixed to the bell and
bolted to the body tube; there's the thick, plain bottom-bow clamp
and a similar ring on the base of the bell; there's the same tiny
14/8 sling ring; the shape of the cut-outs on the bell key guards;
the same 3-slot bumper adjusters. However, you could argue that
such things are generic - in the same way that many Ultra-Cheap
horns closely resemble the professional models they're 'based upon'.
But if we look a little deeper and compare the keywork we see the
same Selmer-style sprung points and the same touchpiece profiles.
But the clincher for me is that this horn exhibited exactly the
same key fit issues as I found on the Rare, right down to the dimensions
of the rod screws - as well as the undersized rods, off-centre barrel
bores and uneven and burred barrel ends.
I think it's reasonable to assume that as well
as the keywork being bought in, so too are the pillars and fittings.
And there's nothing really wrong with this. As I said earlier, the
body tube is the heart of the instrument and you can save a considerable
amount of time and money by focussing your effort where your skills
lie and fitting off-the-shelf parts to complete the project. But
I'm really struggling to understand why you'd go to all the bother
of making a bespoke body and then kitting it out with what's clearly
substandard keywork.
But it doesn't end there - because it's clear that many issues have
been ignored, and some have even been bodge-fixed. It's way, way
below par at this price point.
It didn't come in with its original case (it was
now in a Winter shaped case), but the owner told me it wasn't up
to much and he ditched it pretty quickly.
Under the fingers the horn feels comfortable and
reasonably slick - but it certainly wasn't like this when it came
in, what with all the loose keywork. The sprung points will always
knock a percentage off the slickness, but unless you play the horn
side-by-side with, say, a MkVI that's been tweaked to perfection,
you probably won't notice it all that much. I liked the feel of
the flat pearls, though that's very much a personal preference and
I'm aware that players to tend to be on the wet side may well prefer
concave pearls for a bit of extra grip.
It's quite comfy round the neck, what with being one of the lighter
horns on the market. Not the lightest, for sure, but pretty close.
It's fair to say that the horn's had a bit of
a drubbing on the review workbench, so the big question now is whether
or not it will do the typically Italian thing and shine through
is spite of all the faults and quirks. To which the answer is "Yes.
Yes it will".
Despite never having played a Lupifaro before, it felt immediately
familiar. I daresay this'll be down to its Borgani credentials,
because it has that same verve and sprightliness that I've noted
in their horns in the past. It's eager, it's responsive and drop-dead
easy to blow. Tonewise it's beautifully balanced, but - and here's
the killer feature - that balance is on a knife-edge. You can steer
it straight down the middle with no problem at all, it's got enough
stability to keep you from falling off the rails, but if you tip
your hat to the smooth or set it at a jaunty and edgy angle, the
horn responds in an instant. Relax and chill, and the horn brings
out a rich midrange with just enough crackle around the edges to
stop you from dozing off. Kick things up a notch and it crisps up
the tone and pours a bucket of fizz over it. And it gets better
because it'll do this at any volume. It's got that "What shall
we play now?" thing going on that always gets a big tick in
my book. I liked it a lot, and it reminded me why Borgani were one
of the three horns on my "Which one to get" list some
years ago.
Evenness across the range? You got it. Tuning? No problems. Oh,
and while you don't get a top F# key on this horn, you'll be pleased
to hear that the 'fake' top F# (front top F + side Bb) is bang in
tune.
 At
this point I should, for the sake of balance, relate to you how
the client came to buy this horn in the first place. At
this point I should, for the sake of balance, relate to you how
the client came to buy this horn in the first place.
There are two things you should know beforehand. The first is that
he's an accomplished professional. If you watch music shows on TV
(in the UK) you've probably seen him - either as a soloist or with
a horn section. It's safe to say he's no 'weekend warrior'. The
second is that he used to play a rather fine Selmer MkVI tenor,
which he subsequently sold after he bought this horn.
In choosing a new horn he selected a group of
tenors to try and took along a fellow pro to act as a pair of 'blind
ears' - who would only be able to hear the horns being played but
would not see them. The client blew through the field of candidates,
mentally marked the one he liked the most and then asked his friend
to call out which number (from 1 to whatever) that sounded the best.
The Lupifaro was put up against a Yamaha Custom, a TJ RAW, two Keilwerth
SX90Rs, a Forestone, and a couple of MkVIs. I thought the latter
choice was a bit odd, given that he already had a MKVI - but he
just wanted to see whether either of these two examples would be
any better then his own (they weren't).
And here's the thing - they both agreed on the winner. And it wasn't
a particularly close-run thing either, though he did say that the
Forestone would have been his second choice. Not that this tells
you very much; players' opinions are a dime a dozen - but it at
least indicates that the horn has a certain quality...in terms of
its playability anyway.
What about the competition?
Assuming a retail price of four grand we have to start off with
the Yanagisawa TW020. OK, it's around £100 more - but when
you're spending four grand on a horn it's surely churlish to quibble
about a hundred quid either way. But if you're on a tight budget
there's always the Yamaha 82Z at £100 less. Both of these
horn are titans - if not in playability (AKA personal preference)
then certainly in build quality. If you prefer your horn to be a
little more left field there's the Keilwerth SX90R for £150
below budget, and the Rampone R1 (which I've not yet seen) at over
£500 less. And then there's the formidable TJ RAW XS, which
is less expensive still.
So can I recommend the Lupifaro Platinum?
On the basis of this example, no. I'm sure we're all agreed that
the way a horn sounds is of the utmost importance, but it should
never be an excuse for poor build quality. Having a great-sounding
horn is all fine and dandy, but you want it to be reliable and stay
sounding great over a prolonged period of time. This example hadn't
seen a lot of use - barely a dozen gigs since new - and it came
in with the sort of keywork issues that you'd see on a horn that
had seen a decade of hard and heavy use.
I can't speak for anyone else but when I spend four grand on a horn
I have certain and perfectly reasonable expectations, of which one
is that the quality of the action should be commensurate with the
asking price.
I mean, even the humble Yamaha 280/23 kicks this thing into a corner
in terms of the keywork - and I've seen many an Ultra-Cheap horn
that could give it a good run for its money.
The Rare tenor barely passed muster at a directly-imported price
of £1500, so I can't in all honesty lower the bar for the
very much pricier Lupifaro.
You might think I've been unduly harsh on the
Lupifaro, but having spent some time reading the website blurb and
some of the retailers' bumf it struck me that they're definitely
'talking the talk' when it comes to bigging up the performance aspects.
All that guff about unrestricted airflow and suchlike is just so
much hot air if the workbench reveals that the horn don't 'walk
the walk'. You know what I'm sayin'?
I'm no fan of marketing spiel (as is well known), but if the end
product hits the mark I'm happy to let it pass with a sigh and maybe
a knock or two during the course of a review. But it has to hit
the mark.
This horn is two years old, and from looking on
the manufacturer's web site it appears that a few things have been
changed. There are some differences in the keywork ('improved' and
'impeccable' mechanics are mentioned), and some of the pillar bases
look to be a different shape - and the pearls have been replaced
with wooden ones. If it's the case that the issues have been recognised
and addressed, then yes, I'd be happy to give this horns the old
thumbs up because it's essentially a Borgani on a budget. It's a
fine horn that deserves a fine action - but I can only review the
horn that's on the bench. And even if it had the voice of an angel,
I wouldn't buy it.
But maybe you'd feel that splashing out four grand on a horn that
seems to blow like a Borgani and a further few hundred on having
the action finished off is still a good bet. It's your call.
I'd very much like to see a few more examples, especially a more
recent one - so if anyone out there has one of these horns and wants
to bring it by the workshop for an examination, I'd be more than
happy to add my findings to this review.
Addendum May 2020:
I've had some correspondence in regarding the origin of this horn,
but because I can't personally confirm any of the details I'm not
really at liberty to post it publicly.
However, a comparison was made with Hanson horns - and as it happens
I've just had two of them come in for a service. I've published my
review here
- and you'll have to make up your own mind about it.
|