King Super 20 (Series V) tenor saxophone
 Origin:
USA Origin:
USA
Guide price: £700+ ?
Weight: 3.16kg
Date of Manufacture: 1970(ish) (Serial range: 466xxx)
Date reviewed: December 2018
A later version of one of the most popular
and sought-after American horns
They say that you can't call yourself a petrolhead
(a car enthusiast) until you've owned an Alfa Romeo.
It's not so much that Alfas were renowned for their reliability
or build quality (ahem), rather it's all about how they drive. It
seems that whatever shortcomings an Alfa may have, it's all just
so much water under the bridge when compared to the sheer thrill
of how they handle...plus a certain amount of street cred thrown
in for good measure. Or so the legend goes.
And much the same is true of the King Super 20. It's
by no means a perfect horn, it isn't adored by everyone, it has
a somewhat chequered history...and yet it remains very much the
'wild child' of the saxophone world. If another horn player asks
which horn you play and you reply "A Super 20", it's often
a toss-up whether you'll get a sagely nod of recognition or a pained
look of sympathy.
In historical terms its roots go back to the King Zephyr Special,
of which the Super 20 can be considered to be 'a development'. In
the mid 1940s it came into being in its own right, and thereafter
went through a number of design and ownership changes until the
last example rolled off the production line in the mid '70s. Officially,
at least.
In fact they were produced up until the late '90s, and much speculation
has been put forth as to how and why this happened. It's even been
suggested that the later models were made up from spare parts. As
bizarre as it sounds, it's probably quite a reasonable bet - given
how strange the business of saxophones is at times.
One thing's for sure - the nearer you get to the end of the horn's
production run, the harder it gets to pin down the exact specs.
You can spend a good hour or so trying to figure out what features
disappeared with which serial number...and just when you think you've
nailed it you'll stumble across someone who says otherwise - and
has the photos to prove it.
As with any horn that's had a long production run,
debate is rife over which models are 'the best'. There were six
series of the Super 20 (plus a transitional series) - and as is
typical with such things there's perhaps a tendency to look upon
the very earliest models as prototypes, the mid models as the ones
to go for and the later models as mere shadows of their former selves
that have suffered at the hands of the accountants.
Some of this may be down to physical features that you can point
to, some may be down to general consensus...and some may be down
to simple snobbery. My own opinion on the matter is that these are
quite individual horns, and that each of them needs to be taken
on its own merits (or otherwise) - and that you won't really know
what those merits are until you've played a few.
This review covers the Series V, which is generally
reckoned to be a more contemporary take on the preceding models.
This means the tuning's a little more dialled in and there's a bit
more cut to the tone - but it's said to come at the expense of some
loss of expression. Or soul, if you will.
With that said, there are those who insist that the later models
should really be considered horns that are 'in the style of' the
Super 20. I think that's perhaps rather harsh - though I suppose
if I owned an early model I might well think differently...
I tend to think a lot of it depends on what you expect from a horn
- and as a fan of the contemporary sound I rather like the later
20s over their older brethren - at least in terms of 'If you HAD
to choose one vintage tenor to play' etc. That's my take on it,
for what it's worth - though in so saying I'm acutely aware that
it just adds to the reams of speculation and opinion that surround
these horns...and I'm far more interested in dealing with the more
physical aspects. So let's pop it on the bench and see what all
the fuss is about...
It's quite a light horn, and tips the scales at just
0.01kg more than the Selmer MkVI - which itself only weighs 0.05kg
more than the Yamaha 23 (the lightest tenor I've seen thus far).
0.01kg is about a third of an ounce...which means that the difference
in weight between these three tenors is likely to come down to how
much shellac has been used and the thickness/type of buffers used.
This example (and there were many variants) features
a brass body and keywork that's a bit of a mix of brass and nickel
silver. All the key barrels are nickel silver and the key cups are
brass, but the key arms vary between the two. It rather sounds like
it wouldn't work cosmetically, but in fact it does somehow. Granted,
the horn's lost some of its shine down the years but I think it
still looks pretty cool - and it must have been a blinder back in
its early days.
The nickel silver barrels are something of a double-edge sword for
repairers. They're rather tough - so they stand up to wear very
well - but when they do wear it's a tough old job to swedge them
down. If you're using traditional non-levered swedging pliers it's
the sort of job where your hands end up cramped around the handles
of the pliers after half an hour or so...and it takes you a good
minute of whinging and cursing to straighten your fingers out. It's
also why you see so many of these horns with swedging marks on just
the ends of the barrels - it's just too much like hard work to do
the whole barrel.
Mind you, some repairers only swedge the ends of the barrels as
a matter of course - which goes down in my books as half a job.
Weak-end warriors, I call them.
 In
its early days it was quite a modern horn, at least in terms of
design. Some relatively minor changes kept it abreast of the times
and even the later models didn't look too out of place when sat
beside their modern counterparts from the likes of Yamaha, Yanagisawa
and Selmer. From a distance - at least. When you look a bit closer
you begin to see a few grey hairs... In
its early days it was quite a modern horn, at least in terms of
design. Some relatively minor changes kept it abreast of the times
and even the later models didn't look too out of place when sat
beside their modern counterparts from the likes of Yamaha, Yanagisawa
and Selmer. From a distance - at least. When you look a bit closer
you begin to see a few grey hairs...
There's a fixed (non-detachable) bell with a two-point
bell brace.
It's a step up from many of the bell braces fitted to vintage horns
but it still suffers from having the body stay placed more or less
in the centre of the body tube between two tone holes - and although
it's at least a little bit offset it's not by enough to make a difference.
If the horn cops a hefty whack to the front of the bell, the stay
will be driven into the body and the resultant dent will take out
the toneholes on either side. This is not good.
The way to avoid this is to not drop the horn. Consider that a 'tech
top-tip'.
 The
toneholes are soldered on - and if you're at all familiar with Martin
horns you might be wondering whether the King suffers from the insidious
problem of selective
galvanic corrosion...whereby the toneholes break off from the
body as the solder rots away. The
toneholes are soldered on - and if you're at all familiar with Martin
horns you might be wondering whether the King suffers from the insidious
problem of selective
galvanic corrosion...whereby the toneholes break off from the
body as the solder rots away.
Fear not - because the King's toneholes are silver-soldered (or
hard soldered) in place rather than soft soldered like the Martin.
This is the same kind of solder that's used to put the keys together
and has pretty much the same structural staying power as brass.
In short, those toneholes ain't going anywhere.
If you're wondering how to tell whether a horn has soldered-on or
drawn (pulled out of the body tube) toneholes, the easiest way is
to take a peek inside one. You'll see a very clearly defined line
where the body meets the base of the tonehole.
As for how to tell whether such toneholes are soft or silver soldered,
that's a little harder - but as a general rule silver solder looks,
well, silvery and soft solder looks grey. If that doesn't seem very
conclusive you can always try poking the seam with a needle - which
will make a distinct mark on soft solder but won't really touch
silver solder.
This feature was dropped on later models, which had drawn toneholes
- though there was a period when the body tube holes were drawn
and the bell holes soldered.
The bell keys guards are rather attractive in a skimpy
kind of way, and I've always felt they lent the horn a rather sporty
look. However, the low C guard is a bit pants because it only has
two feet to secure it to the body. There are other horns with this
two-footer design, and every time I see it I'm moved to rail against
how bloody useless it is.
The poor old low C guard has a very hard life - it's forever being
bashed against chairs, tables, music stands and whoever happens
to be standing on the right hand side of the player - and if it
cops a sufficiently hard whack it'll distort the bottom bow tube
around the guard stays. This inevitably means that the tonehole
gets pushed out of whack...which all adds up to a pretty serious
problem (and a hefty repair bill). It can also mean that the slightest
knock can tilt the guard over, which is more of a nuisance than
anything else - and I'm at least pleased to see that some small
consideration was given to this potential problem by way of fitting
double screws to the stays. It's still rather naff in terms of robustness,
and is a bit like fitting a glass bumper (fender) to a car...and
then beefing it up by slapping a layer of gaffer tape over it.
What about the bumper felts, I hear you cry? No need for 'em - all
the bell keys have feet fitted to them, and all the height adjustment
is made there. This is neither a good thing or a bad thing, though
I tend to find it can introduce rather more bounce to the keys than
you get from bumper felts - so some care needs to be taken with
choosing the most appropriate buffering.
You also get the usual trouser/pant guard (detachable) to the rear
of the lower stack and a fixed guard around the side F# key cup.
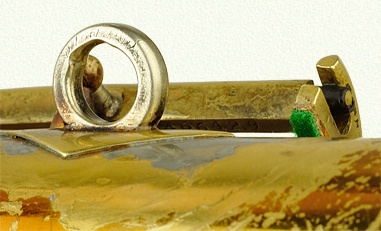 There's
a seriously chunky (16/9.5mm) sling ring fitted and it's possibly
the thickest fitted to any horn - easily double the width of most
rings. There's
a seriously chunky (16/9.5mm) sling ring fitted and it's possibly
the thickest fitted to any horn - easily double the width of most
rings.
This always wins points as far as I'm concerned because a large
sling ring means less hassle when switching your sling from one
horn to another on the quick, and the difference in cost between
fitting a hero-sized ring and a fiddly-arse one is mere pennies.
However, even the stoutest sling ring will suffer if you choose
to use a metal sling hook. It might take time, but that hook will
eventually eat its way through the ring - as has happened here.
Earlier models featured a triple ring (one above each other) which
allowed the player to fine-tune the balance of the horn. It's a
shame they dropped this feature because it's genuinely useful at
times.
Note the simple fork and pin connector on the side key. Very nice.
Incidentally, if you remove the side Bb key you should see the horn's
serial number stamped on the underside, just along from the pin.
I've never really understood why some manufacturers do this, and
I can only assume it points to a degree of hand-fitting when it
comes to putting the keys on.
 Finishing
up the body overview I note that that construction is single pillar
(post to body) and that most of the pillars have suitably large
bases. There's a simple non-adjustable thumb hook and, lastly, the
crook joint on this model is a bog-standard receiver-on-body job.
The earlier models up to and including the Series III had what's
called a double socket, whereby (effectively) the tenon sleeve was
fixed to the body. Finishing
up the body overview I note that that construction is single pillar
(post to body) and that most of the pillars have suitably large
bases. There's a simple non-adjustable thumb hook and, lastly, the
crook joint on this model is a bog-standard receiver-on-body job.
The earlier models up to and including the Series III had what's
called a double socket, whereby (effectively) the tenon sleeve was
fixed to the body.
There's absolutely nothing wrong with the double socket design...aside
from the fact that it's a proper pain in the arse to sort out when
it wears, or when things go wrong. As with many things in life,
the KISS (Keep It Simple, Stupid) principle applies.
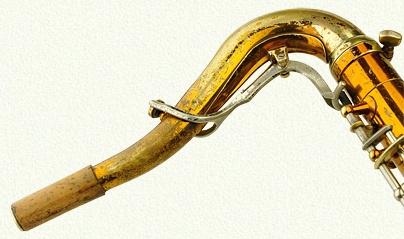
And while we're looking at the crook I might as well
kick off the keywork section with the octave key, which is of the
semi-underslung design. A true underslung design has the octave
key pip situated underneath the crook tube (as on the Conn
6M) - so the semi-underslung is just a standard octave mech
with a bit of a detour. There are pros and cons to this layout,
but by far the biggest advantage is that it enormously reduces the
chance of a heavy-handed player bending the crook key out of alignment
when handling the crook. On later models (the Series VI) the key
changed to the standard overslung design - which, from a purely
aesthetic point of view, was a great shame.
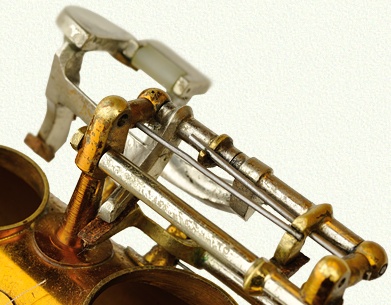
 The
octave key mech itself is worth a mention because it's one of the
longest you'll find on any horn. The
octave key mech itself is worth a mention because it's one of the
longest you'll find on any horn.
As per the rest of the action it's sturdily built - so despite its
length and relatively exposed position it should stand up to a few
knocks...though the long, arched arm of the body key pad is a bit
of a weak spot.
It's a swivel mech, and provided it's in good working order with
no significant wear it should present the player with a very switchlike
performance. The flip side to this is that once wear creeps in,
the extra length tends to exaggerate the wear...so the feel of the
mech starts to deteriorate quite rapidly. It's easy enough to fix,
though some care needs to be taken to get the fit of the extra-long
swivel tight on its pin - and you can see how I carried such work
to this mech here.
The touchpiece is nice and chunky, and profiled around
the thumb rest. The only drawback is that the thumb rest itself
is a bit on the small side, and could prove to be uncomfortable
for player with large thumbs. No big deal really, a dollop of Sugru
around the lower left side of the rest will provide you with a larger
and more comfortable rest - and can be removed as and when desired
with no damage to the lacquer.
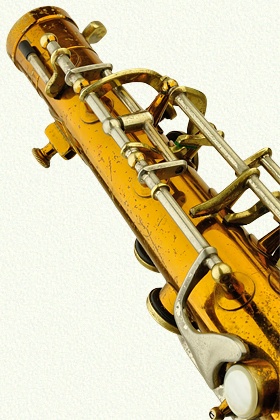
 The
top stack is mounted on a single rod screw - which is one of the
areas in which the Series V shows its age (or its heritage I suppose).
From a mechanical perspective it means more wear to deal with over
time; it's more prone to misalignment due to a light knock and it's
generally a bit of a faff when it comes to fitting the keys to the
body. The
top stack is mounted on a single rod screw - which is one of the
areas in which the Series V shows its age (or its heritage I suppose).
From a mechanical perspective it means more wear to deal with over
time; it's more prone to misalignment due to a light knock and it's
generally a bit of a faff when it comes to fitting the keys to the
body.
For the player it probably makes little difference other than a
slightly less responsive feel compared to a modern stack, but it's
certainly worth ensuring you keep it well lubricated. And the rest
of the keywork too - because it's expensive to have the action tightened
up on a horn with such tough key barrels.
Another throwback to earlier times is that there are
no adjusters on the horn. Not one. Not even for the G#/Bis Bb or
the low C#/B connection. For the vast majority of players this won't
be of any consequence at all, but for repairers and those players
who're comfortable with tweaking the action it's a bit of a chore.
With that said, there's plenty of meat on the bar that sits across
the Bis Bb lower arm and the G# key cup - and it really wouldn't
take much of an effort to fit a pair of adjusting screws. In fact
the design of the bar almost looks like they intended to fit screws,
but somehow forgot to do so.
The design of the front top F mech isn't, shall we
say, the best. In fact it's rather clunky in operation and isn't
best placed for anyone who doesn't have supersized hands.
Fortunately it's quite a chunky mech, so it's very amenable to being
modded to advantage (most of which involves bending the keys). This'll
improve the location of the touchpiece and optimise the leverage
between the link key and the top F. I could be wrong, but I think
later models had a slightly more extended touchpiece.
The key pearls are all proper mother-of-pearl, and only very slightly
concave. In fact they're almost flat, which (I think) gives the
action a nice feel.
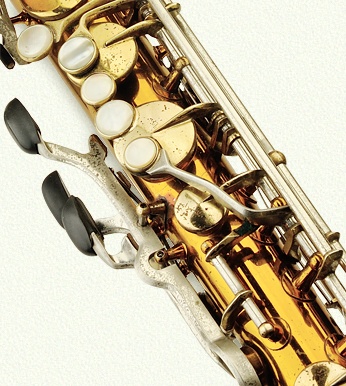
 From
a repairer's perspective the (ahem) standout feature of the keywork
is the design of the bell key table. From
a repairer's perspective the (ahem) standout feature of the keywork
is the design of the bell key table.
I shall be very frank. Whoever designed this layout must have been
at least four sheets to the wind - or into some serious recreational
pharmaceuticals. Don't get me wrong though - it's not a bad mech
in terms of how it feels to the player, and while it isn't the best
that's out there it's most certainly not the worst.
No, my beef is that dismantling, reassembling and regulating the
mech is so hideously fussy and complex that it's like trying to
assemble a flat-pack wardrobe with no instructions and half a dozen
bits from a completely unrelated piece of furniture thrown in for
good measure.
Just look at how the springs for the G# and C# are
placed. The C#'s not so bad - it merely has to sit over the arm
on the G# - but the G#'s spring has to go underneath the connecting
arm on the C#. You're probably thinking "Pah, that's not so
bad!", but that's because half the table is missing at the
moment.
Here's the rest of it, and if you look carefully enough you can
see that the low B touchpiece arm has to slide right under the G#
barrel - which means you can't assemble or dismantle this mech piece-by-piece...it's
all got to be done in one operation.
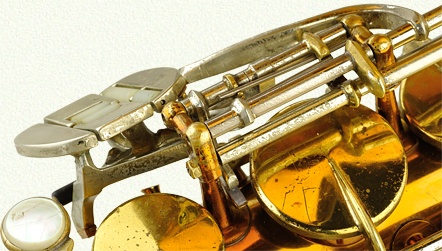 It's
very much a matter of get that there, put this here, wiggle that
through there, pop this spring here and...at which point the whole
mech falls off the horn and you have to start over. It's
very much a matter of get that there, put this here, wiggle that
through there, pop this spring here and...at which point the whole
mech falls off the horn and you have to start over.
It's such an improbable design that it's almost as
if another designer had laid out the pillars and then handed it
over to someone else to make a table to fit. It's the sort of mechanism
that's either a work of stunning genius...or a complete box of frogs.
I can't say for sure, but if you put the horn in it case and leave
it for an hour or two, I swear you can hear a faint croaking.
Needless to say, it's a proper pig's ear to muck about with and
you really do have to pull out all the tricks of the trade to get
the best out of it. I shouldn't be that way.
And there's something of a mechanical flaw in the
design. The lower pillar's base sits in what little space there
is between the G and G# toneholes. Consequently the base of the
pillar is really rather small - with the result that it's able to
flex with just the tension of the G# and C# springs against it.
Not that it's likely to go anywhere once the table is assembled,
because the rod that holds the B key in place has a point on the
end which fits into the Bb key barrel...which then acts as a sort
of brace for the pillar. This can make setting the low Bb key to
run freely something of a fun job...
Note the spring cradles (where the tip of a spring
sits). They're of a very distinctive design and look for all the
world like a little brass number 9 has been fitted to the key. From
a strictly technical viewpoint they work very well, but I'm in two
minds as to whether they add to or detract from the look of the
horn. On the one hand they make the keywork look 'bitty' and lumpy
- but on the other they lend it a sort of industrial charm...a bit
like a steam engine.
As for the springs, they're of the stainless variety - and as far
as I'm aware they're original fitments. I don't usually recommend
the swapping out of blued steel springs for stainless ones on a
vintage horn - but the spring geometry on the Super 20 coupled with
the large spring cradles will make it a far less problematic switch...should
you feel so inclined.
 The
foot of the G# key is worth a mention if only because it's common
to see Super 20s with a clanky G#. The
foot of the G# key is worth a mention if only because it's common
to see Super 20s with a clanky G#.
There's a small dome fitted to the underside of the lever key's
foot that rubs against a corresponding arm on the cup key. Because
the contact point is so small you get a sort of 'stiletto effect',
whereby the dome really digs in to the buffer that's stuck to the
cup arm. This is really punishing, and as the dome slides back and
forth it soon makes mincemeat of the buffer...which pretty soon
gives up the ghost and falls to pieces. Or simply comes unstuck
and drops off. And if neither of those two things happens, the dome
will just eat its way through the buffer until it hits metal. It's
a good place to pop a piece of Teflon sheet, and for the sake of
longevity it's worth glueing it to the cup arm with an epoxy adhesive.
Have you noticed the little nuts yet?
These are locknuts, and are fitted to all the (proper) point screws.
The idea is that you screw the point screw into the pillar until
the key is held snugly yet is still able to move freely, then you
tighten up the little nut to lock the screw in place...where it
will remain until you need to adjust the screw again.
As a means of locking the screw in place it's excellent - and you'll
certainly never suffer from the problem that often plagues Conn
horns, whereby the fiddly little locking screw works loose...closely
followed by the point screw.
 However,
it's a bit of a faff to set the screws because in turning the nut
to lock the screw, the screw turns a little just as the nut starts
to lock...and it can be enough to make the key bind. The trick is
to set the key a tiny bit loose and guesstimate how much it'll move
when the nut locks. Takes a couple of goes to get the feel of it. However,
it's a bit of a faff to set the screws because in turning the nut
to lock the screw, the screw turns a little just as the nut starts
to lock...and it can be enough to make the key bind. The trick is
to set the key a tiny bit loose and guesstimate how much it'll move
when the nut locks. Takes a couple of goes to get the feel of it.
But by far the bigger problem is that folks attempt to fiddle with
the screws without using a proper spanner on the nut. It's a tiny
nut, and even though you can buy a nice set of mini spanners on
a sort of Swiss army knife type holder for just a few quid I'm willing
to bet that few of you have such a thing. As a result, people tend
to reach for a pair of pliers...which pretty quickly mangles the
nut and the face of the pillar. It was a reasonable idea in its
day, but there are far easier ways to lock screws in place these
days - and as far as I'm aware the only manufacturer using this
system today is Eppelsheim. At the very least they fit in well with
the industrial charm theme.
In the hands the horn feels nicely balanced, though
it should be noted that the sling ring had been moved (by the owner
who, on his own admission, made a bit of a messy job). In its original
spot the horn tended to hang a little to one side, which he found
rather annoying.
Despite the age of the design the keywork feels quite modern under
the fingers and I, at least, had very few issues. I can't in all
honesty say the same will be true for you, because vintage horns
can often be a bit challenging ergonomically - but I've certainly
coped with worse.
I tripped up a little over the bell key spatulas
and found the low C a little bit of a reach, but neither felt like
they were something that I couldn't get used to in time. The G#
mechanism felt wonderful, really swift and positive. You really
can't beat a decent bit of leverage here, it's something modern
manufacturers ought to look back to. I wasn't that thrilled with
the position and feel of the front top F key, but I also wasn't
so inconvenienced by it that I felt it to be a dealbreaker.
 As
with the small thumb rest and the static thumb hook, it really doesn't
take long to 'get your vintage fingers on'. As
with the small thumb rest and the static thumb hook, it really doesn't
take long to 'get your vintage fingers on'.
I made a reference earlier on to steam engines - and it's in running
the fingers over the action that the analogy really stands out...
the thing goes like a train! If this horn was the Chattanooga Choo
Choo you'd barely have time to down your ham & eggs, let alone
get your shoes shined up.
It's all down to the weight of the keys and the length of the springs.
It's such a marvellously tweakable horn in this respect - and it's
also very forgiving. You'd really have to make a concerted effort
with a springhook to bugger up the feel of one of these horns (though
I know it can be done, 'cos I've seen it), but there's really no
reason to settle for anything less than a slick and responsive action.
It's all there, on a plate.
Note the engraving on the low B/Bb key cups. It's a nice touch.
And how does it play?
Well, d'you remember those old Batman shows on telly? Whenever the
Dynamic Duo got into a scrap the screen would be littered with punctuation
like POW!, WHAMMO! and COWABUNGA!!!
That's what this horn plays like.
Tonewise it seems to be able to switch from strident to melancholic
in a gnat's cough - one moment you're riding the A-Train, the next
you're doodling on that Slow Boat To China - it's got oodles of
tonal expanse, and then some. It's no wonder this horn is a big
hit with the jazzers, and an even bigger hit with the R n' B'ers.
And when you want it to whisper it'll whisper with the kind of tone
that would set anyone's bottom lip a-quiver.
If you'd prefer a less colourful description I'd say
that the tone was robust, well-developed across the range, rich
- with just a dash of brilliance and morishly smoky. If the latter
appeals more than the former then there's a good chance you might
prefer the earlier models, but this one suited me just fine.
Tuning? It plays in tune - if you can't play
it in tune you're not man enough to own one.
OK, to be fair it's a vintage horn - and as such it's going to have
a few foibles. I think where these horns get a poor rep. from is
through players who are beguiled by the ease with which these horns
blow - and the instantly lush tone. It's so terribly easy to just
leave it there, and spend hours wallowing in the fat low notes -
and I suspect this is what a great many newcomers to the Super 20
do. But this is a horn that requires a bit of input from the player.
It needs to be steered, and with a firm hand...or embouchure. You
need to be sensible with your choice of mouthpiece, and you have
to spend the time learning how to tame that touch of wildness that
makes this such a powerful horn. It's not difficult, it just takes
time...and use your ear rather than a tuning meter.
With that said, it's quite a picky horn when it comes to the setup
- both in terms of the action height, the choice of reflectors/resonators
and the mouthpiece.
I think there's a tendency to 'over-bling' these horns simply because
it feels like the horn can handle it. And it can, but it's likely
to come at the cost of stability and evenness. I've always found
these horns work best when you're 'conservative' with the setup
- and you take the time to let your chops learn how to respond to
what the horn's telling you.
As you can probably tell, I was enthusiastic about
this horn. It was a sod to work on, I'm even now nursing a fat blister
from having to swedge those tough key barrels - but it really was
a labour of love, and I feel suitably rewarded. Even though this
is a relatively late model I don't think there can be any shame
in owning one, and you ought to be able to find a decent example
at a pretty reasonable price.
|